

The Yahoo DSP connector sends ZMP Customer and Prospect audiences to your Yahoo DSP account so you can target them in campaigns.
This destination should be configured prior to being able to use it. If this is not yet configured, you will be prompted to authenticate in Settings > Connections. If you have more than one account configured for this destination, you’ll be prompted to select it before you see a list of audiences.
Your Yahoo DSP MDM ID must be correct in order to authenticate your account. Yahoo requires the first-party (Customer) and third-party (Prospect) data to be stored separately underneath your account’s MDM ID. While exporting audiences across Yahoo, you will need to explicitly select Customer and Prospect audiences throughout your export process, and you cannot send data of one kind in ZMP to the other in Yahoo DSP.
Configuring the Connection
1. Navigate to Settings > Integrations > Connections. Click on Create Connection.
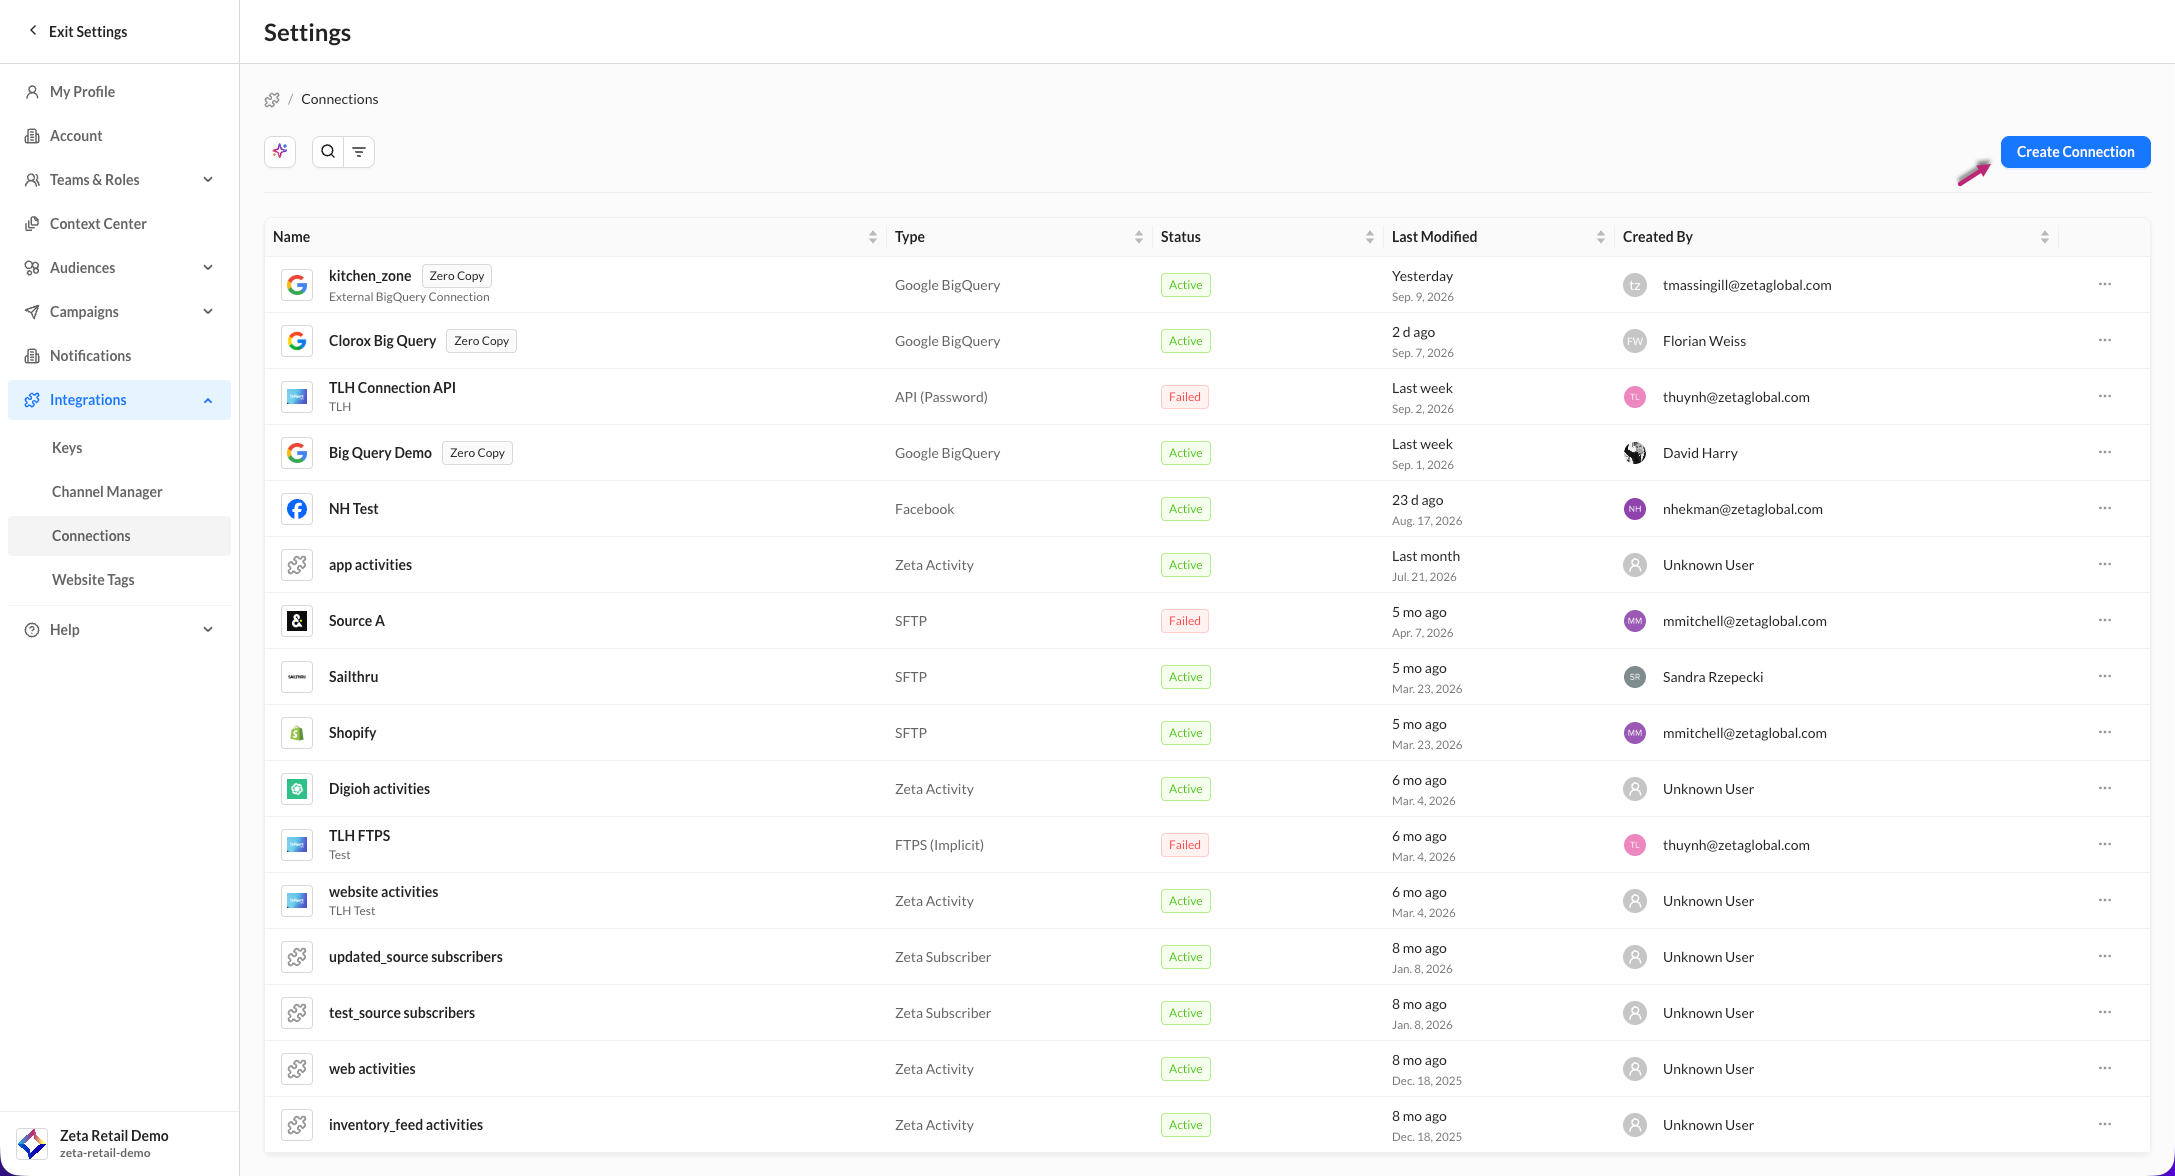
2. On the Select Connection Type page, click on the Yahoo DSP tile. Click on Next.
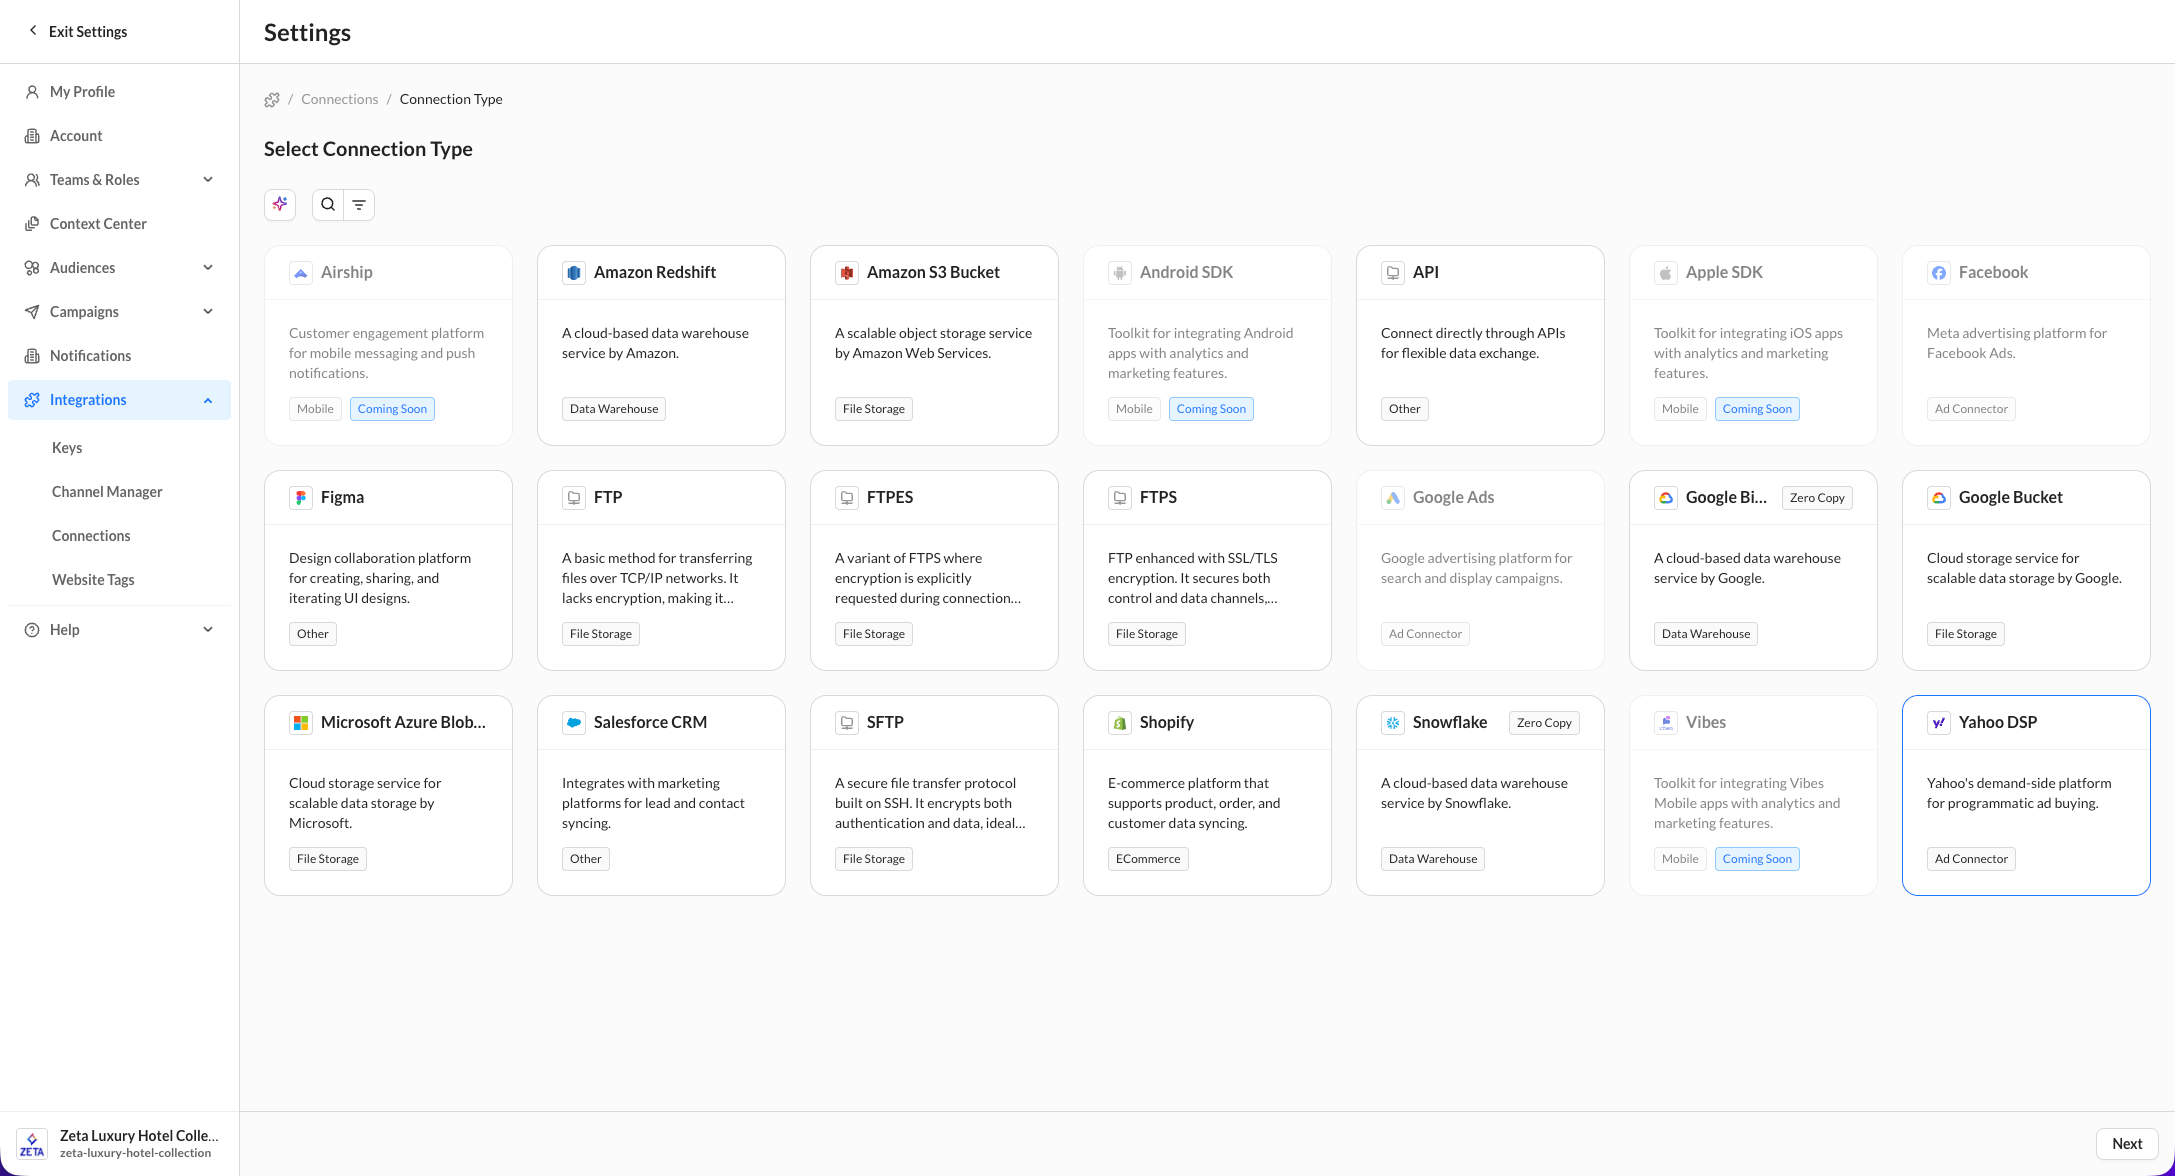
3. Once on the Configure Your Connection page, click on Add New MDM ID to insert your MDM ID. You can add an optional display name to help you identify the account when you’re exporting audiences later.
-20260910-094147.gif?cb=1d2577fa9b3402348ee6be35122da685)
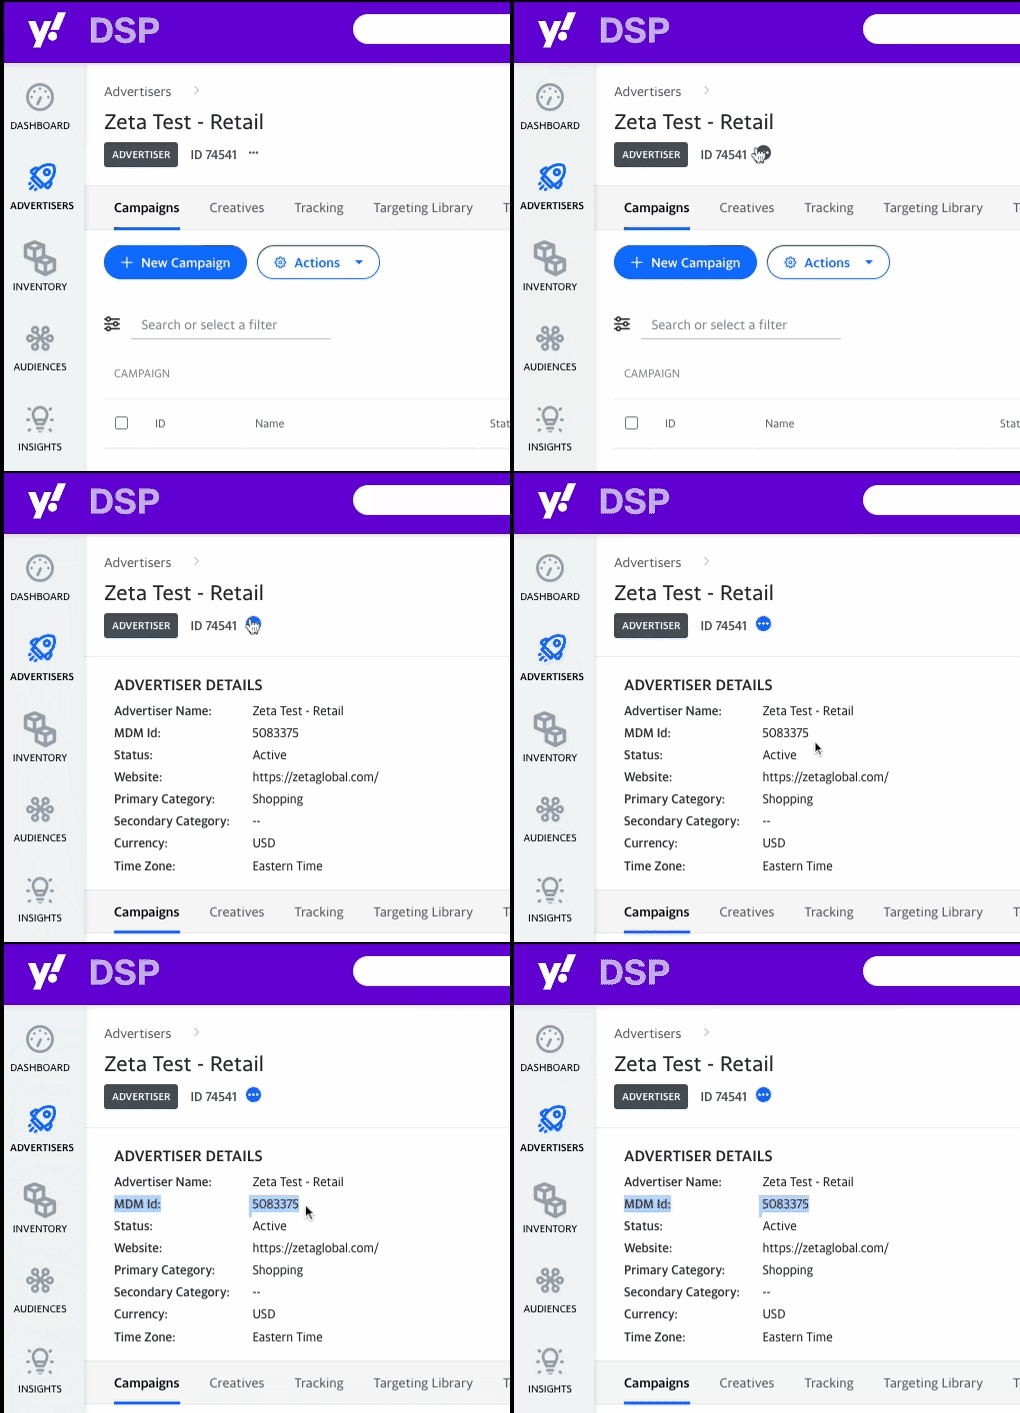
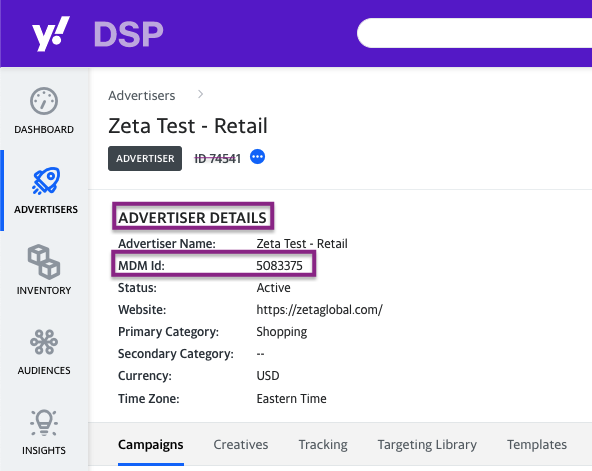
4. To find your MDM ID, you will need to log in to the Yahoo DSP and navigate to Advertisers. It is very important to ensure you copy and paste the exact MDM ID for your account so that your segments are successfully created in the right place.
-
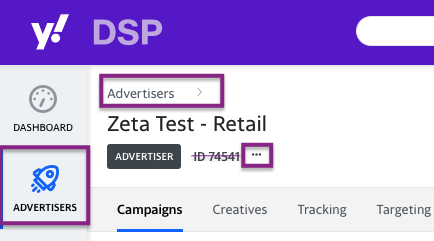
From the Advertisers page, click the 3 dots below the Account Name to expand the Advertiser Details section. Do not use the Advertiser ID next to the 3 dots; it is NOT your MDM ID.
-
Once the Advertiser Details section is expanded, locate the MDM ID and the corresponding numeric string. Double-check that this is the right Account Name and the right MDM ID for the ZMP instance you are enabling. Copy the MDM ID and take it back to the ZMP integrations page.
5. Once you add your MDM ID(s), click Save to submit your accounts for validation and return to the Connections page. It can take up to 30 minutes to validate your MDM ID(s).
To add a new account to your existing Yahoo DSP Connection, simply add more MDM IDs.
You can use the action menu (three dots) against the connection row to edit or delete the connection.
-20260910-142545.gif?cb=1af18382521ee4e7d535a2d545b9ae36)
-
You’ll be prompted to confirm this action because it will deactivate any automated exports or experiences that use the ad account being removed.
Sync using Audience Exports
The process for exporting an audience to a partner destination is standardized across all connectors.
1. From Segments & Lists, locate the row of the audience you wish to export. Click on the action menu (three dots) on the far right and select Export.
-20260820-063037.gif)
2. Within the Connect Audience panel that appears on the right, select Yahoo DSP from the list of Available Connectors and click on Next.
3. From the list that appears, select the desired Yahoo Account and Yahoo Audience you want to export your audience to, and click on Next.
4. Click on Connect to save the export. Turn the Automate Connection toggle on to schedule your export.
You have the option to export to an existing audience segment in Yahoo DSP or to create a new one. Exporting to an existing Yahoo DSP segment will add new members only. It currently doesn’t support overwriting or removing audience members.
Status Check
Processing audiences can take up to 48 hours depending on their size. There are 2 phases to the connector: uploading from ZMP and downloading from Yahoo DSP. You can check the status on the ZMP side of the connector in our platform.
In ZMP
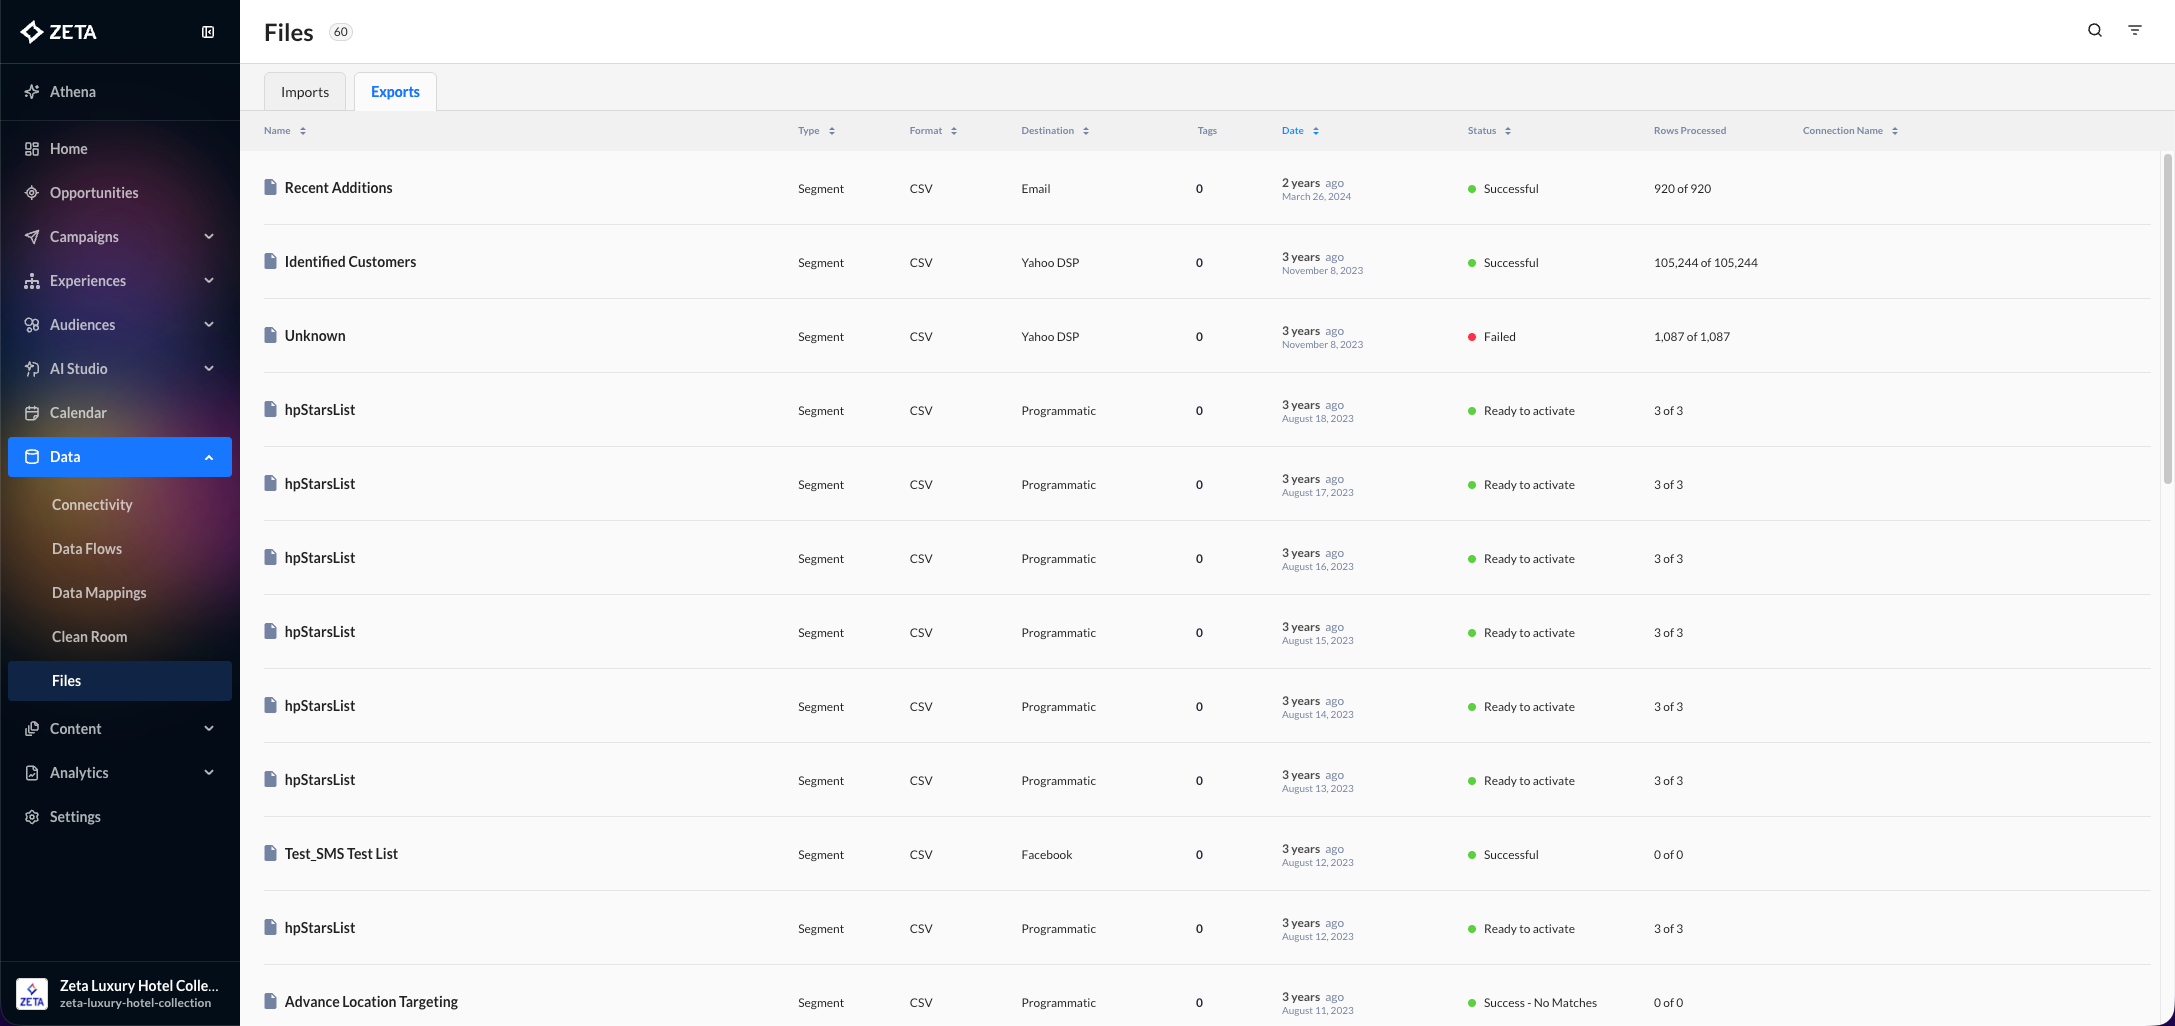
1. Navigate to Data > Files and select the Exports tab.
2. Find your file and check the status to ensure the counts match what’s on the Audiences page.
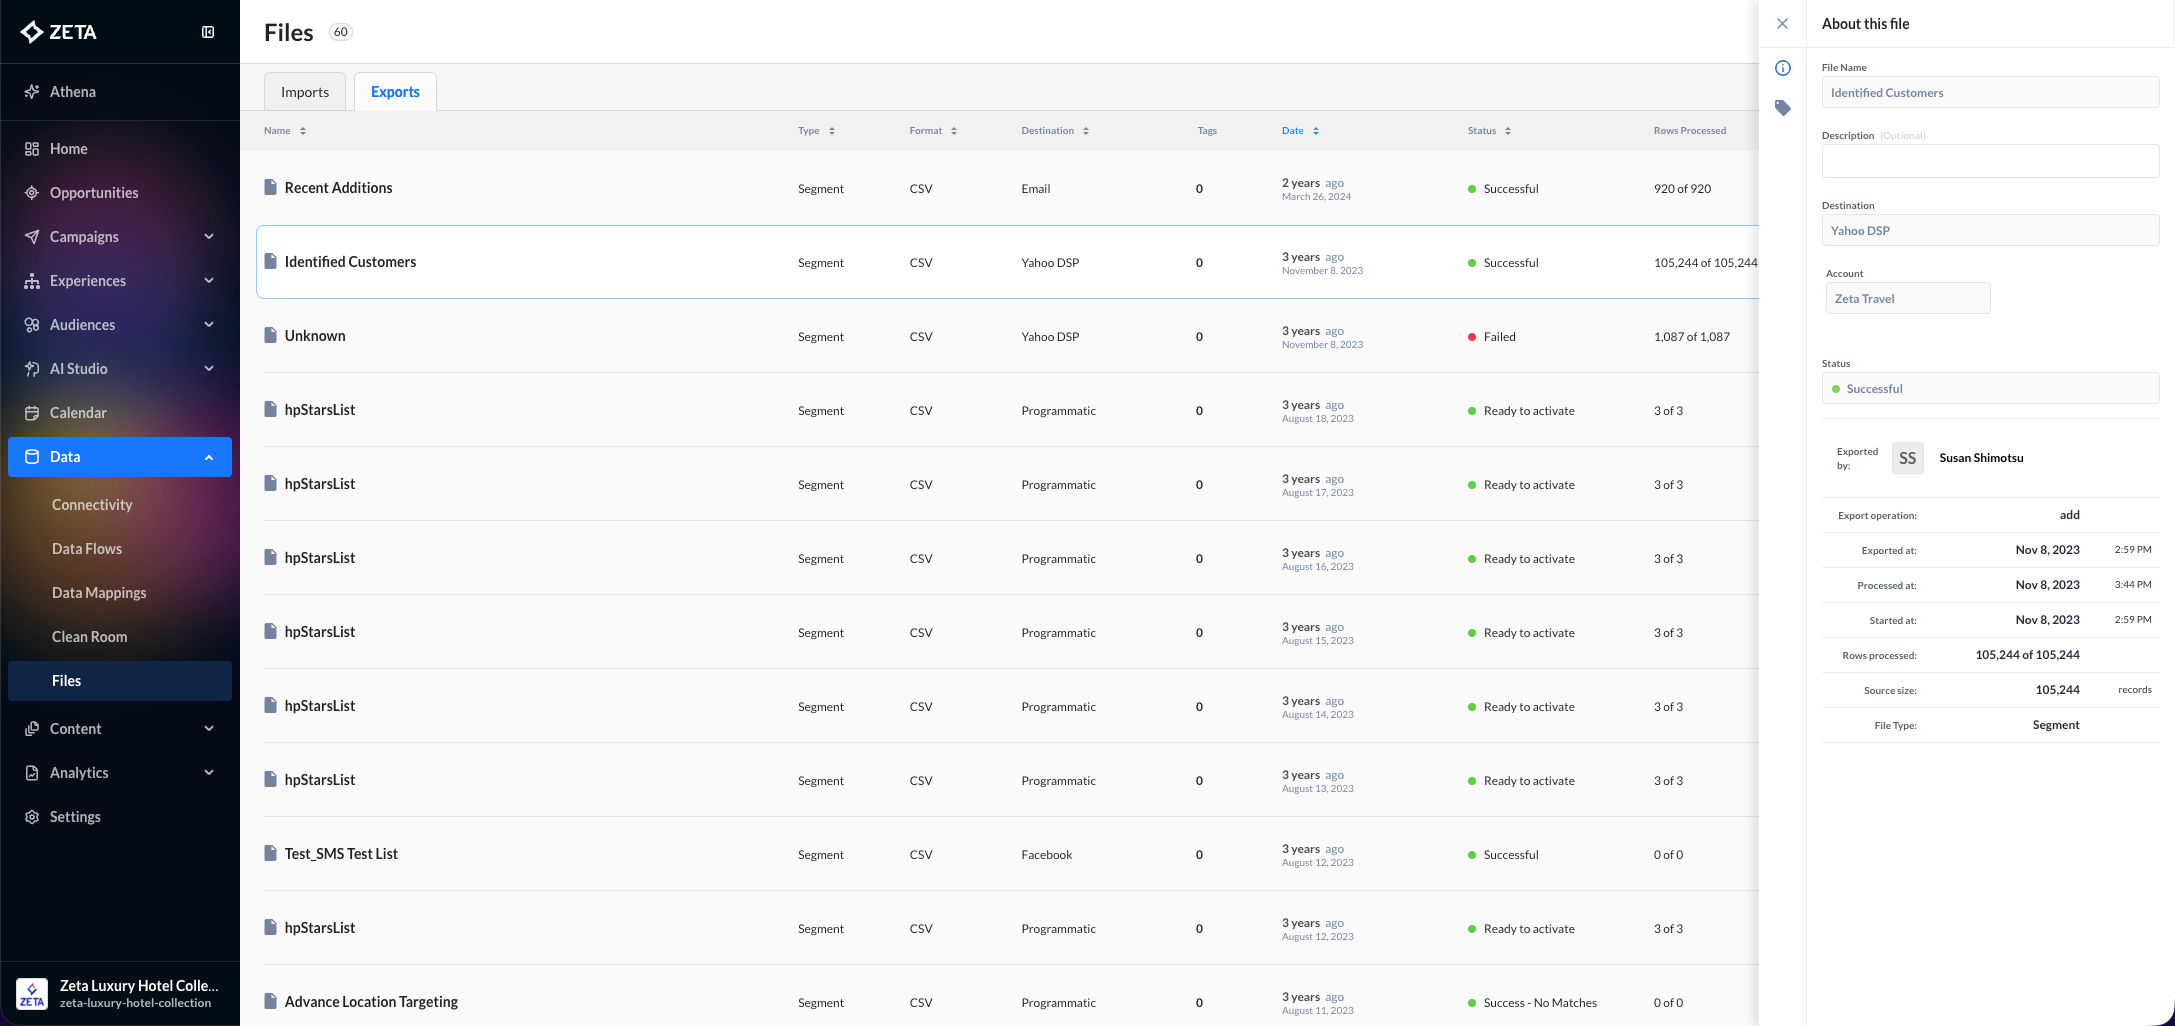
3. Click into the row to reveal data about the connector job, such as timestamps for exporting and processing functions.
Using ZMP Audiences within Yahoo DSP
When you connect your ZMP account to Yahoo DSP, you allow us to create and populate segments in your Yahoo DSP instance that will allow you to activate campaigns.
Find your Audiences
1. To find all audience data from the ZMP, navigate to Advertisers > Targeting Library > Advertiser Audiences.
2. In the Data Type dropdown list, make sure Advertiser Custom > Imported Audiences is selected. (It is not selected by default.)
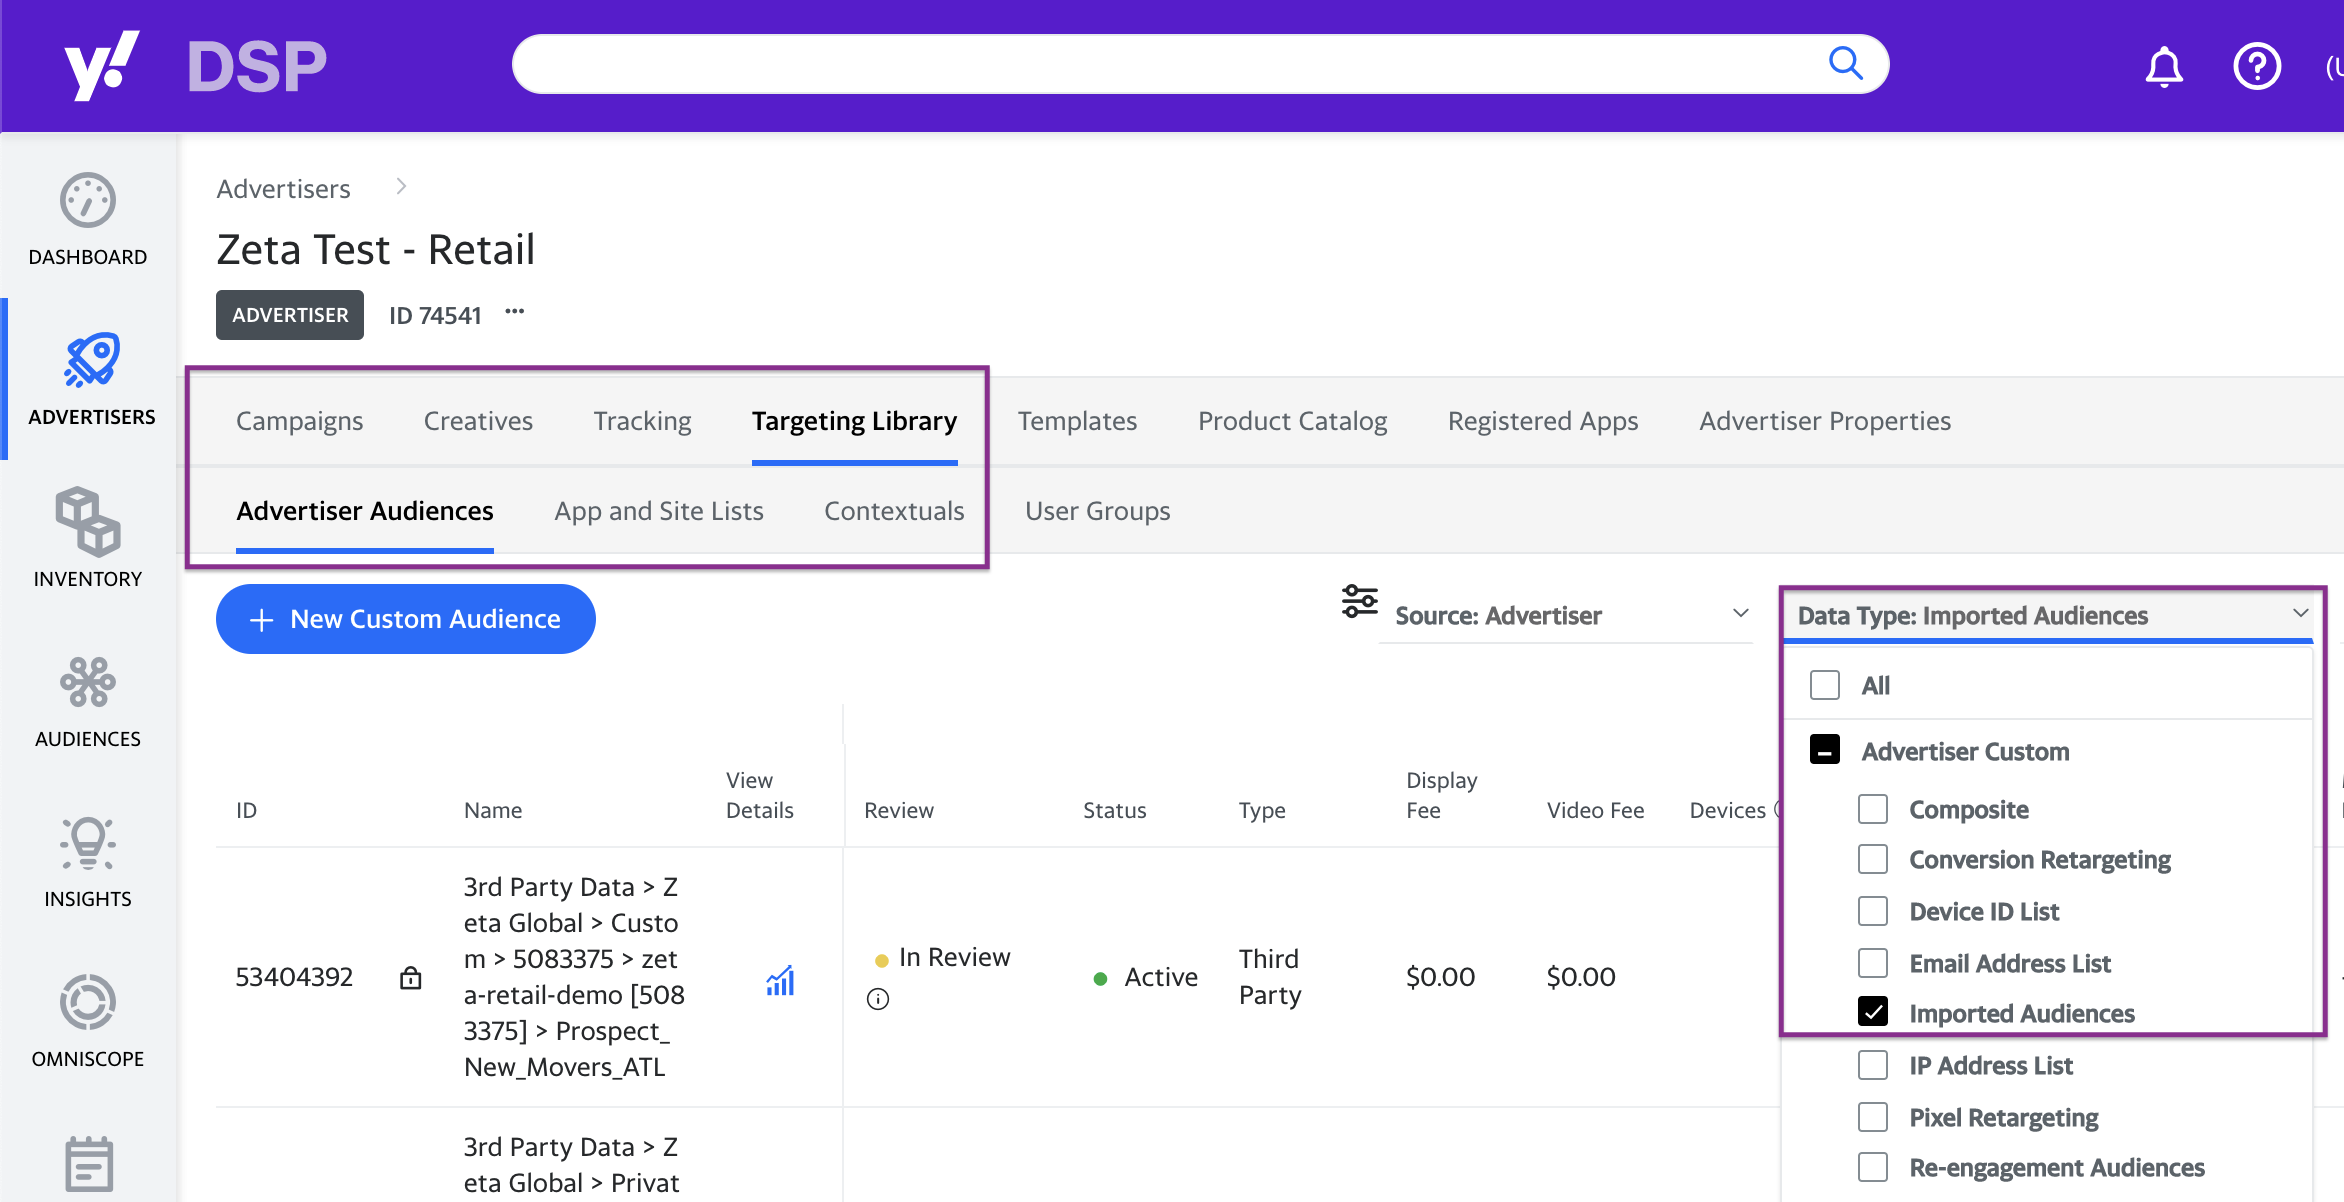
Each row in the Advertiser Audiences page should match a job run by the ZMP over Yahoo’s DataX API. The Name will change based on the type of job.
Creating Account Folders
When you submit your MDM ID to be validated, and it’s successful, Yahoo creates a folder for your MDM ID based on whether your account is enabled for Customers and/or Prospects:
If Yahoo DSP Connector is enabled for Customers (first-party data):
3rd Party data > Zeta Global > Private > MDM ID
If Yahoo DSP Connector is enabled for Prospects (third-party data):
3rd Party data > Zeta Global > Custom > MDM ID
Even if you only have one audience type enabled, the folder structure will still apply. This is to keep your first- and third-party data separate for compliance reasons.
Secondly, Yahoo DSP will create a subfolder to separate every ZMP instance that uses your MDM ID:
If Yahoo DSP Connector is enabled for Customers (first-party data):
3rd Party data > Zeta Global > Private > MDM ID > Site ID [MDM ID]
If Yahoo DSP Connector is enabled for Prospects (third-party data):
3rd Party data > Zeta Global > Custom > MDM ID > Site ID [MDM ID]
This means that you authenticate multiple ZMP instances with your MDM ID. In this example, two ZMP sites (admin-app-id and dnb-admin) have successfully connected using MDM ID 5083375, creating separate folders for each to store first- and third-party segments.
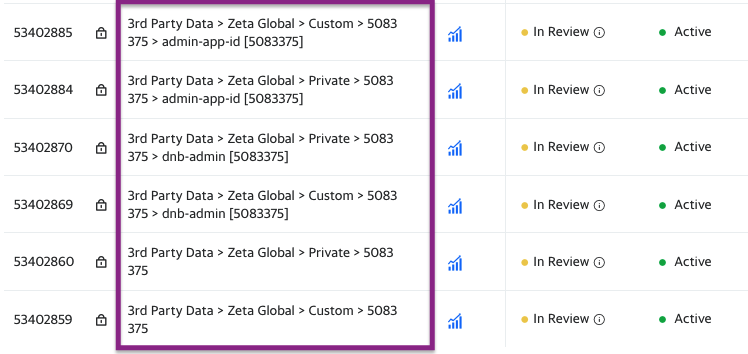
Creating Segments
When you create a new Yahoo DSP segment in the ZMP, there will be an audience row confirming that the segment has been created in the folder you specified.
If Yahoo DSP Connector is enabled for Customers (first-party data):
3rd Party data > Zeta Global > Private > MDM ID > Site ID [MDM ID] > segment name
If Yahoo DSP Connector is enabled for Prospects (third-party data):
3rd Party data > Zeta Global > Custom > MDM ID > Site ID [MDM ID] > segment name
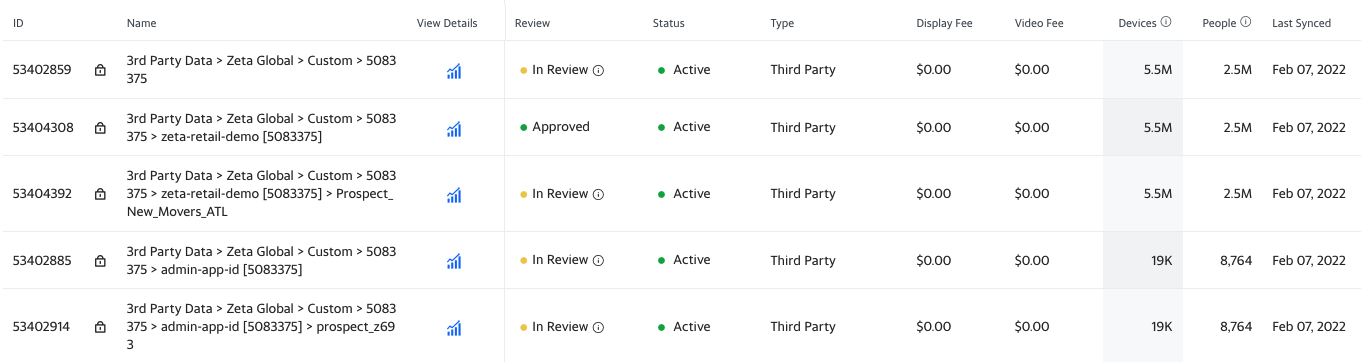
As mentioned earlier in this user guide, it’s a good idea to use a prefix to distinguish your first- and third-party audiences. In the example below, the Zeta Retail Demo account has created a third-party segment with a “Prospect_” prefix in its name.

Updating Segments
Every time you sync an audience to Yahoo DSP, the entire taxonomy hierarchy for that segment will update as well. This means that you should have a running count of how many people are in all your segments across your Site ID, MDM ID, and audience type.
In this example below, the segment Prospect_New_Movers_ATL added 5.5M devices and 2.5M people to Yahoo DSP. This also added 5.5M devices and 2.5M people to the Site ID (zeta-retail-demo) and the MDM ID for the audience type (Custom > 5083375). Once more devices and people are added from other segments, the Site ID and MDM ID will continue to grow.
Activate your Audience for a Campaign
If you’re creating a brand new segment, the audience will follow up in a separate API call. You do not need to take any additional action for this. It will typically take several hours for the data to sync and match in Yahoo DSP, depending on the size of the audience.
If your audience has more than 1000 people in it, you can click the audience icon to view details.
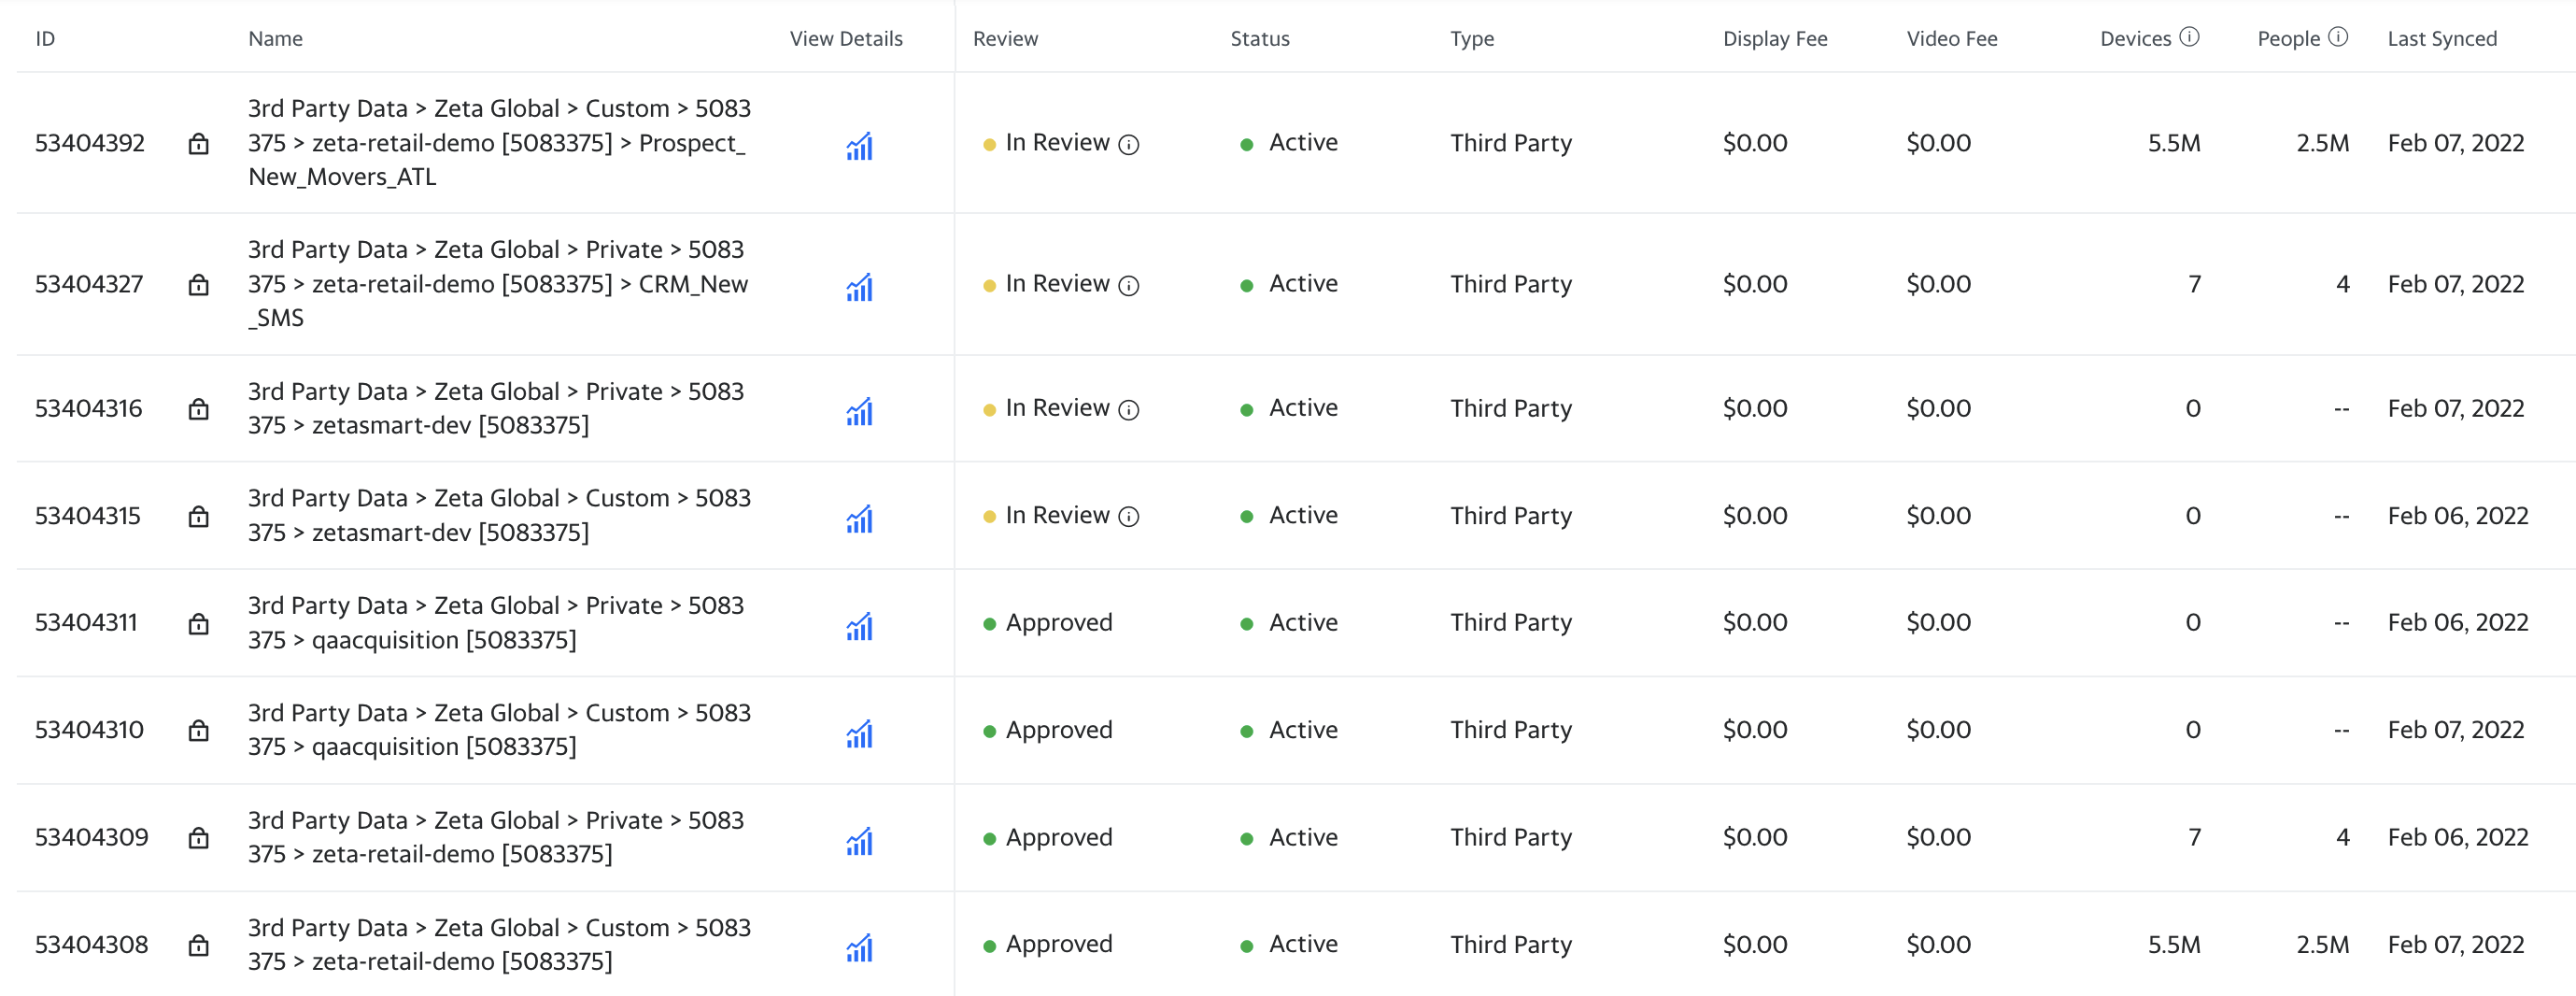
Once the data is loaded, it will go into review for compliance. A segment is eligible to be targeted in a campaign while in review, but it can be rejected later.
Create a campaign like you normally would and select the segment you just synced to your Yahoo DSP account.
Sync using Experience Builder
While Segments & Lists allow you to export audiences to Yahoo DSP in bulk, some campaigns require action-based criteria. With our automation tool Experience Builder, you can create trigger-based campaigns to determine how and when a person is added or removed from a segment in Yahoo DSP.
Because both Customers and Prospects can enter experiences, don’t forget to confirm what kind of segment you’re syncing to on the Yahoo DSP side for each node.
1. Navigate to Experiences > Builder and click on Create Experience to open the canvas.
2. Begin building your experience by selecting a trigger event. Fill out your canvas with your relevant nodes.
While not mandatory, you can use the Split by Identity feature to segment users who enter your experience into three branches: Customer Known, Zeta Known, Unknown.
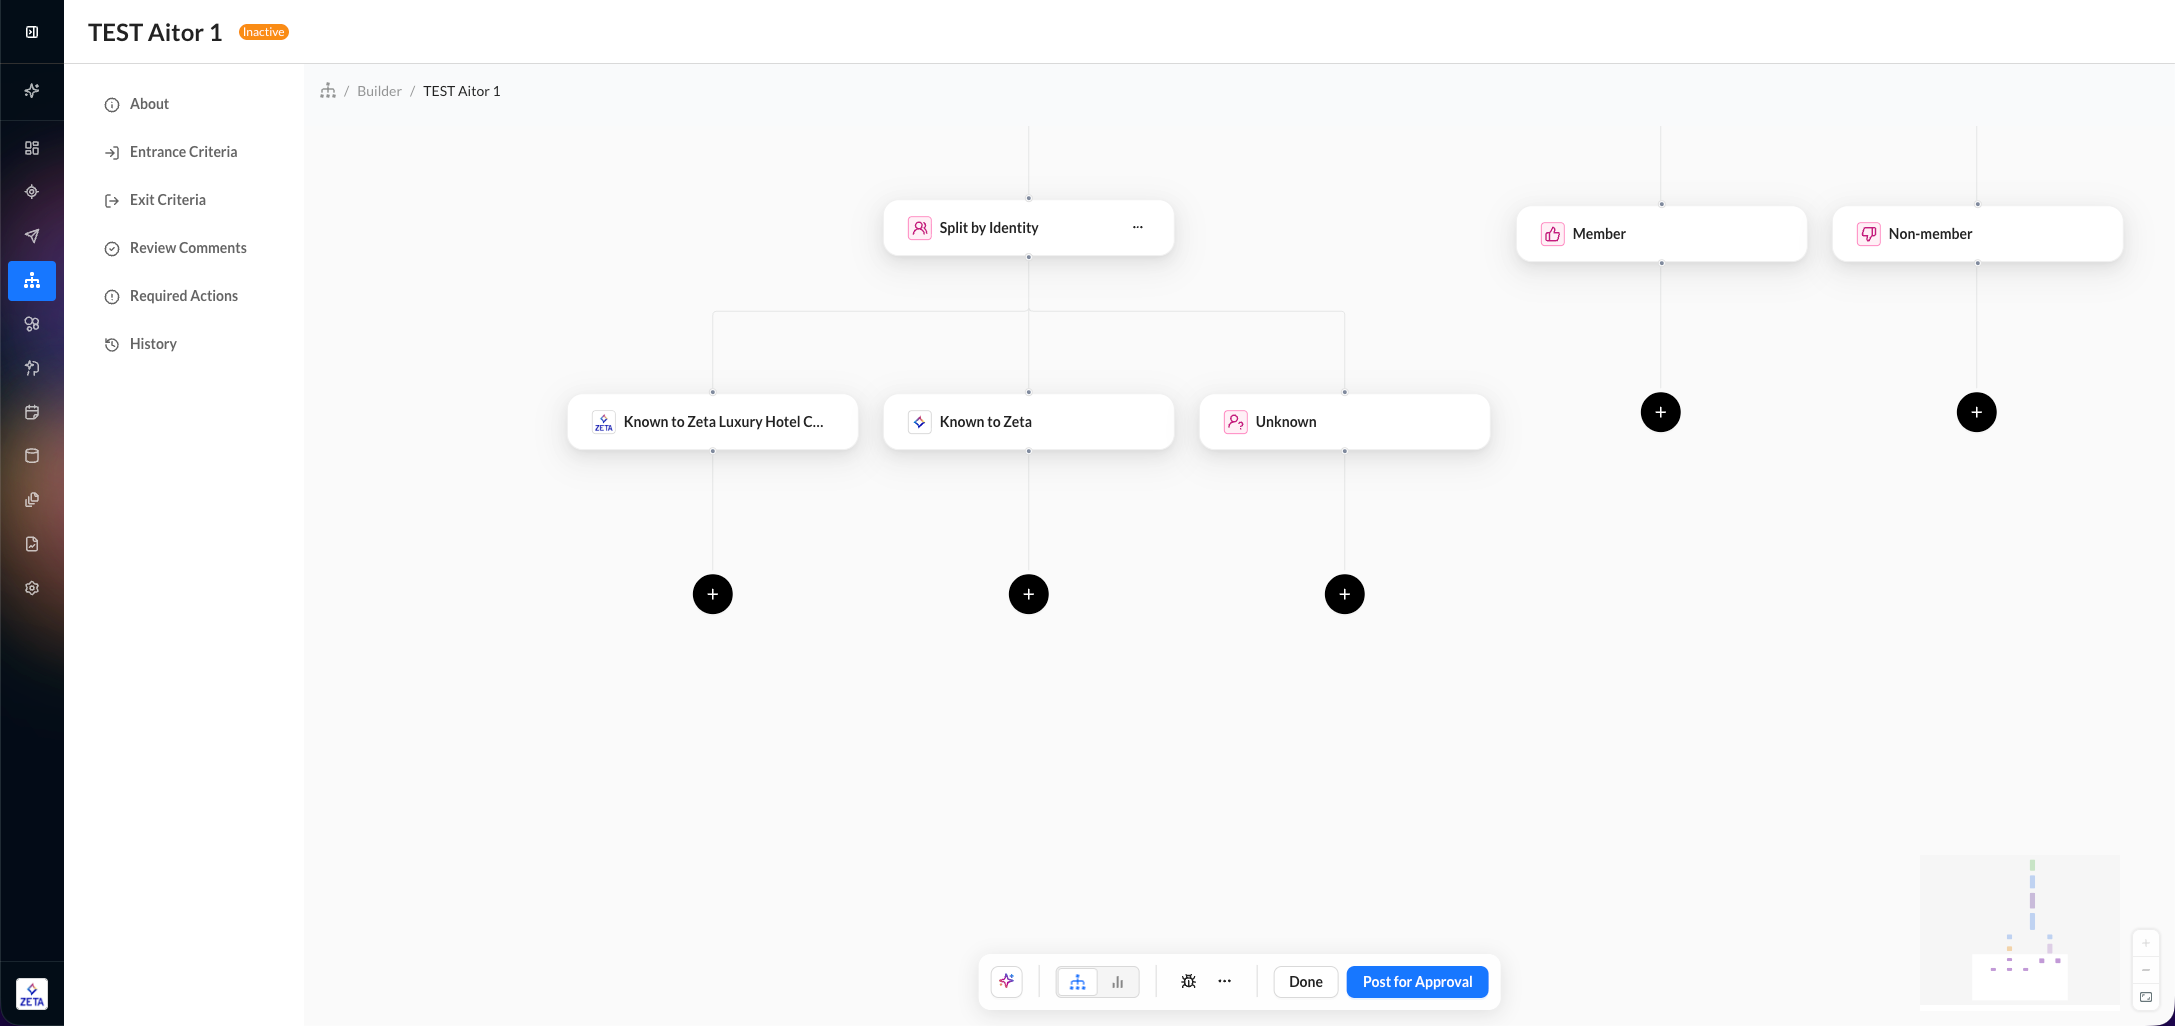
3. For both Customers and Prospects to be syndicated to Yahoo DSP, select the button on your Experience Builder canvas to open the node menu. Select Actions.
4. From the Actions panel, select Sync to Yahoo DSP.
5. From the Sync User to Yahoo DSP dialog box, select the Account Name you want to use; if you only have one account authenticated, it will already be selected for you.
6. With Customers selected as the Audience Type, a dropdown list appears containing all of the first-party audience segments that currently exist in your Yahoo DSP account. Just as with Segments & Exports, you can choose to select one of these existing segments or create a new one.
7. Once selected, click on Add To Experience, and it will show up on the canvas as an Action node.
-20260910-150440.gif?cb=231fb96911872ab86d1bee46073f8aac)
While you can add a Sync to Yahoo DSP node without using the Split by Identity feature, don’t forget to account for this when building your experience. You should select the Audience Type that best fits your use case in a given workflow.