

Facebook Connector for Prospects is currently available exclusively in the U.S., but we’re just getting started. Stay tuned for updates as we expand to more regions soon!
Businesses that derive value from data have always had an edge over the competition and continue to do so even today. In order to leverage the value of data and be able to offer connected customer experiences, companies have started embracing digital transformation by adopting new technologies and opening doors to new integrations and acquisitions. The kind of integrations that enable users to connect faster and streamline transactions with their customers, thus improving the ease of doing business, is the kind that you need! To that end, the Zeta Marketing Platform has introduced the Facebook connector for prospect audiences.
The ZMP Omnichannel Acquisition Connector unlocks a quick and easy way to syndicate acquisition segments (Prospect Segments, Matched Lists, Lookalikes, and Prospect Lists) to Zeta’s acquisition activation systems, including partners such as Google Ads, Facebook, and more. This document will focus on how to set up the connector and syndicate data from the ZMP to your client’s Facebook account.
Setting Up the Connector
Once you’ve enabled the feature, you’ll need to authenticate that you have permission to use your Facebook account. This means you only need one set of credentials to connect any account you wish; however, you can only connect one Facebook user per ZMP instance. If you do not have Facebook account credentials, reach out to Solutions and they’ll authenticate for you.
If your account already has Facebook set up through CRM Features, you can skip this section.
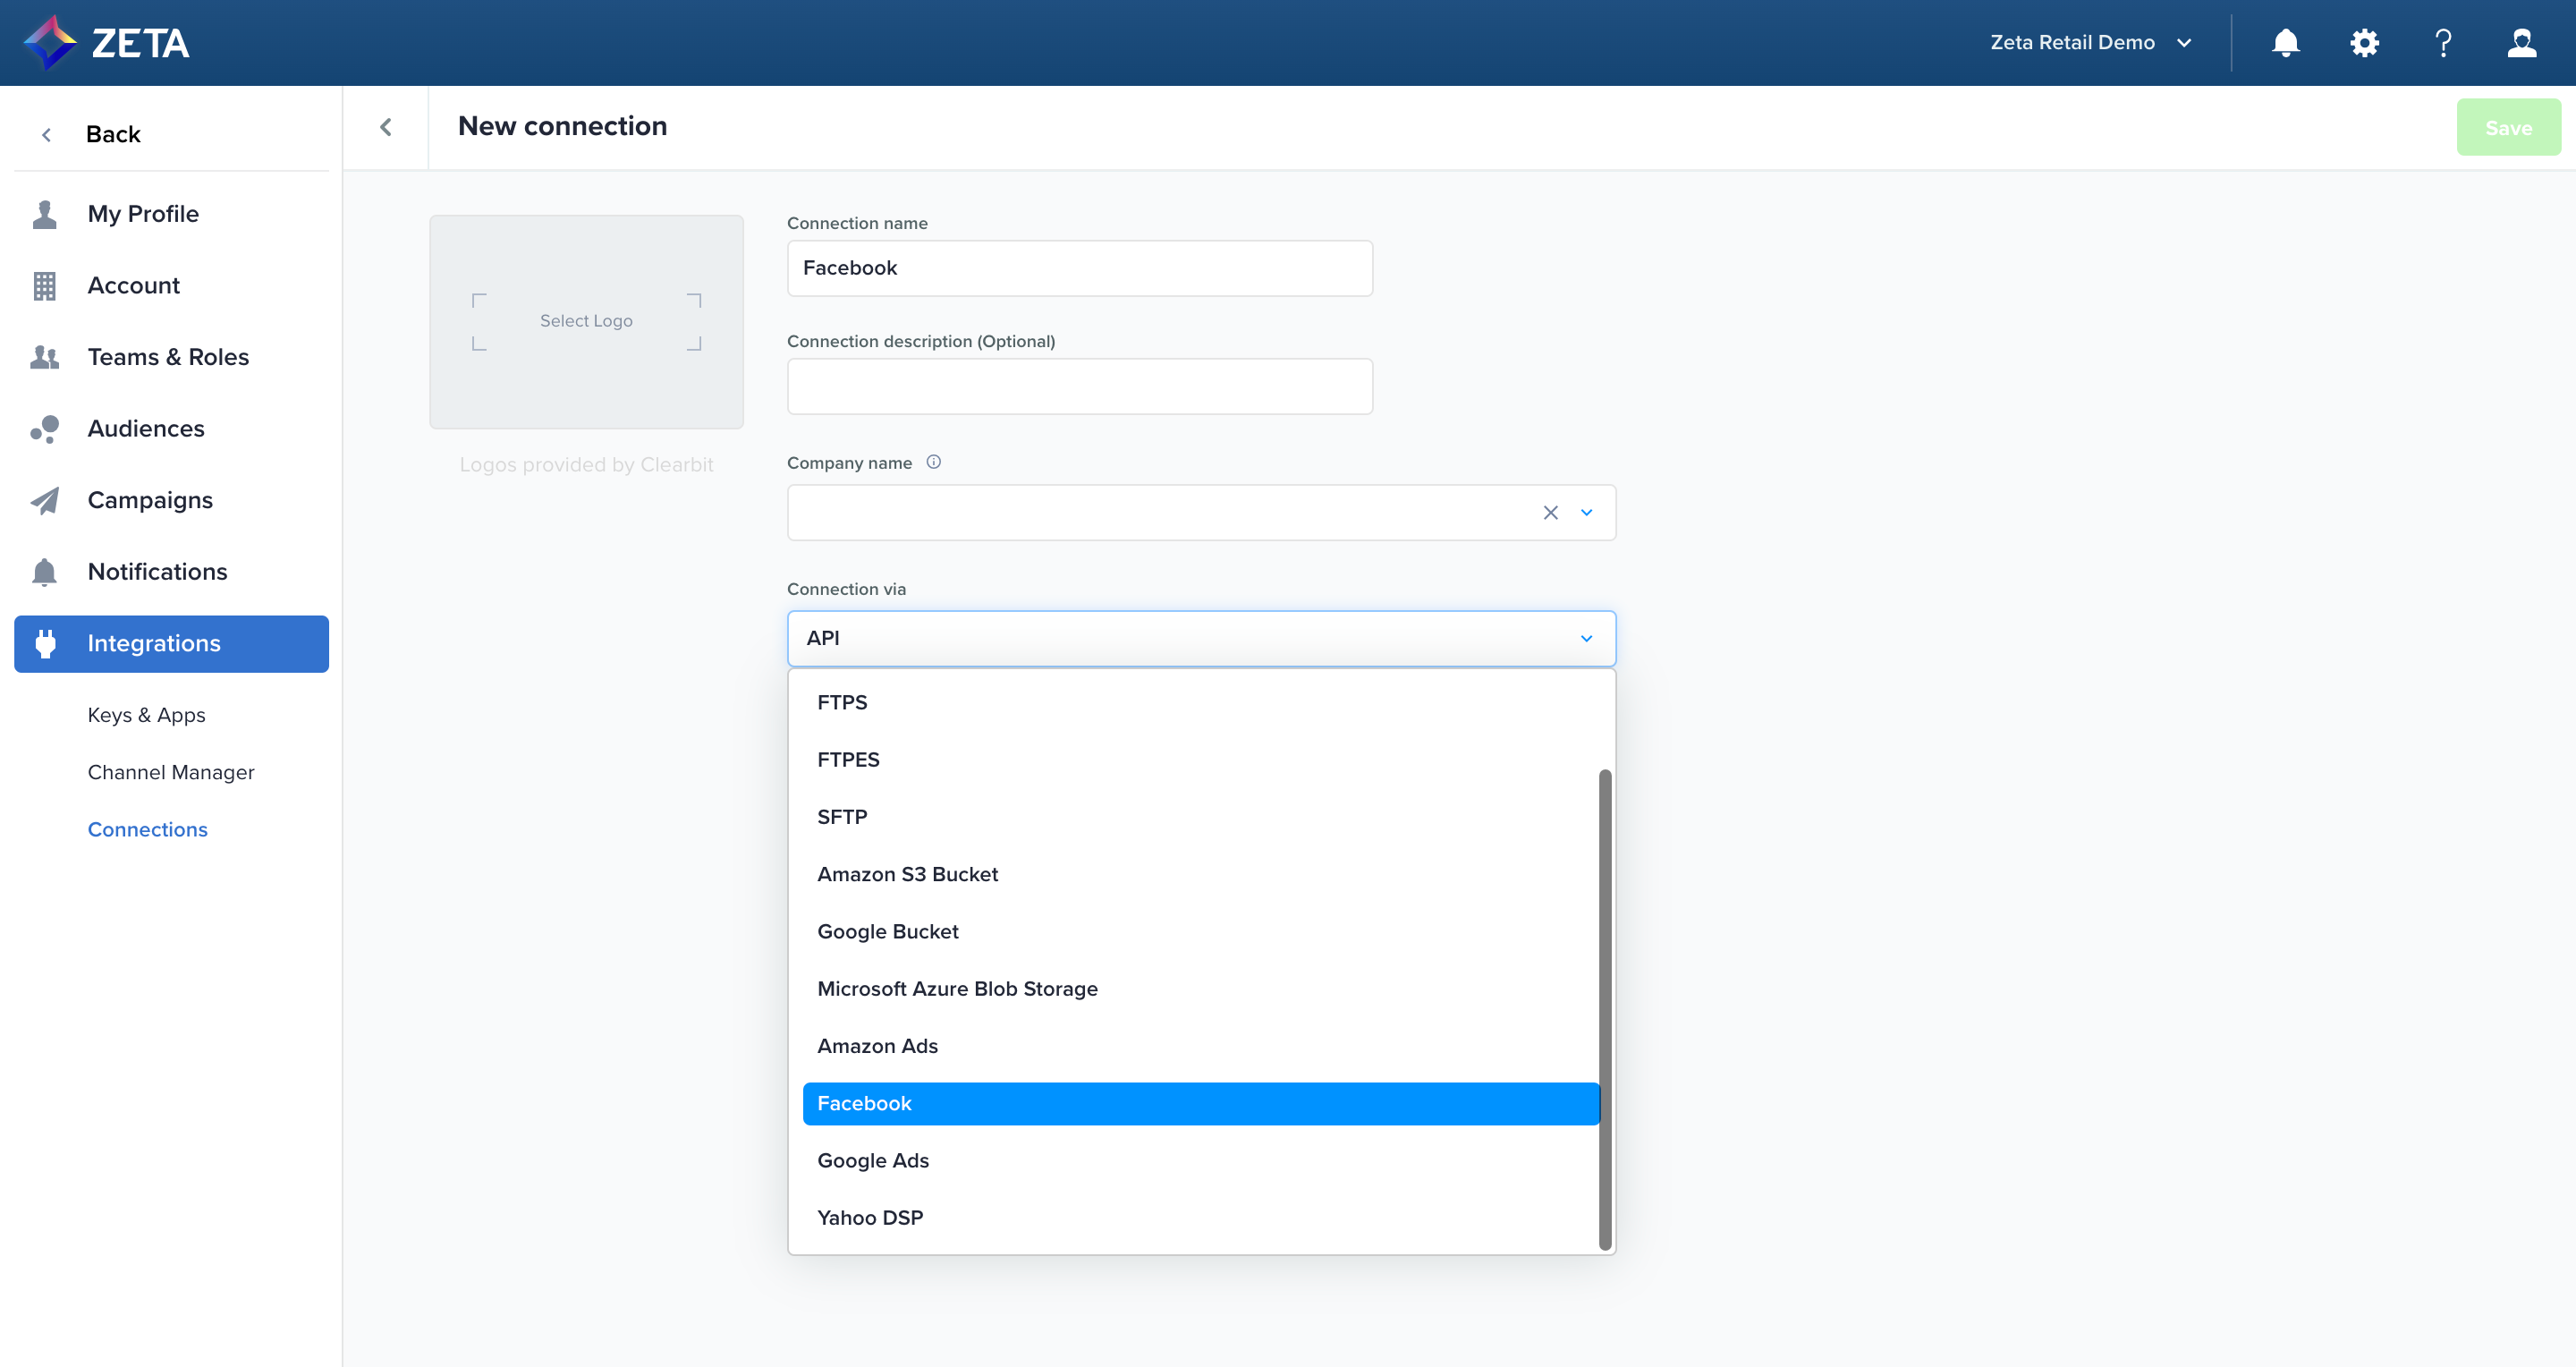
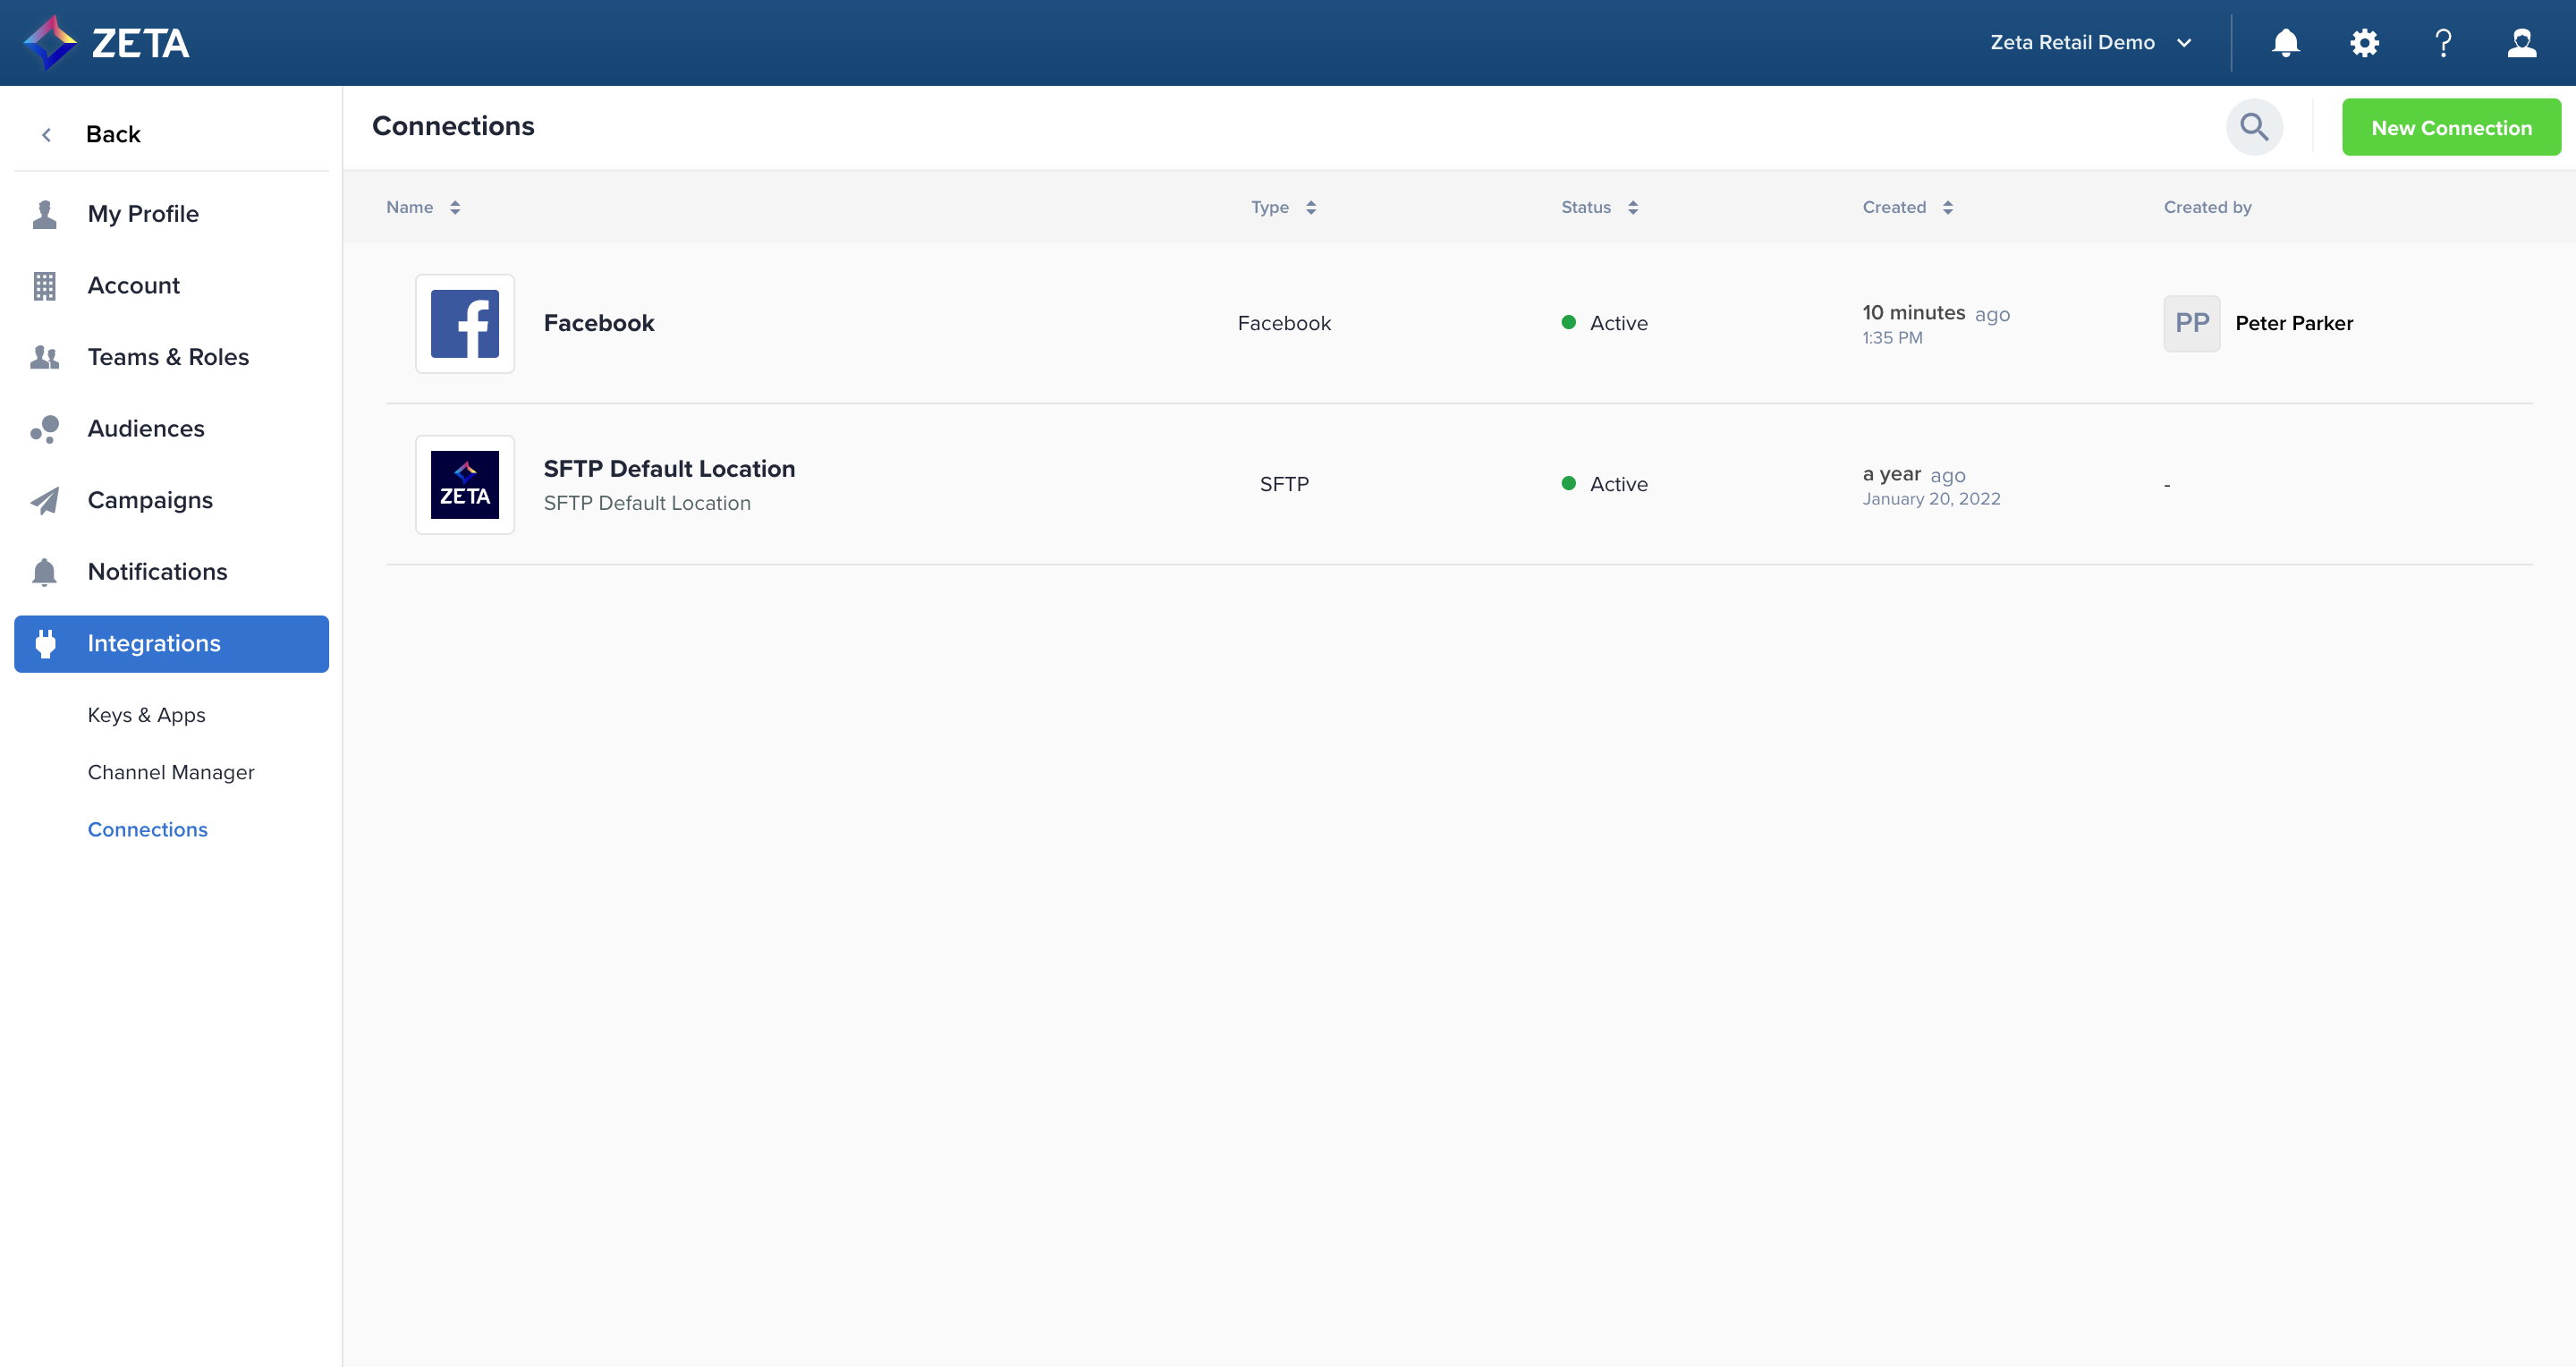
1. Navigate to Platform Settings > Connections. Click on New Connection.
2. On a new Connection page, add a Connection name.
3. Select Facebook from the Connection via dropdown list.
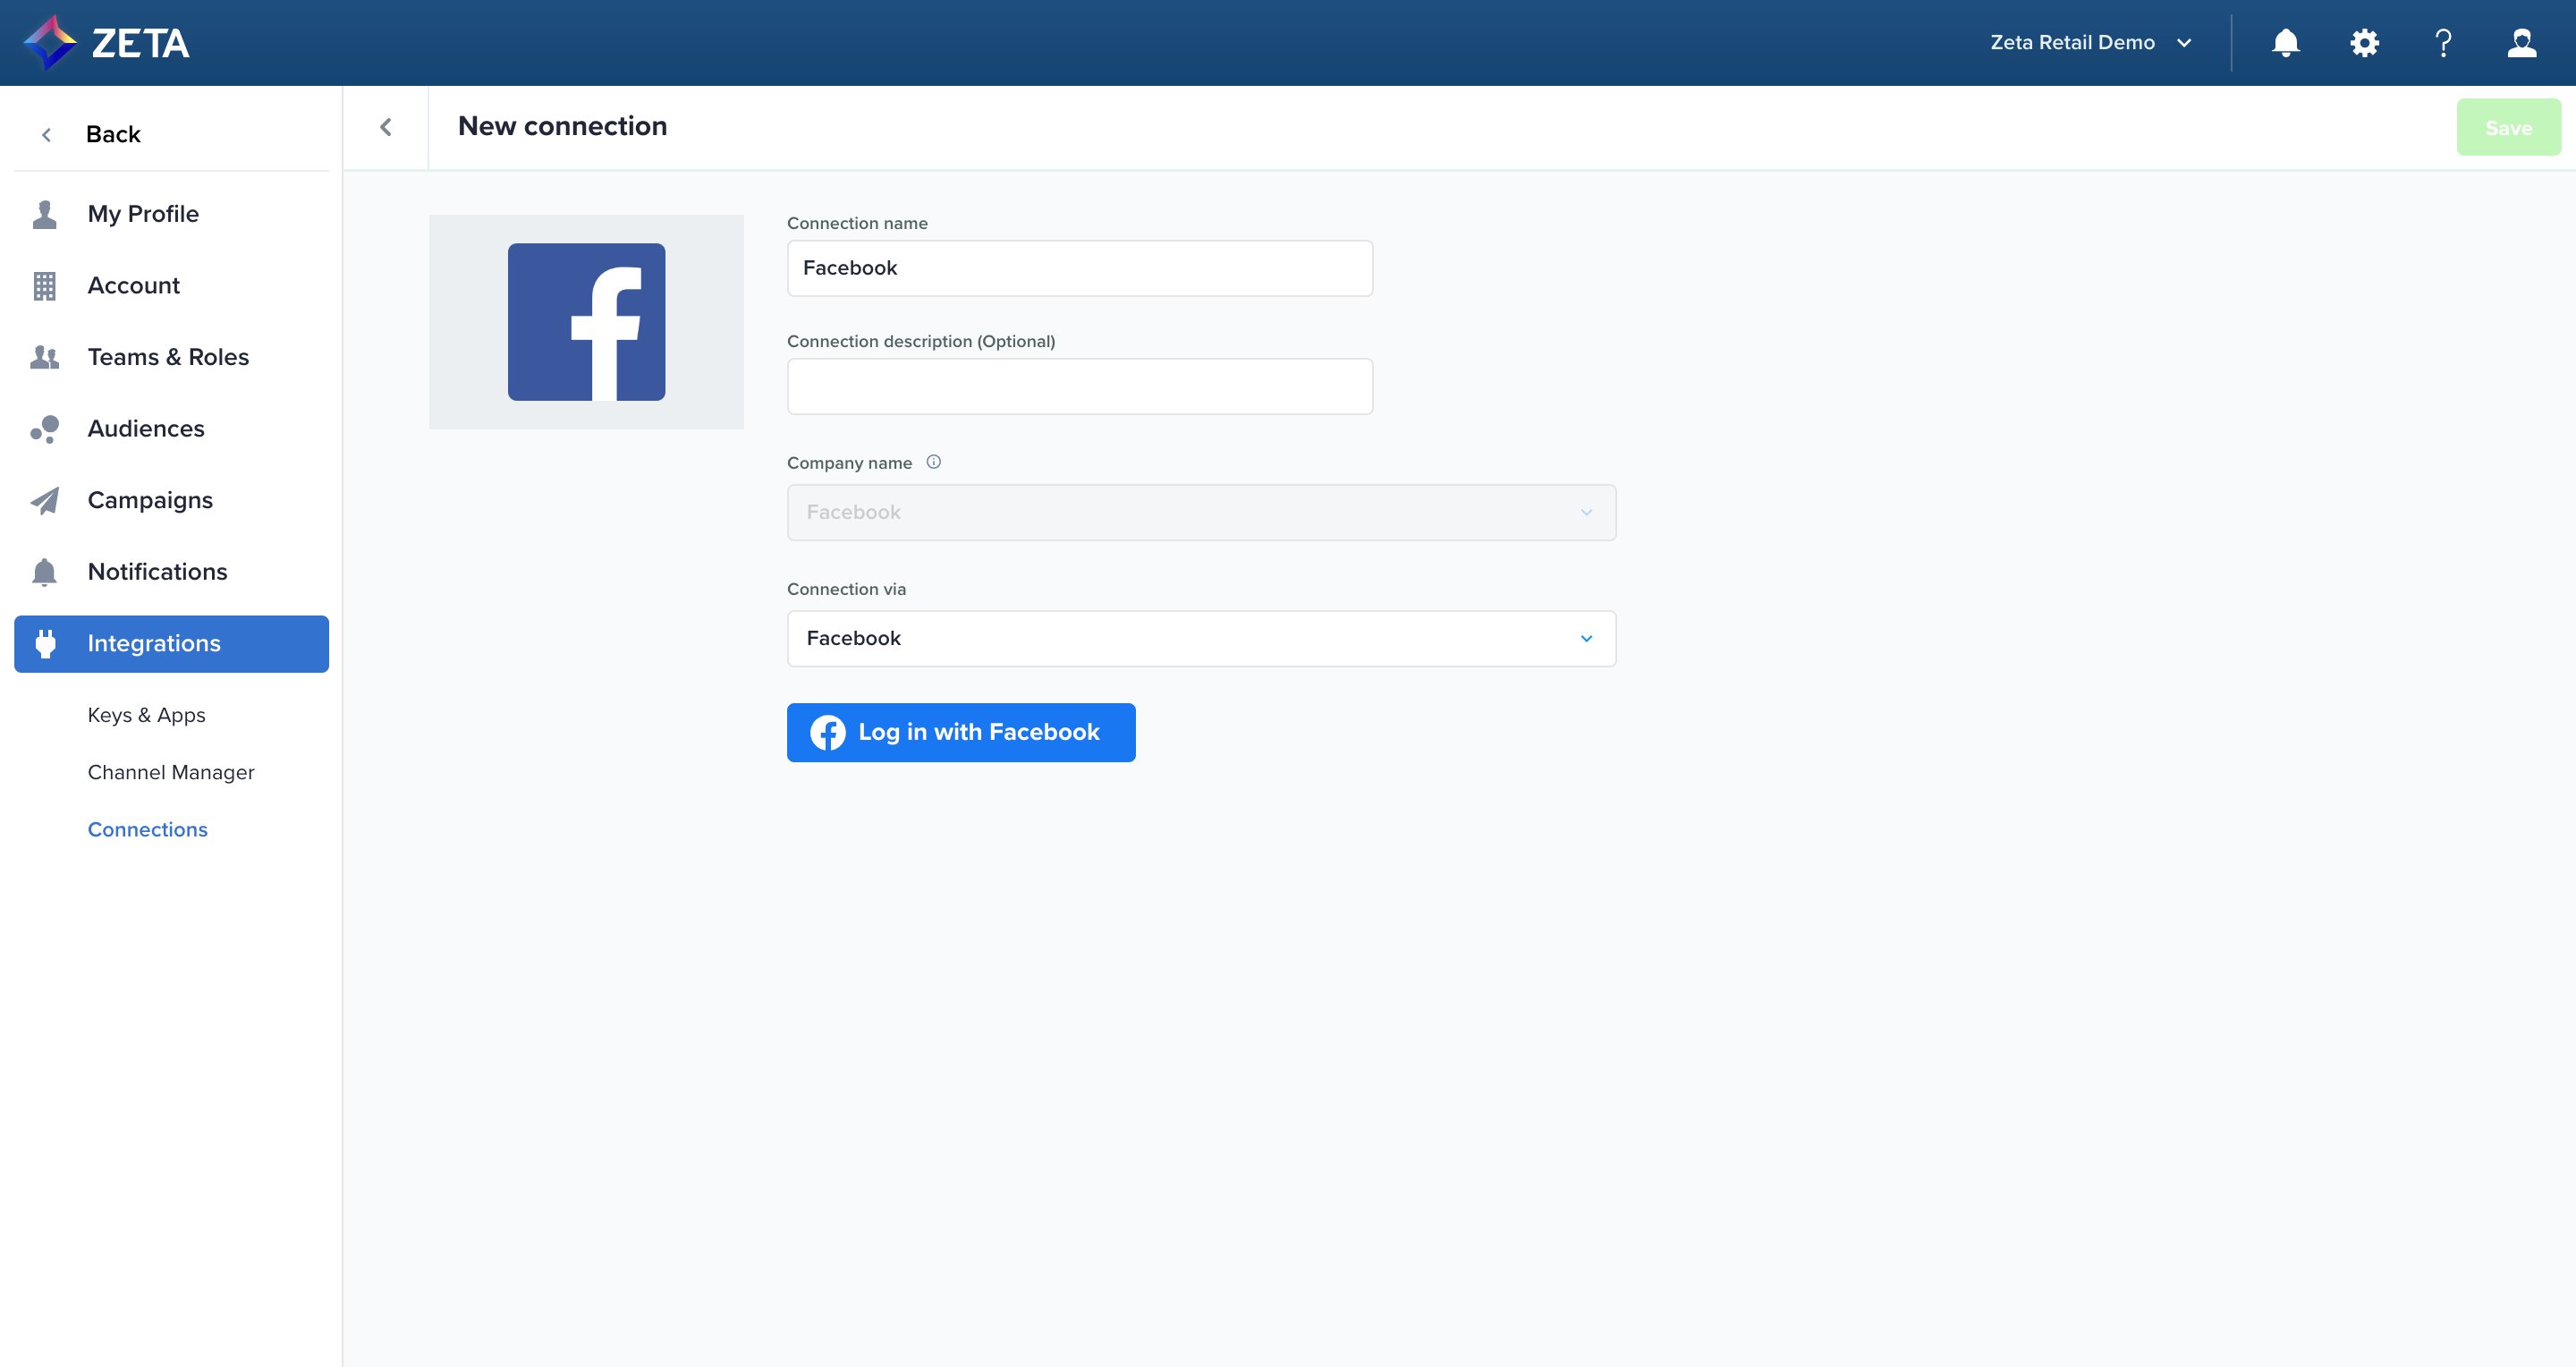
4. Once selected, the fields will resolve to a single Log in with Facebook button for you to sign in to your account via SSO. Clicking the button will open a pop-up for you to sign in.
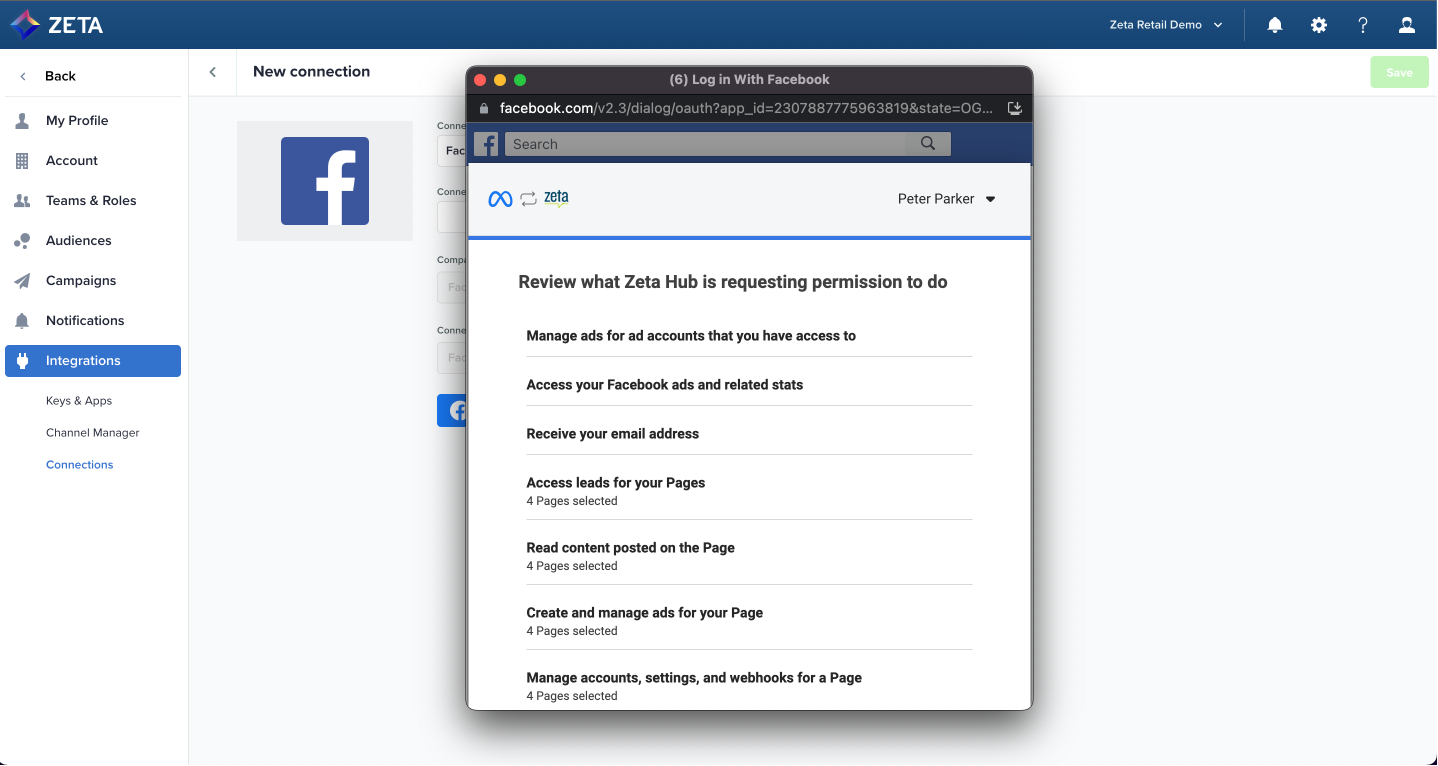
5. When prompted, make sure you accept all permissions so you can send data from ZMP to Facebook. If you have Pages, add the relevant ones so you can use the Meta Leads feature.
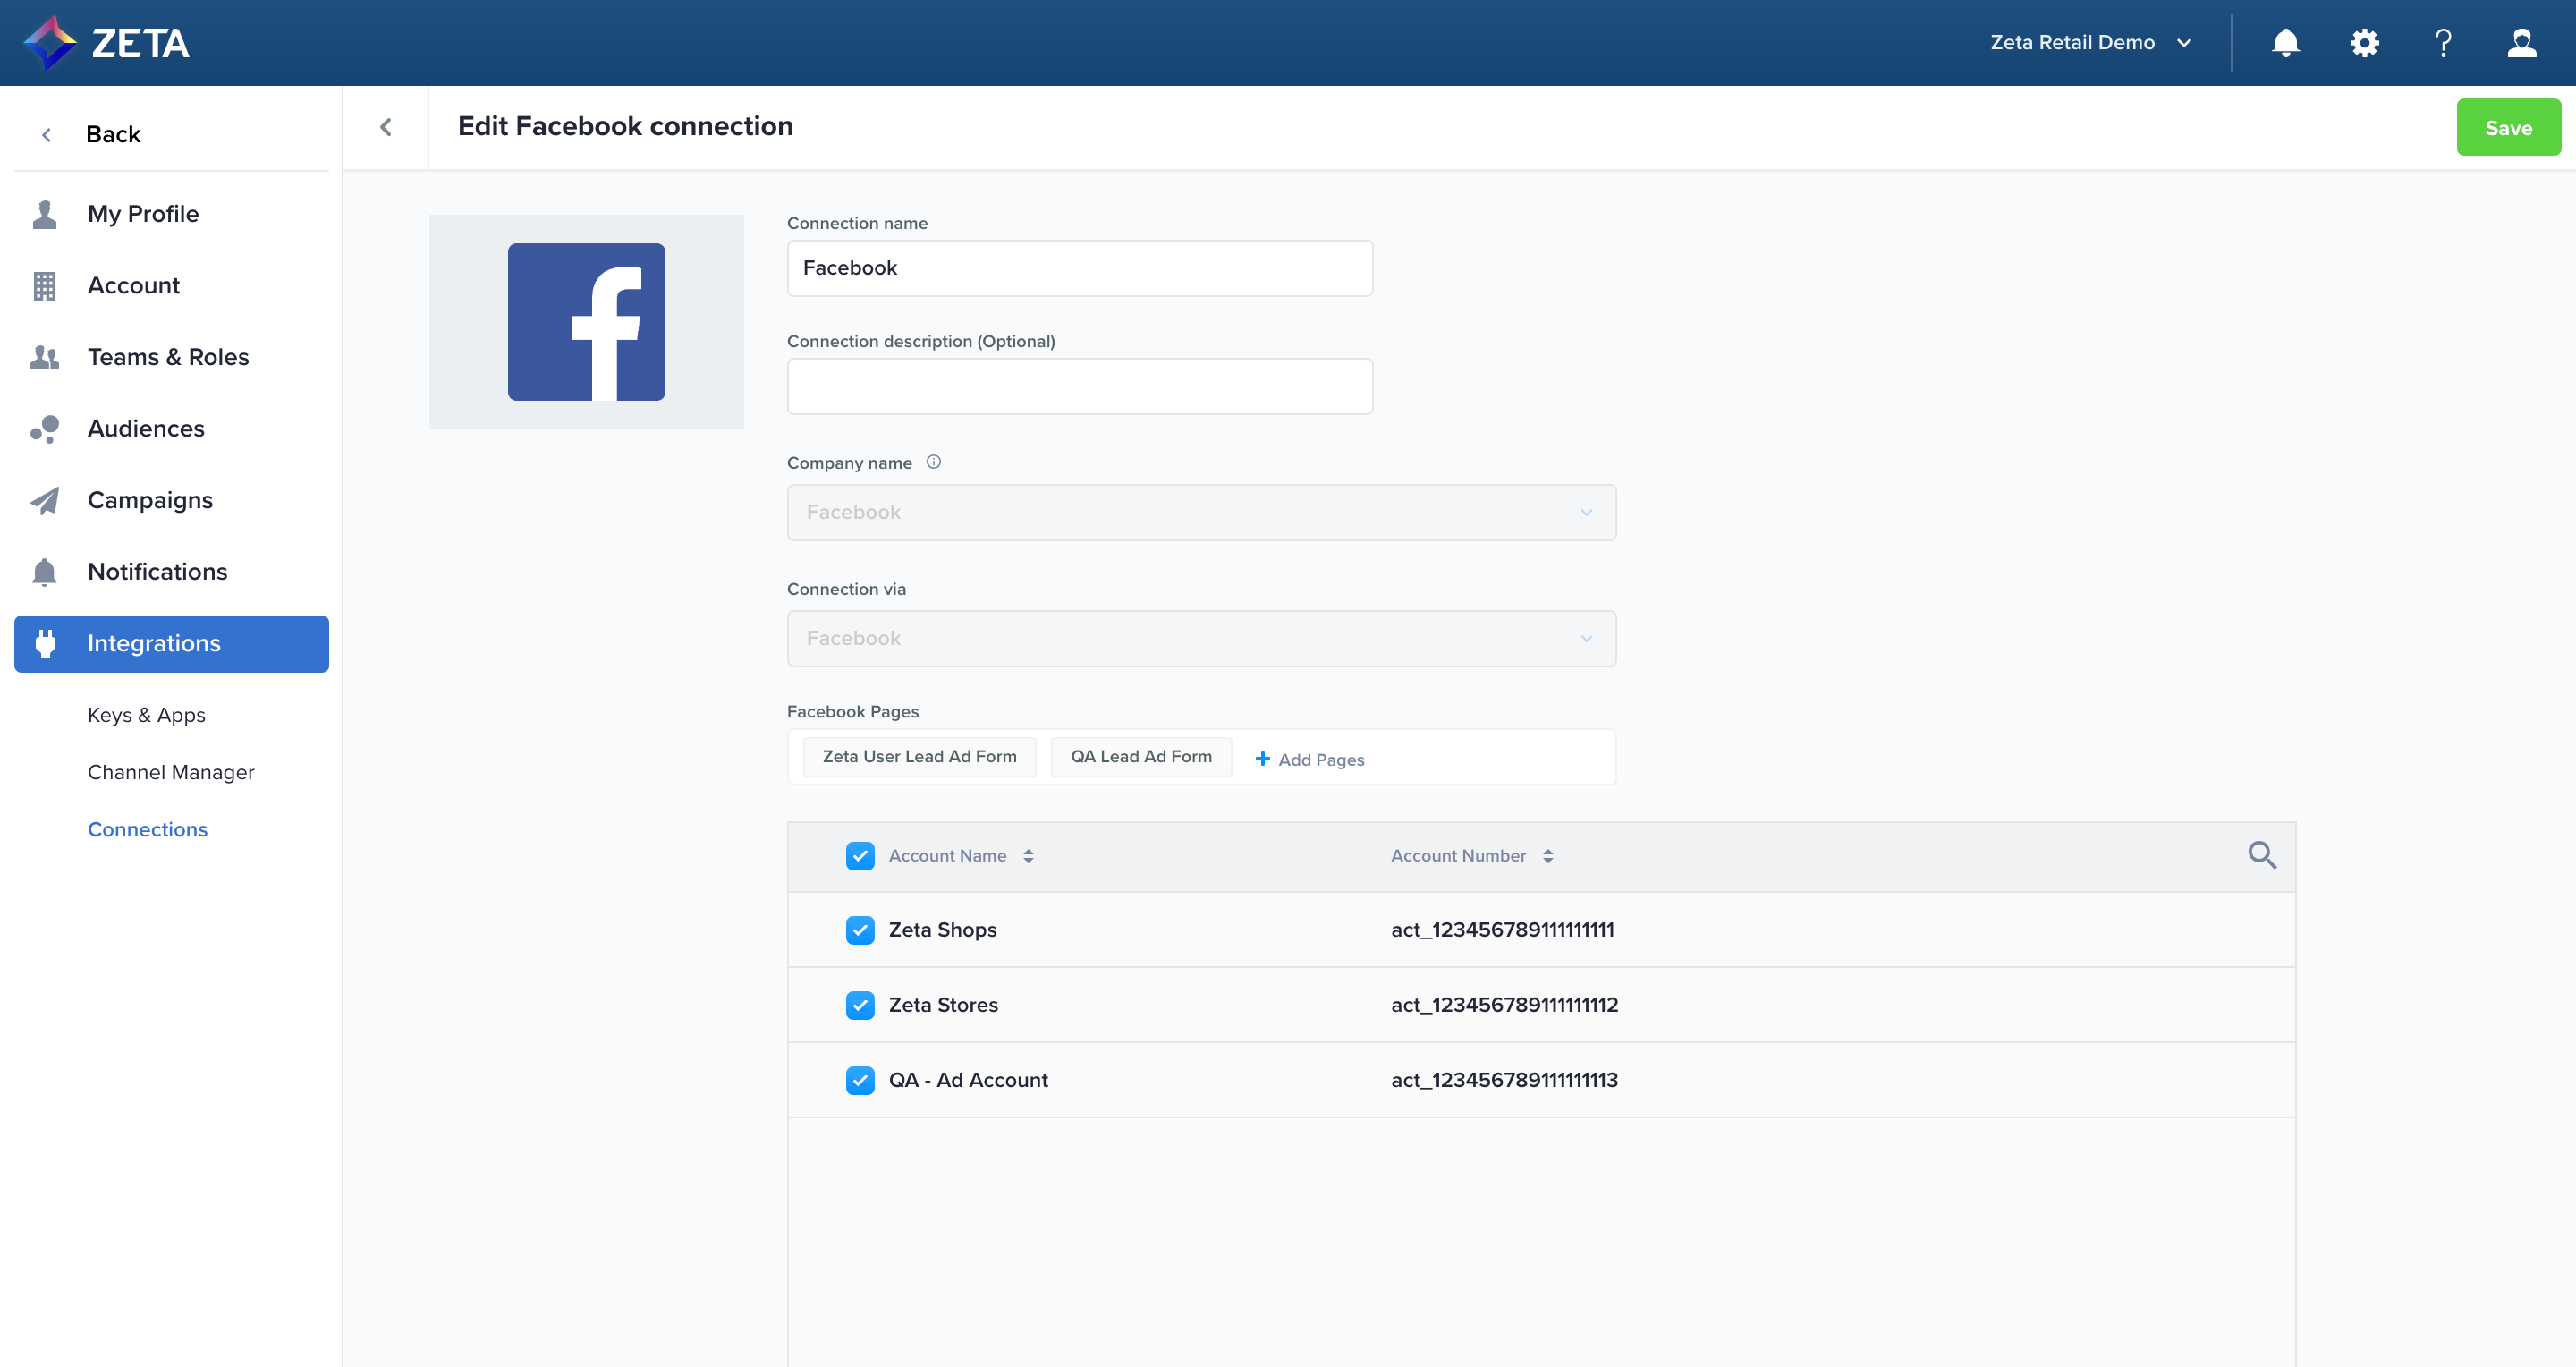
6. Once authenticated, all the Facebook ad accounts attached to your username will appear in a table. Check the boxes of the accounts you want to use on the current ZMP instance.
7. After clicking Save on the Facebook Connection page, you’ll be redirected to the Connections page where you can see the active status of your connection.
Using the Connector
Create an Audience
The Facebook Connector supports 4 types of prospect audiences:
-
Prospect Lists
-
Matched List
-
Lookalike
-
Prospect Segment
1. To create a prospect audience, navigate to Segments & Lists and click on Explore Audience to open the Unified Audience Explorer.
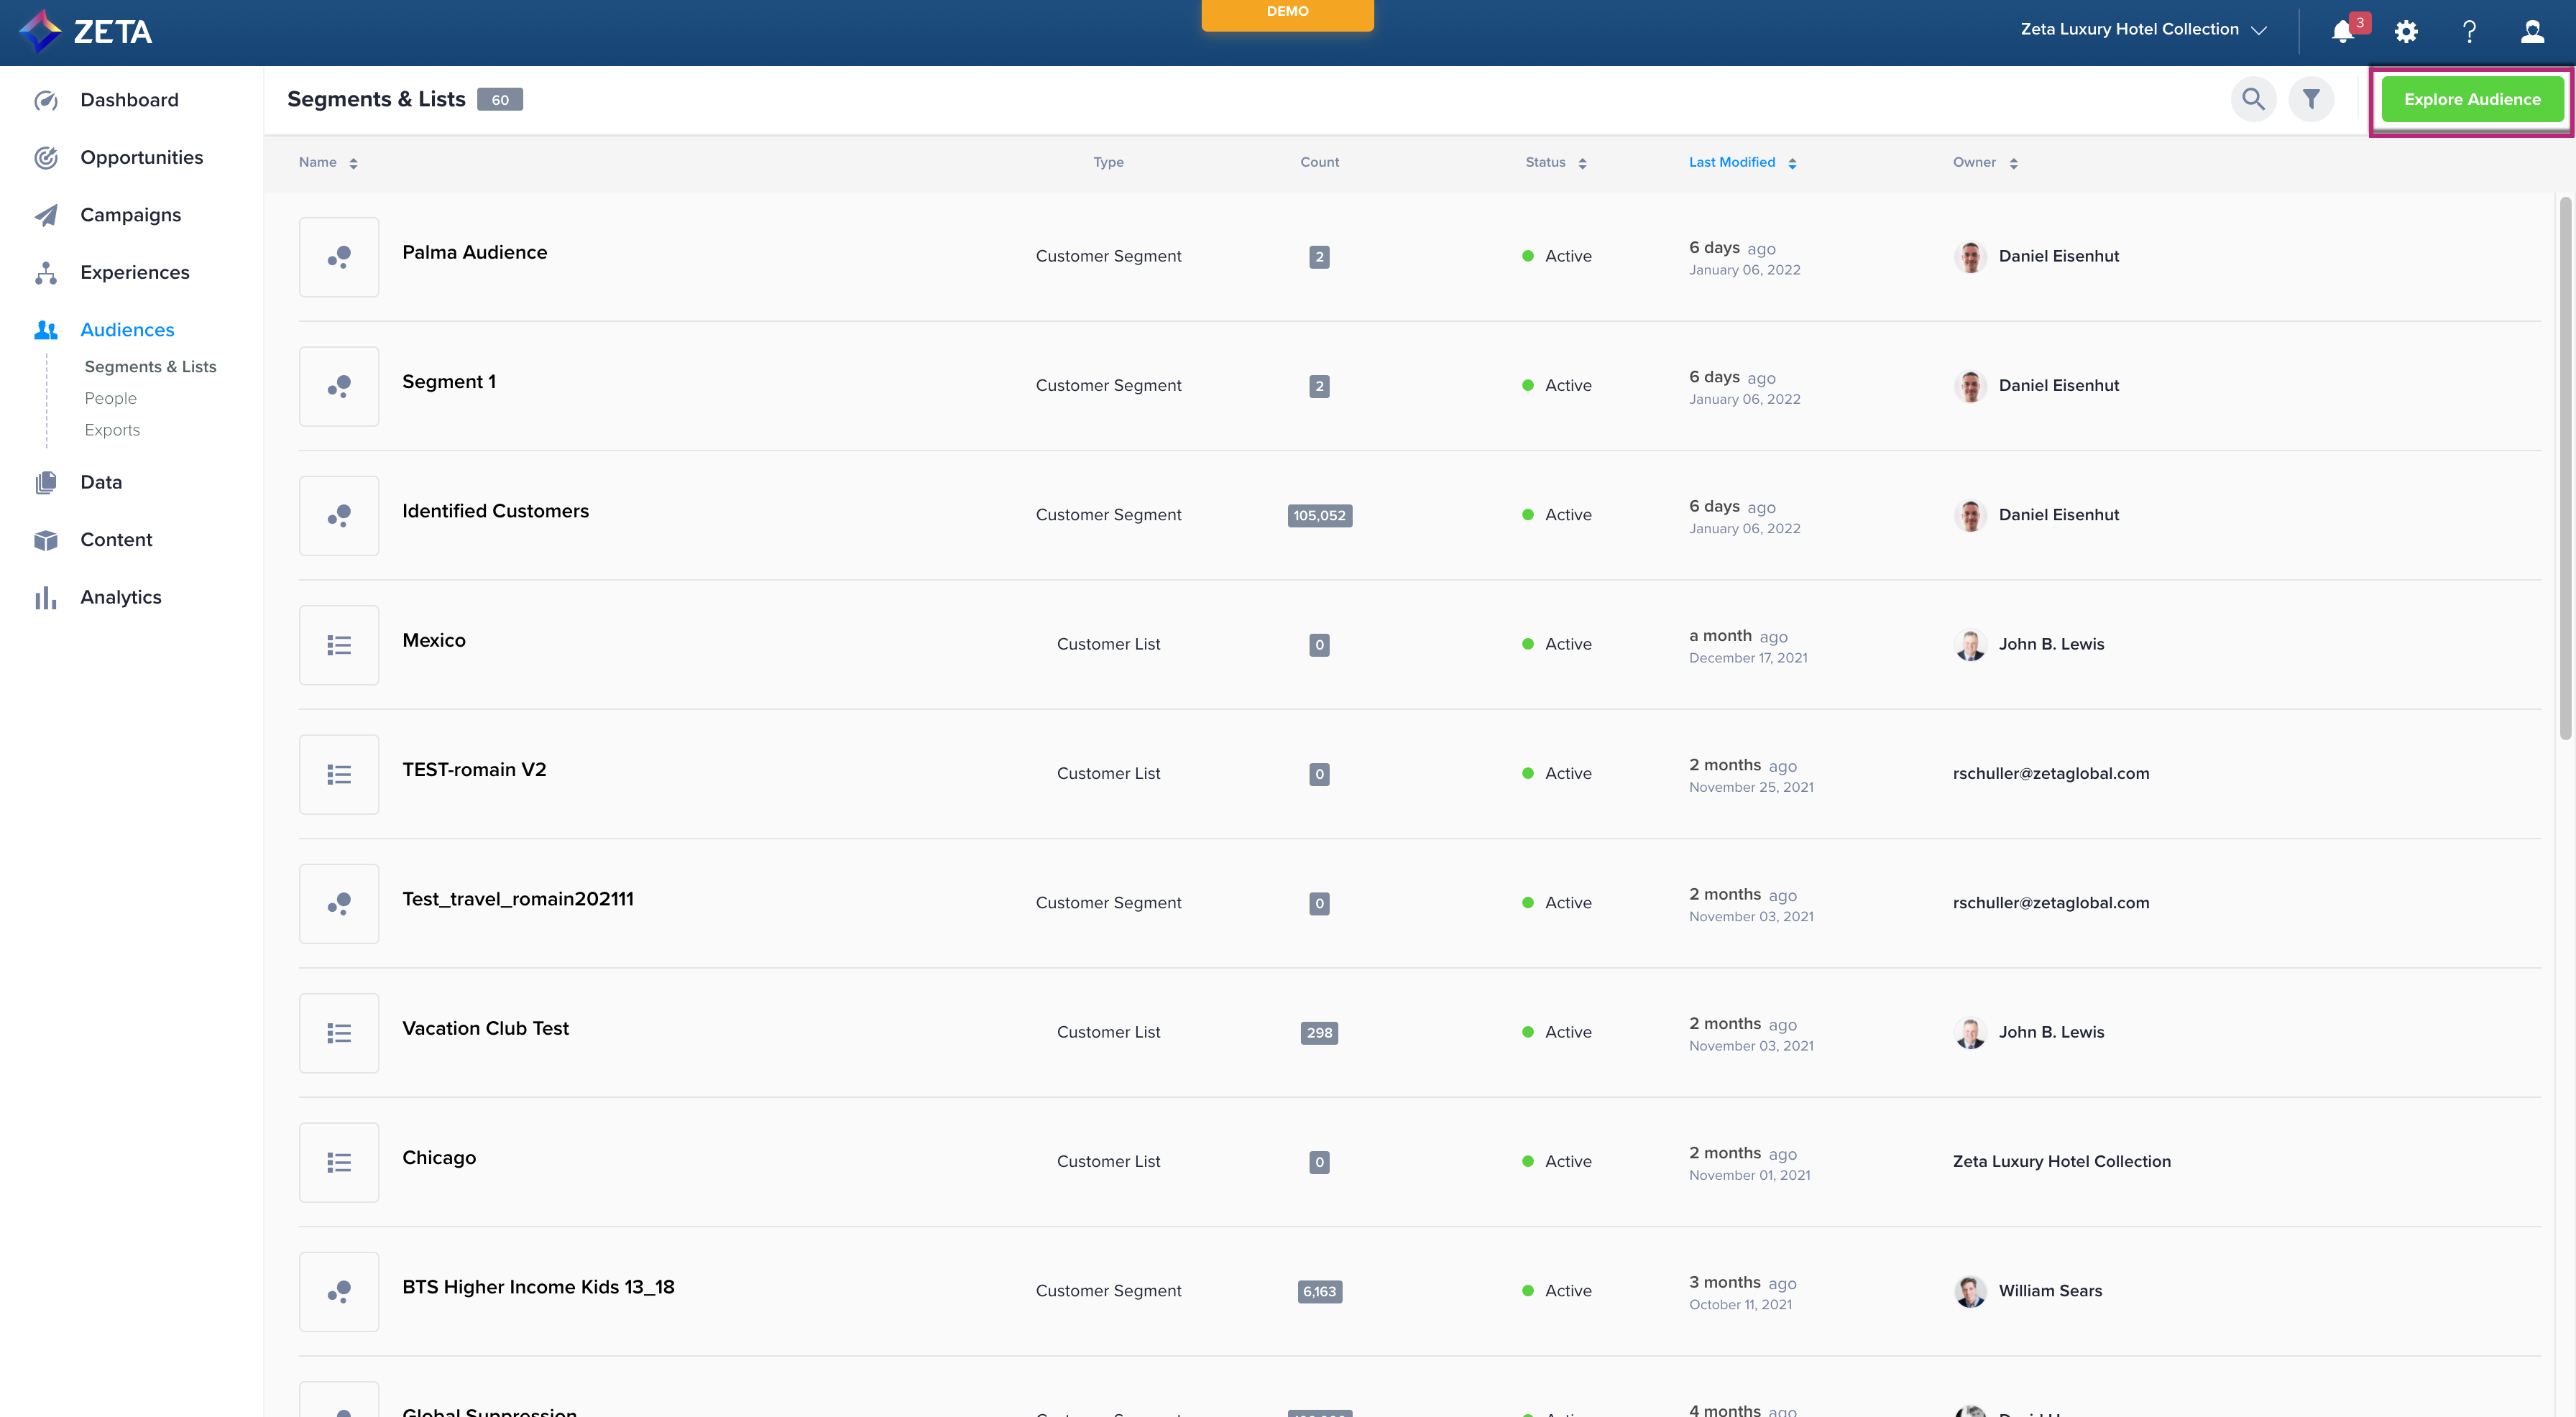
2. Select an audience type under Zeta Prospects.
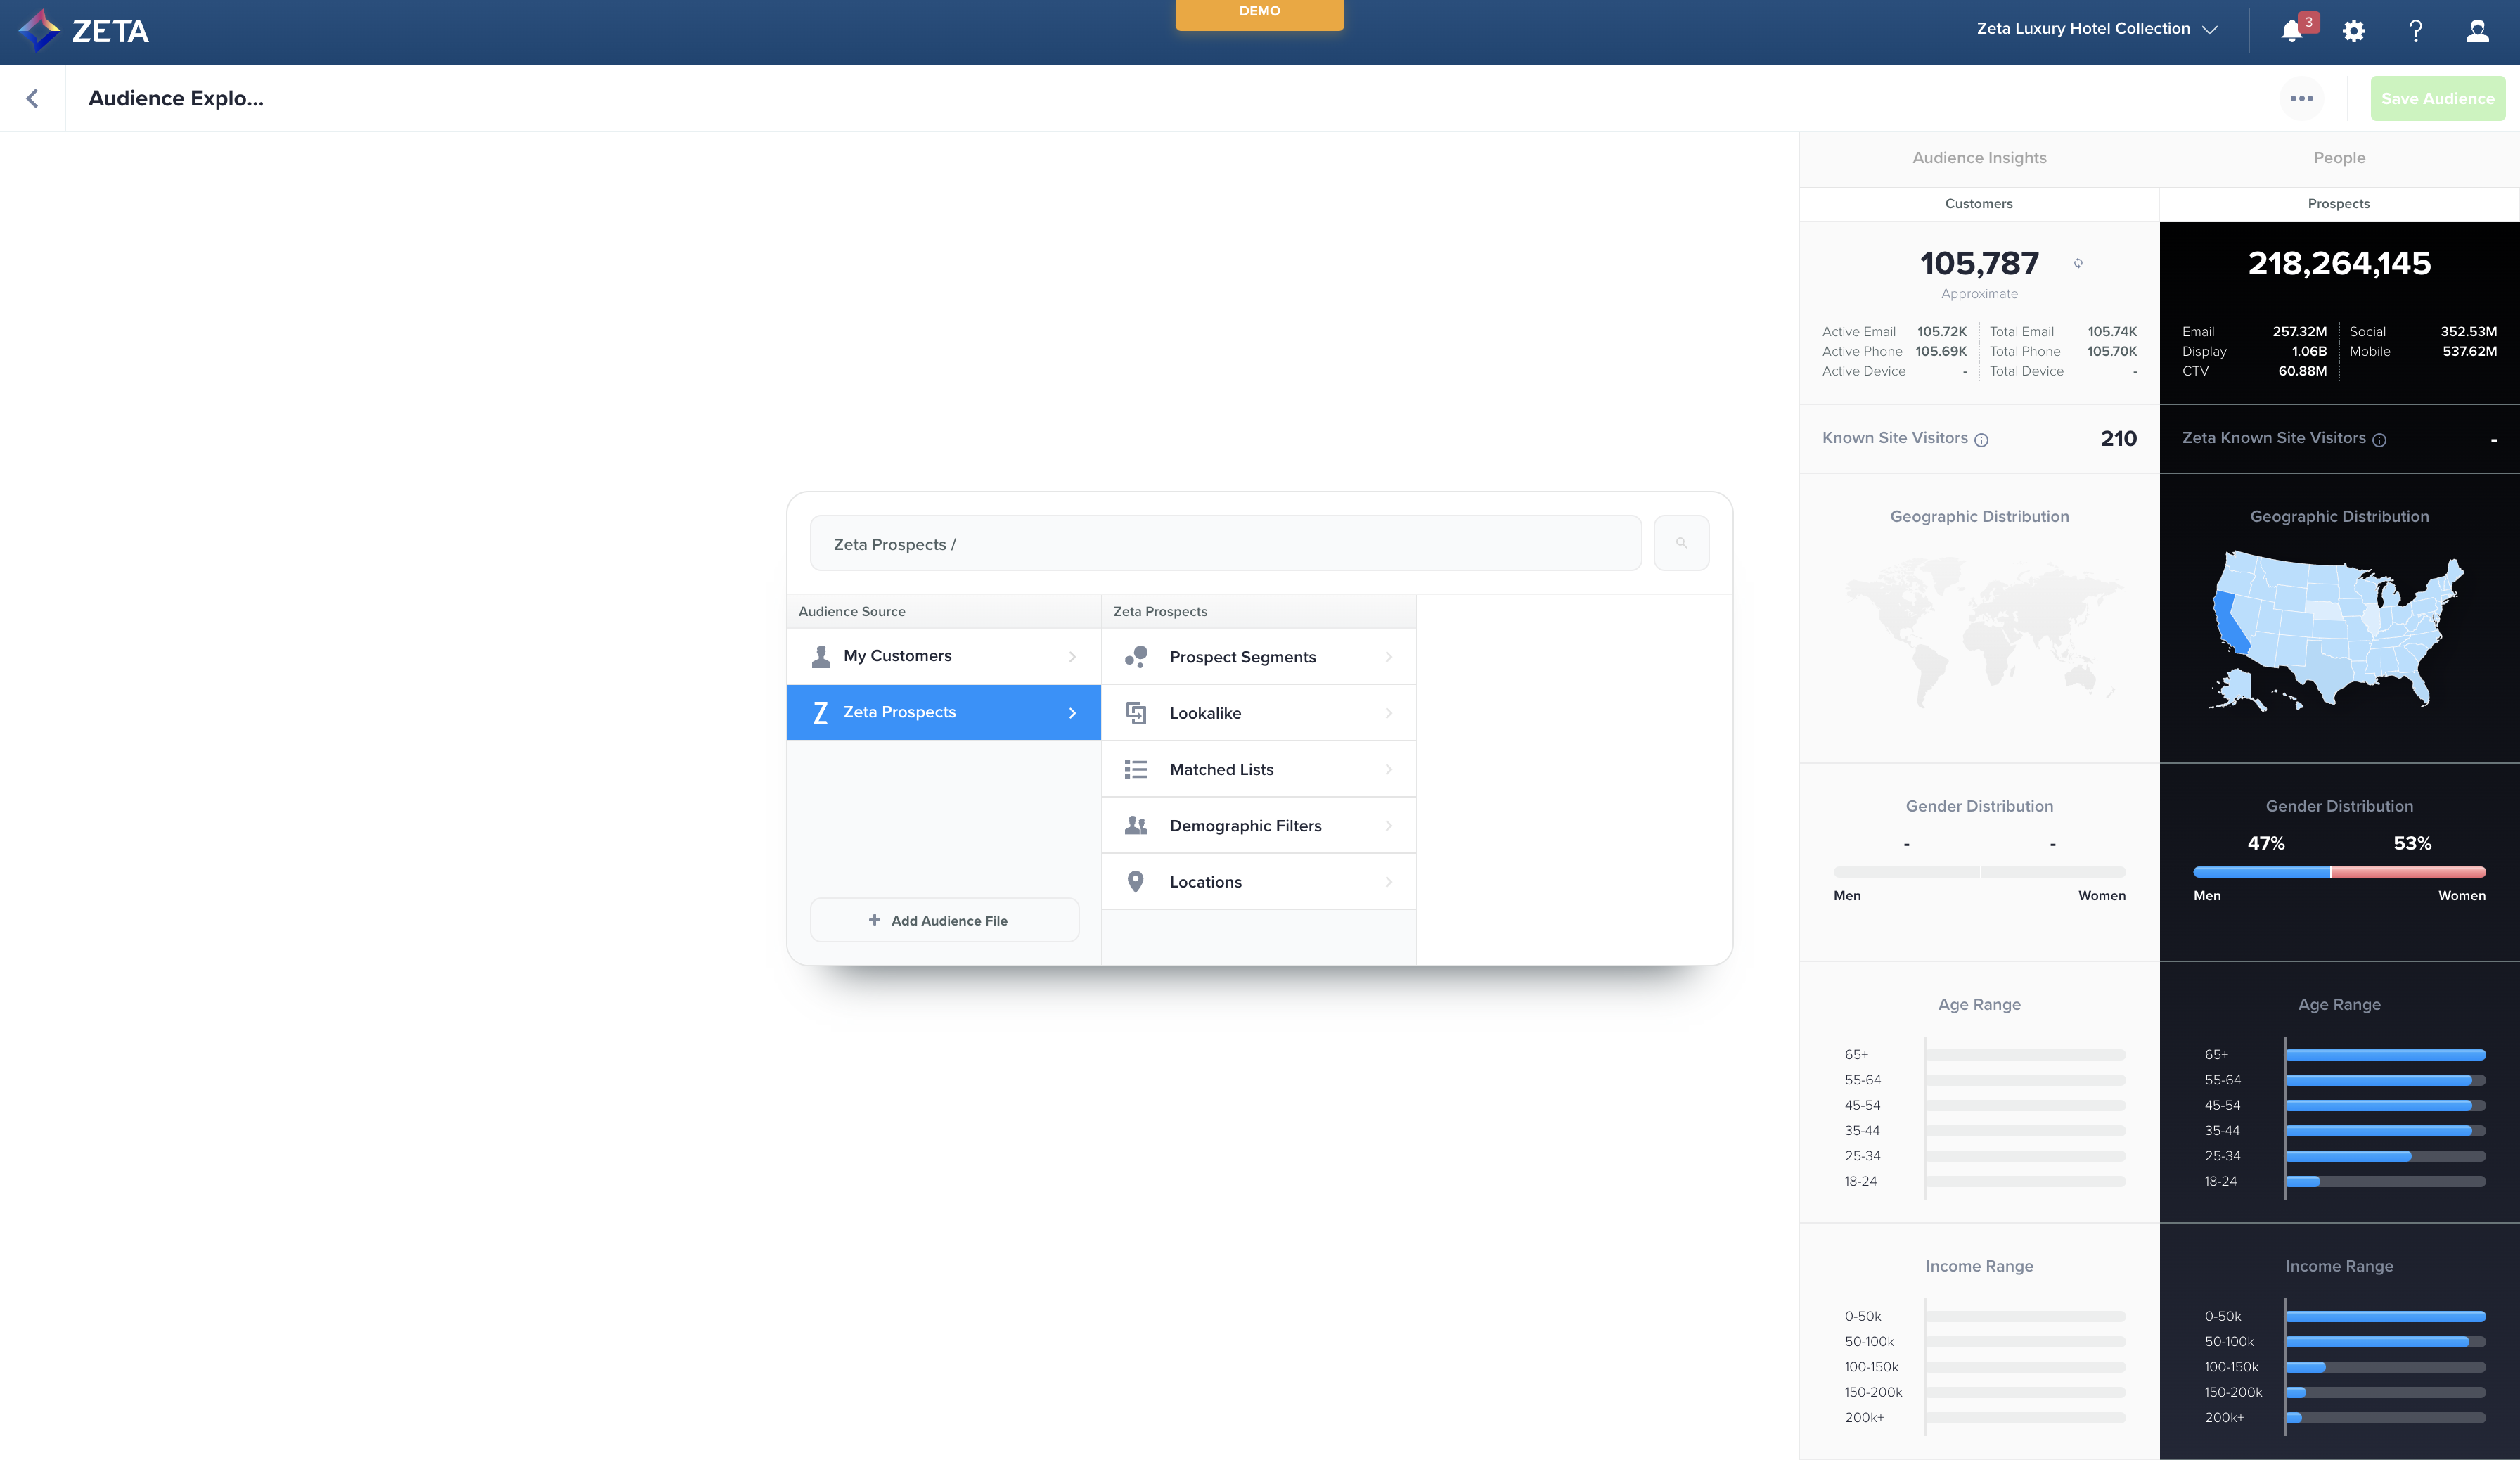
3. Build your audience as you normally would.
In order to export an audience later, you can’t layer on demographic attributes in the Audience Explorer. Talk to your account manager for more info on what can and cannot be exported out of Zeta.
Export an Audience
The process for exporting an audience to a partner destination is standardized across all connectors i.e., Google Ads, Facebook, and any other DSP we add in the future.
1. From Segments & Lists, locate the row of the Prospect audience you wish to export. Click on the three dots on the extreme right and select Export.
2. Within the Connect Audience panel that appears on the right, select Facebook from the list of Available Connectors and click on Next.
3. From the list that appears, select the desired Facebook Account and Facebook Audience you want to export your audience to, and click on Next.
4. Click on Connect to save the export. Turn the Automate Connection toggle on to schedule your export.
.gif?cb=3028e167d2d059ad98f766f4c5e0c6d4)
For refreshable audiences like Prospect Segments, you can choose to export the audience one time or on a recurring basis. You cannot schedule a recurring export for Prospect List, Matched List, or Lookalike because you cannot modify existing items.
You can only export audiences up to 85MM to Facebook. Prospect Audiences will be further matched to email_sha256 identifiers in Data Cloud.
ZMP cannot execute Audience Export against inactive segments (archived/error).
Check Status
Processing audiences can take up to 48 hours depending on its size. There are 2 phases to the connector — uploading from the ZMP and downloading to Facebook. You can check the status on either side of the connector on each platform.
In ZMP
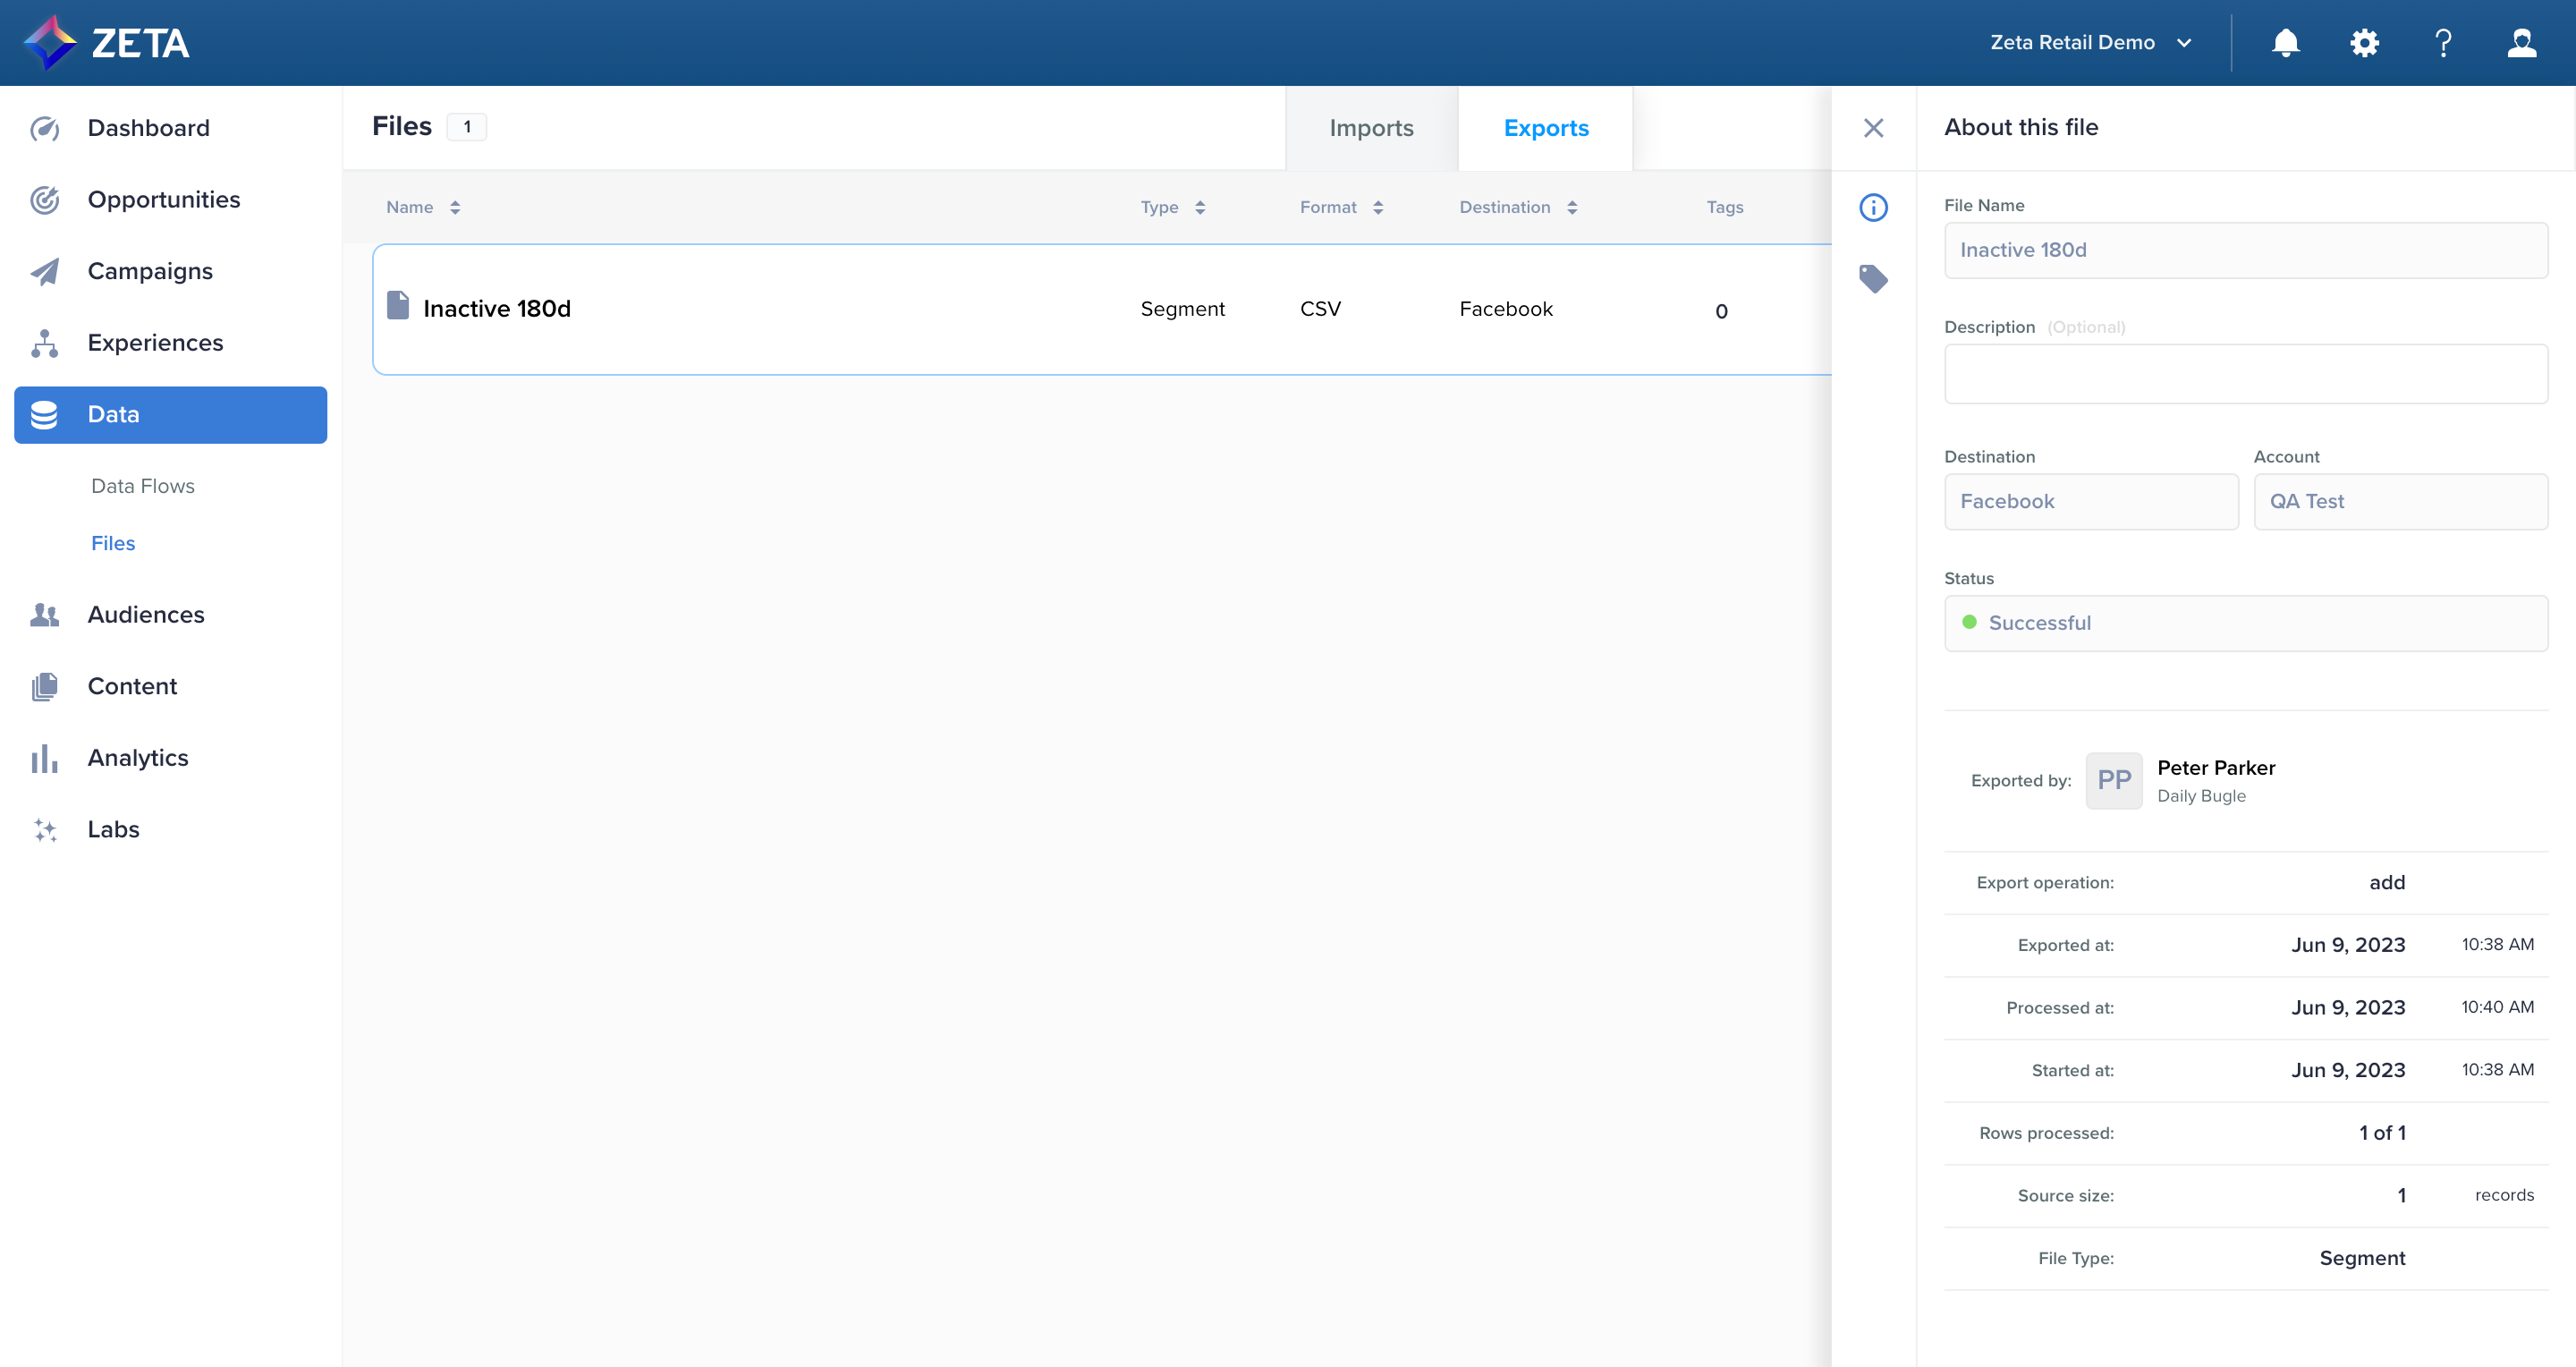
1. Click on Data on the left-hand navigation to open the Files page.
2. Under the Exports tab, locate your file and check its status.
3. Click on the particular row to reveal the data about the connector task, such as timestamps for exporting and processing. If successful, the Processed at timestamp should match with what’s shown in Facebook such as the account the audience belongs to and the timestamps for exporting and processing.
|
Status |
What it Means |
|---|---|
|
Connector in progress |
This status represents the period during which the export is in progress |
|
Successful |
This status represents the successful completion of the export |
|
Failed |
This status represents the unsuccessful completion of the export |
In Facebook
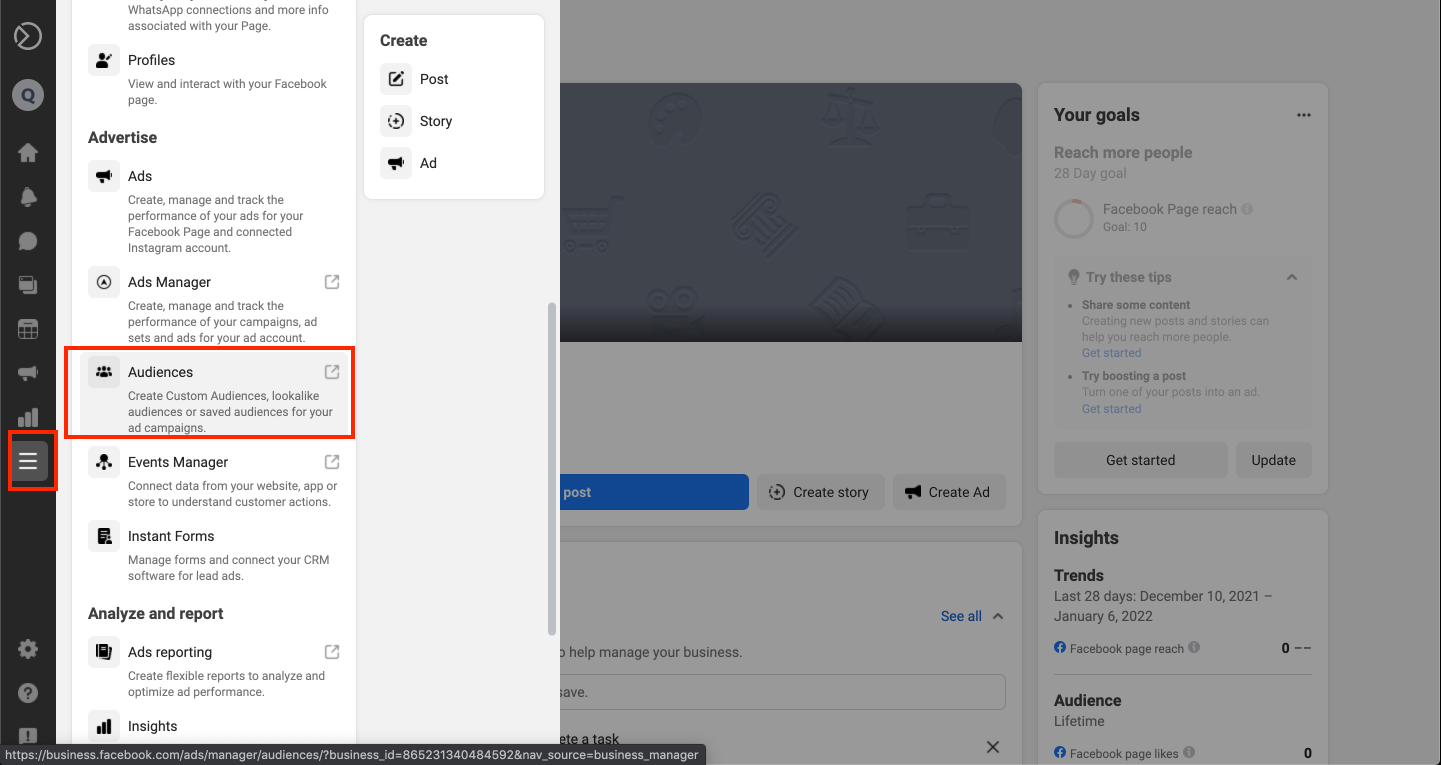
1. Log in to Facebook Business and navigate to the correct sub-account for your client.
2. Navigate to All Tools > Audiences to open the audiences section of Ad Manager.
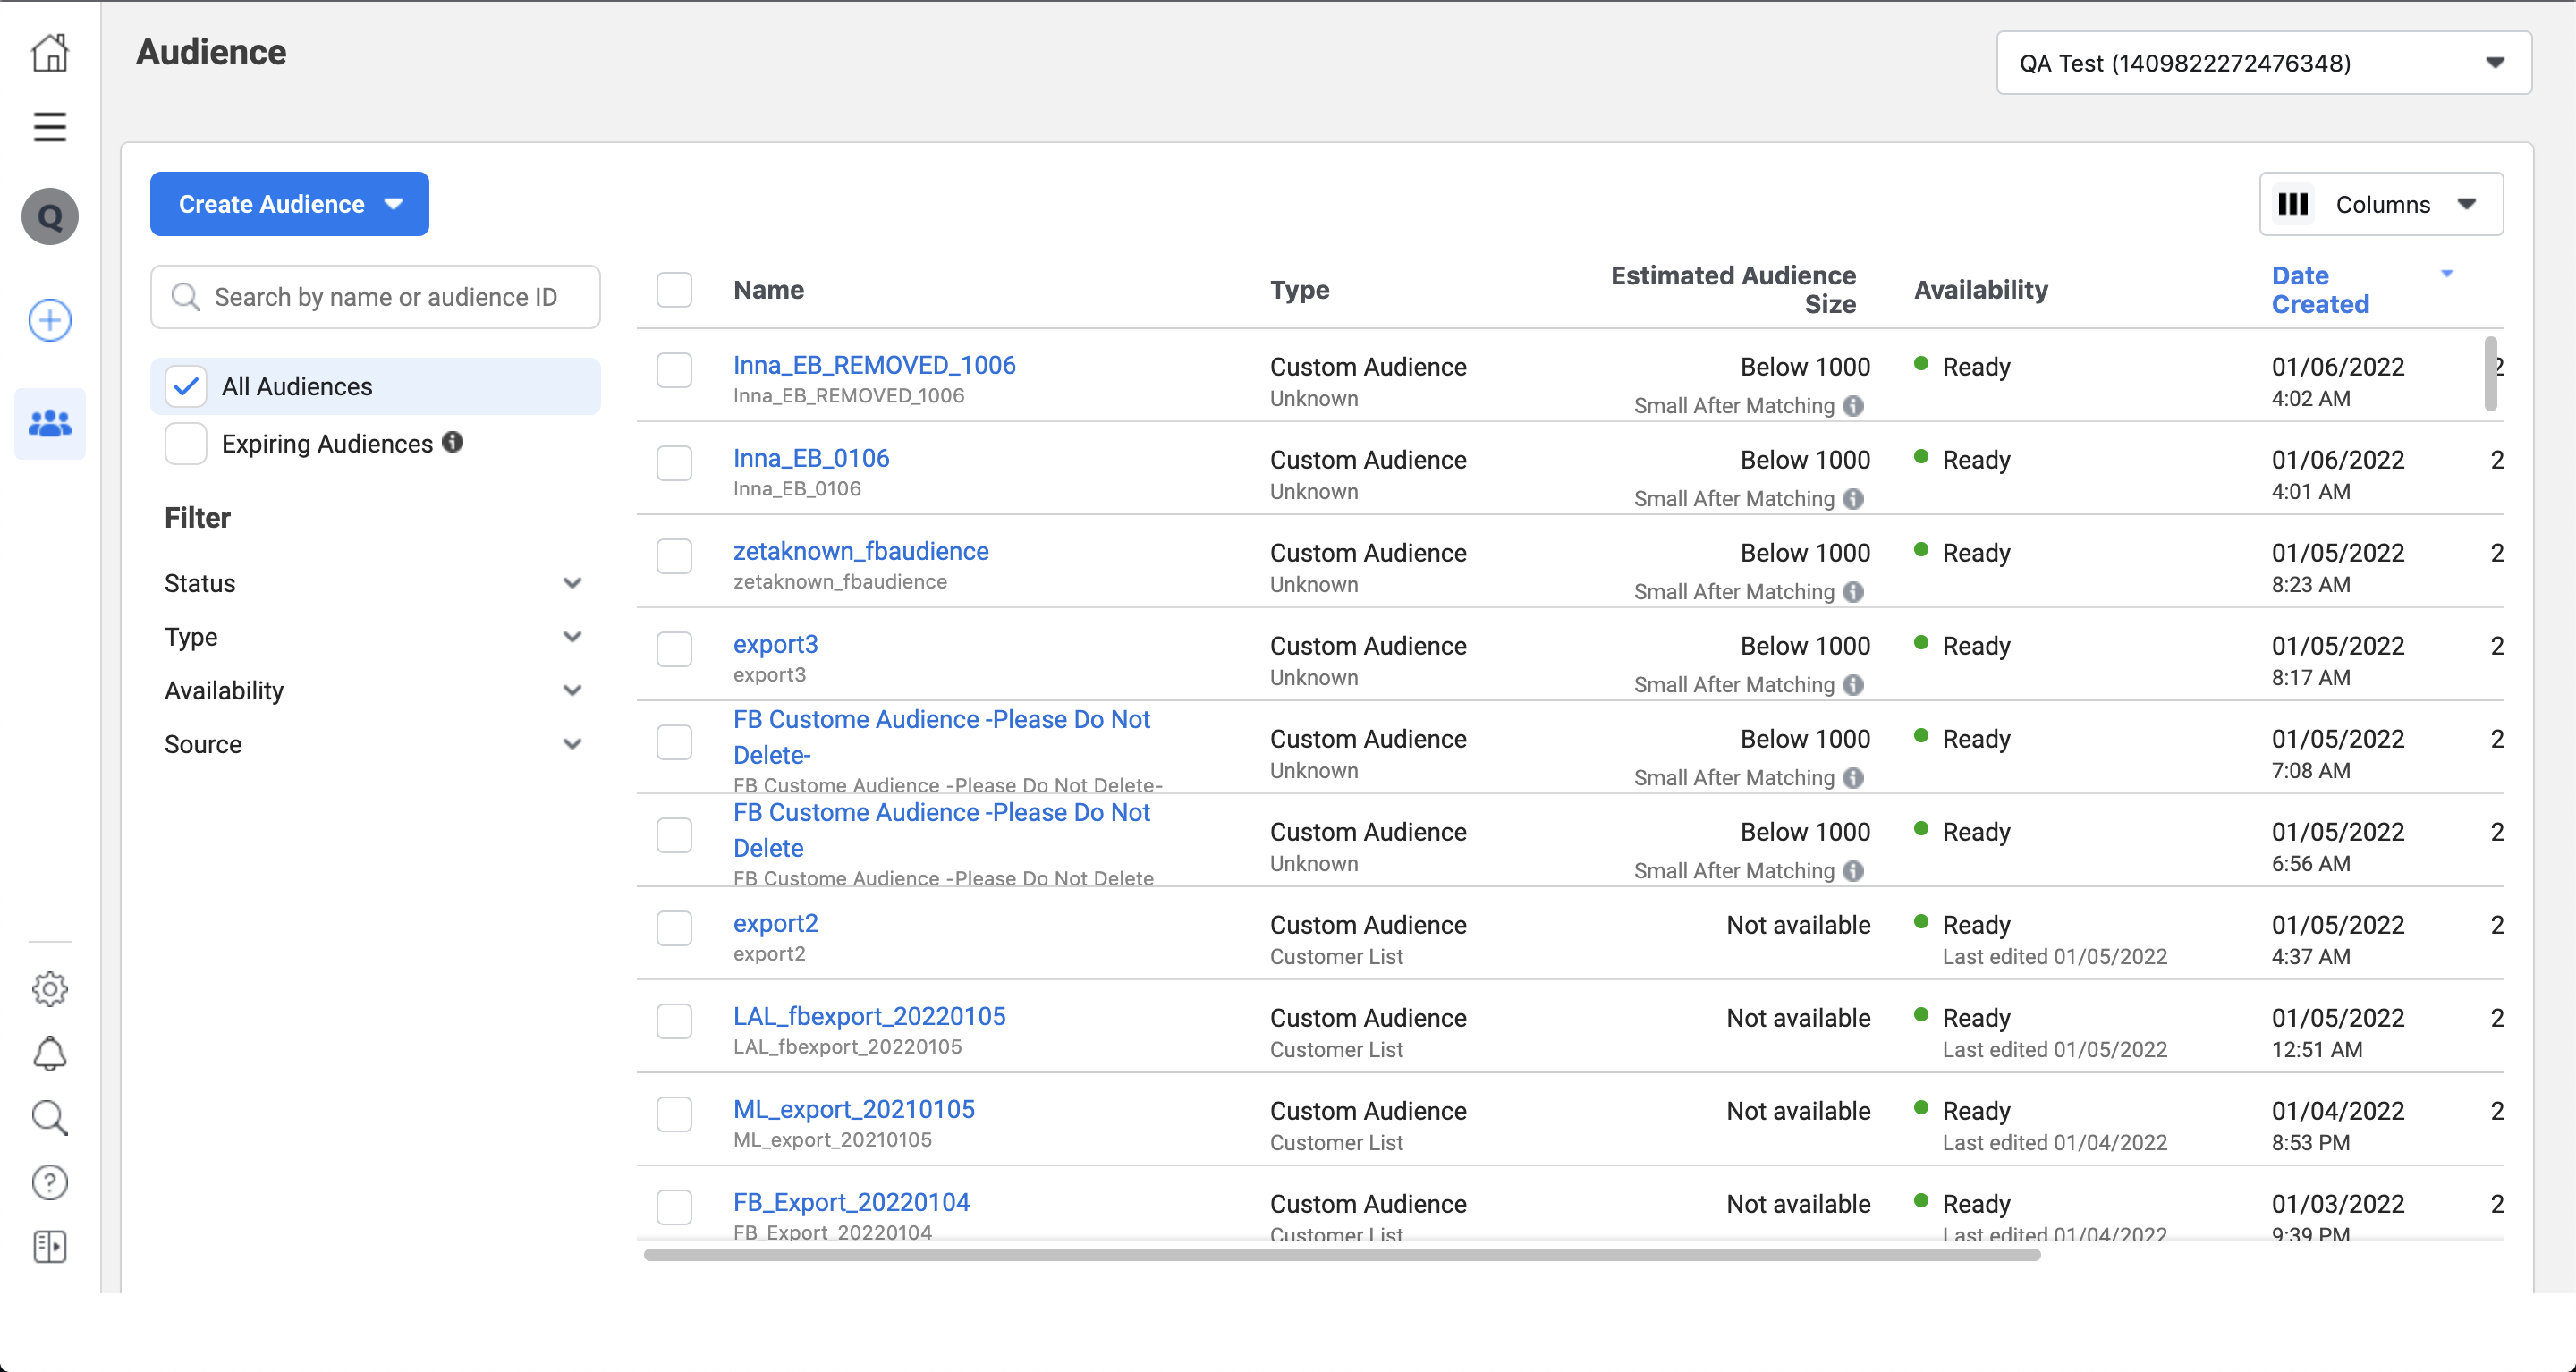
3. Search for the custom audience you either created or added from the ZMP.
Using Meta Lead Ads
Learn more about Meta Lead ads.
In addition to sending audiences from ZMP to Facebook, you can also instrument lead ads on Facebook and Instagram that can take user data and send it back to ZMP. This feature is available as soon as you authenticate your Facebook account (as demonstrated earlier in this article) and add Facebook pages to your ZMP account.
In Facebook Ads Manager, create a new Lead ad and select the Facebook Page with which you want to publish the ad. Instagram accounts can be attached to Facebook Pages, which is how you can use Instagram ads to send lead data back to ZMP.
We don’t support Instagram accounts that are not part of a Facebook Page.
Testing your Connection
To verify your Lead ads connection,
1. Navigate to Business Settings > Integrations > Leads Access. Select CRMs.
2. Verify Zeta Hub appears under Connected CRM apps.
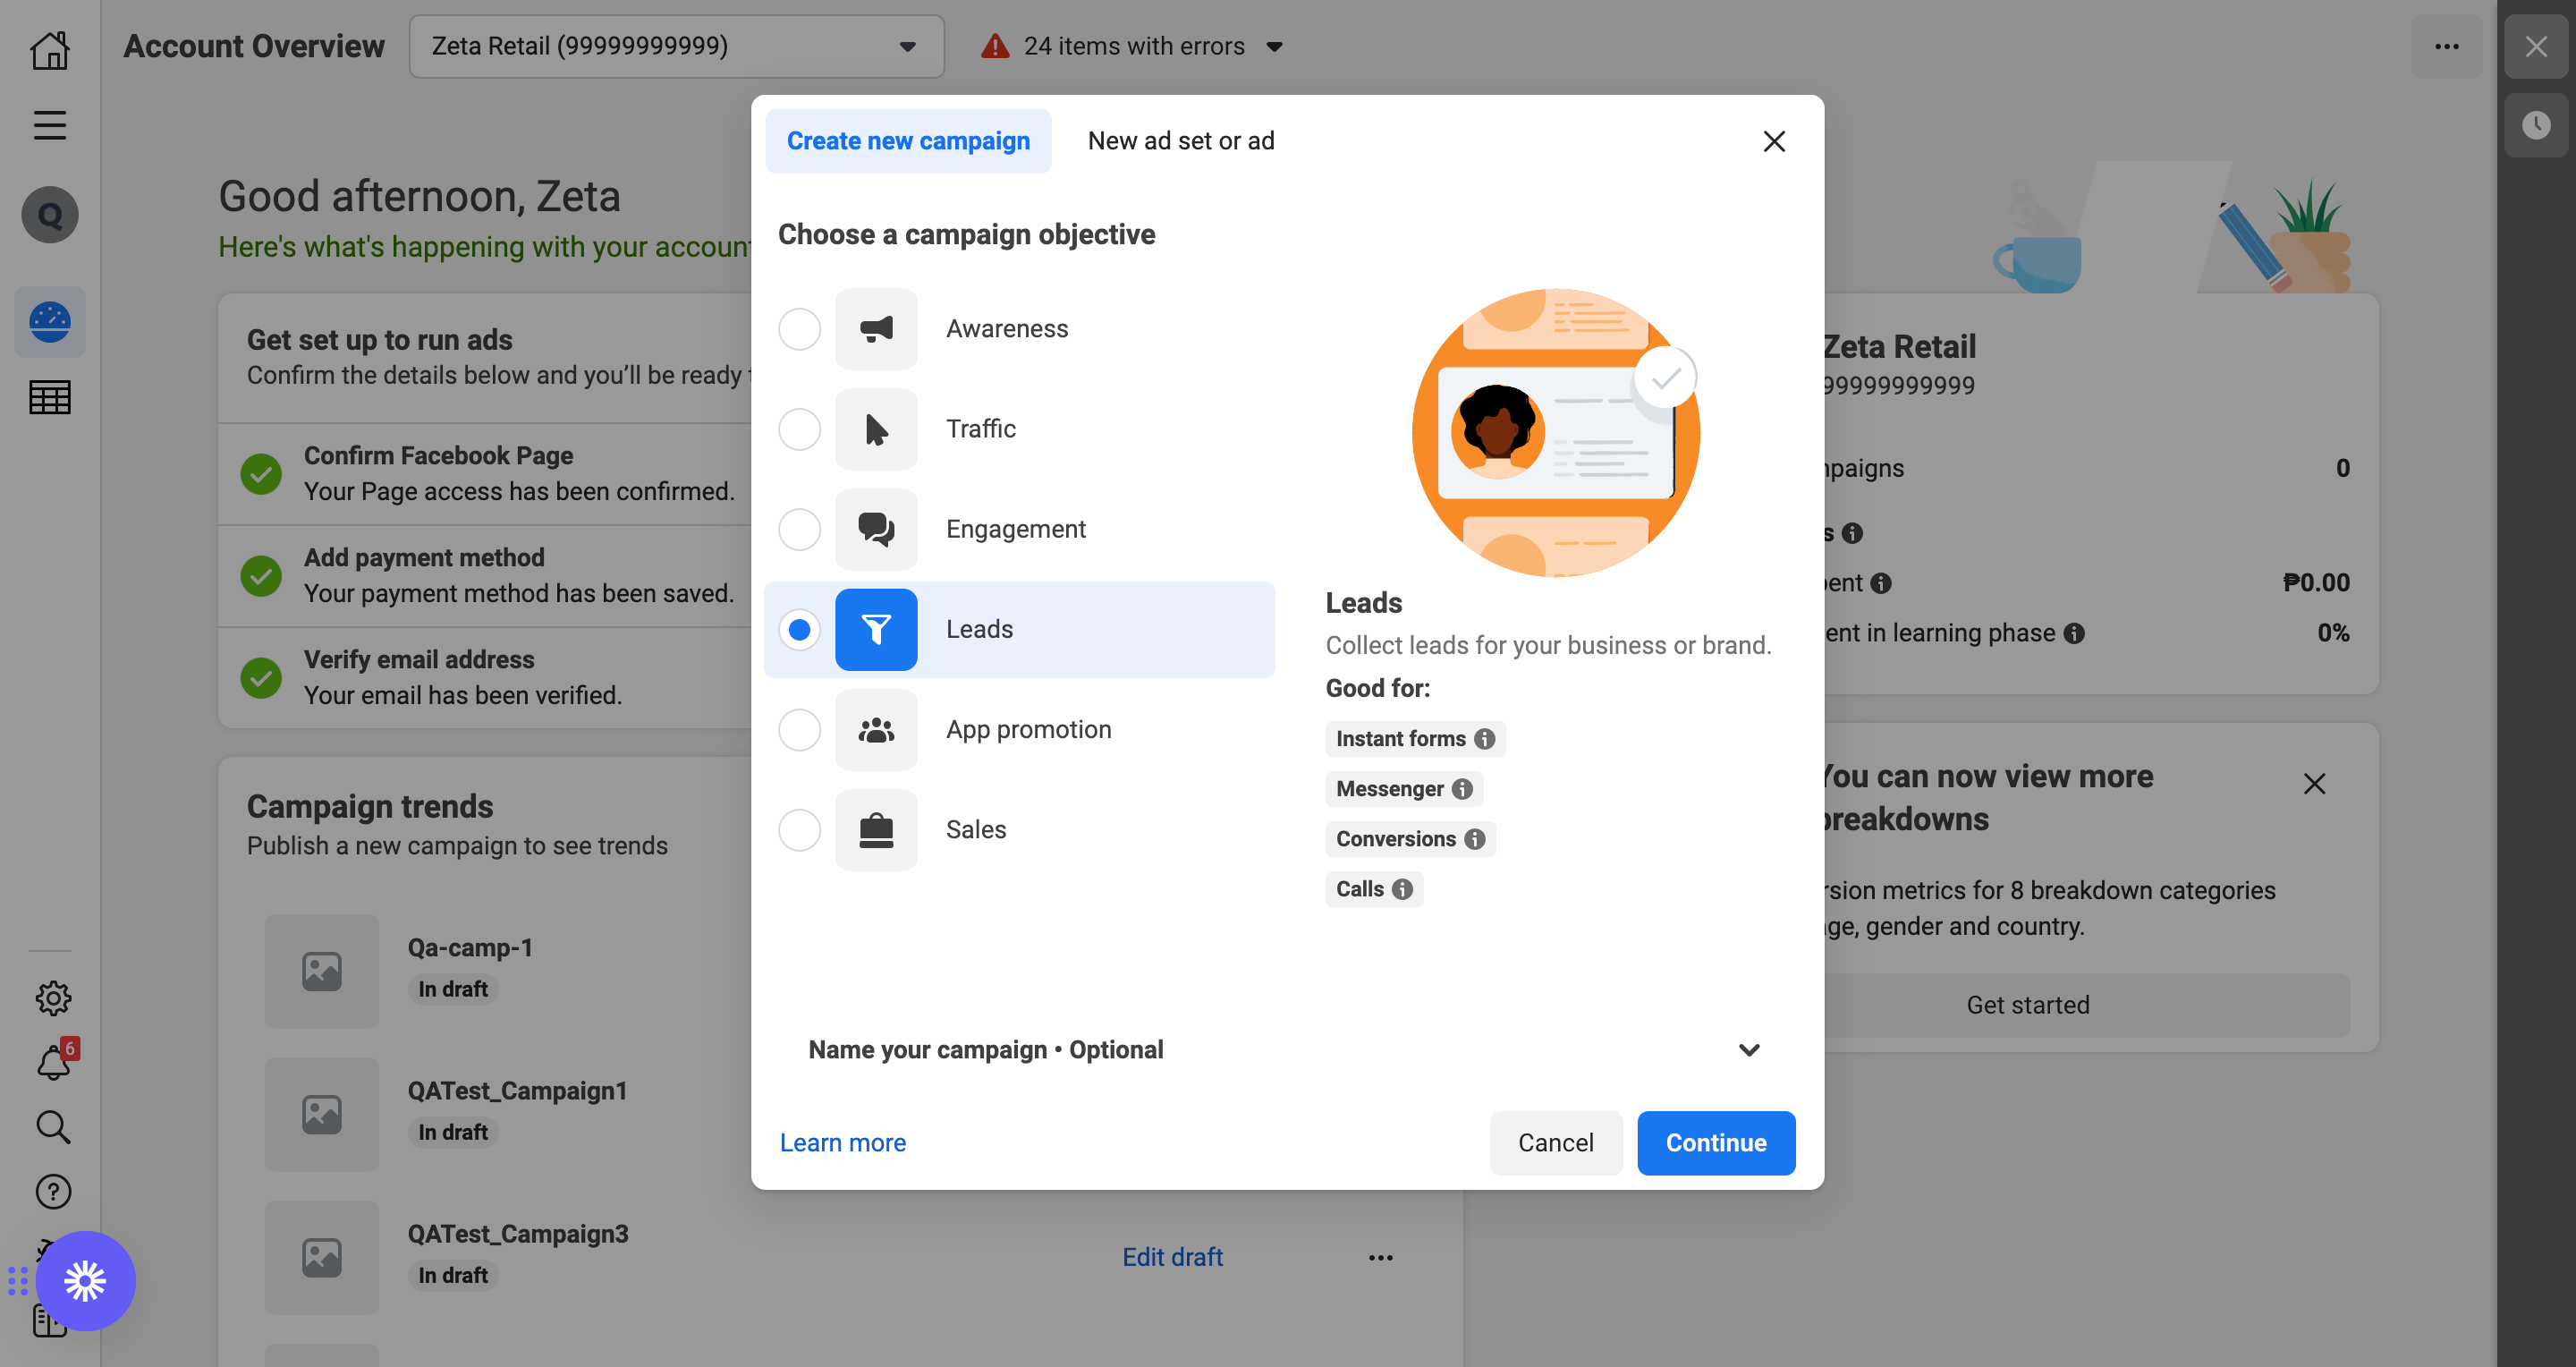
3. Navigate back to Ads Manager to create your ad and create a Leads campaign in Ads Manager.
4. Once the campaign is created, navigate to the Lead Ads Testing Tool. Here, you can create a test form and verify that the information gathered in this form is pushed to ZMP via the facebook::lead_submitted event.
5. You can check the event and its payload by visiting Experiences > Events and searching for facebook::lead_submitted.
6. Once you turn on your campaign, you can look up newly submitted leads on the Events page as well as on the People page since each new lead should create a new profile in ZMP based on the form’s User ID. If a submitted User ID already exists, then the profile will simply update with the new lead data.
While this page walks you through Facebook Connector for Prospects, the Customer Version of this feature already exists in the ZMP.
|
If you get this error message: |