Every experience starts with a trigger node, which is how you set the actionable criteria for people to enter your workflow. Most triggers listen for events to happen in real time, so people who qualify by doing those events enter the experience asynchronously. For other batch use cases, you can configure a specific audience made up of your segments and lists.
If you want to add even more requirements on top of the trigger node, you can configure Entrance Criteria in the Build panel to further restrict who enters your experience based on past entrances and segment membership.
Creating Your Experience
You can create experiences from scratch, from a template, or by duplicating an existing experience. We’ll walk through creating one from scratch.
1. From the Experiences page, click on New Experience to open a new canvas.
2. Give your experience a unique name and optional description. Click the button to show a list of all available trigger nodes.
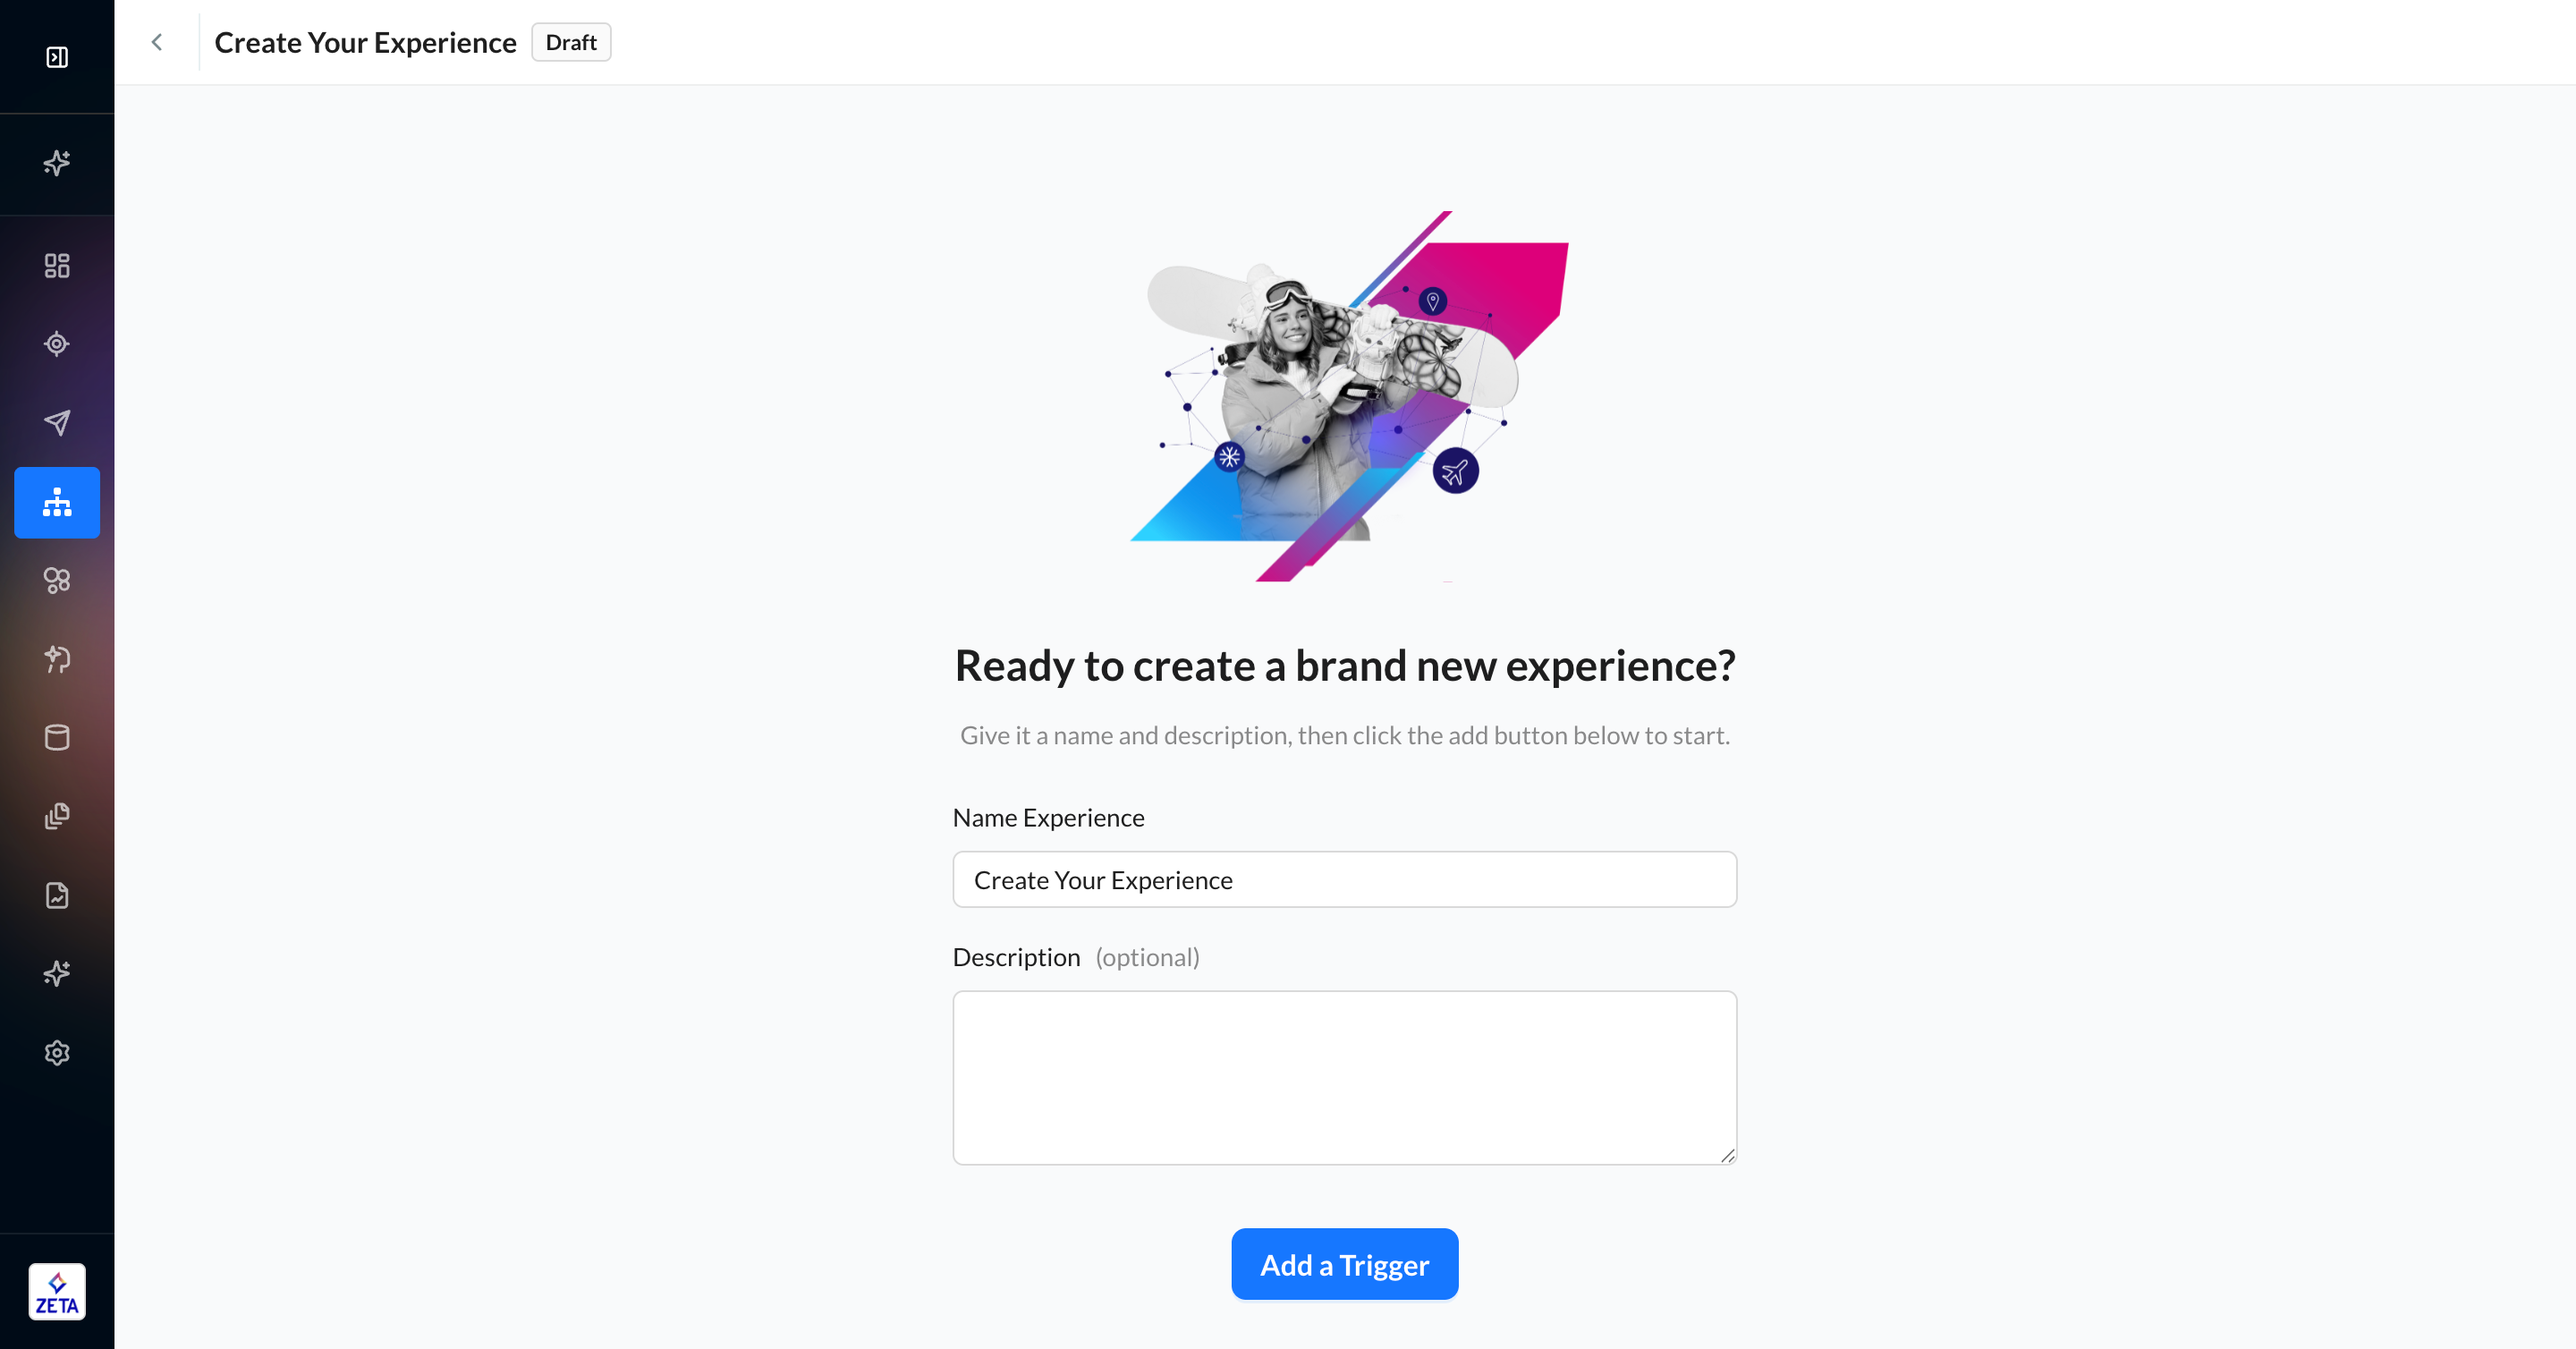
3. Select a trigger and configure it to your experience’s unique needs.
.png?cb=bf247318d6d47df90e513ce1800d0b35)
4. Click on Add to Experience to create your experience. You can then add Event, Delay, Action, and Split nodes to build out your workflow.
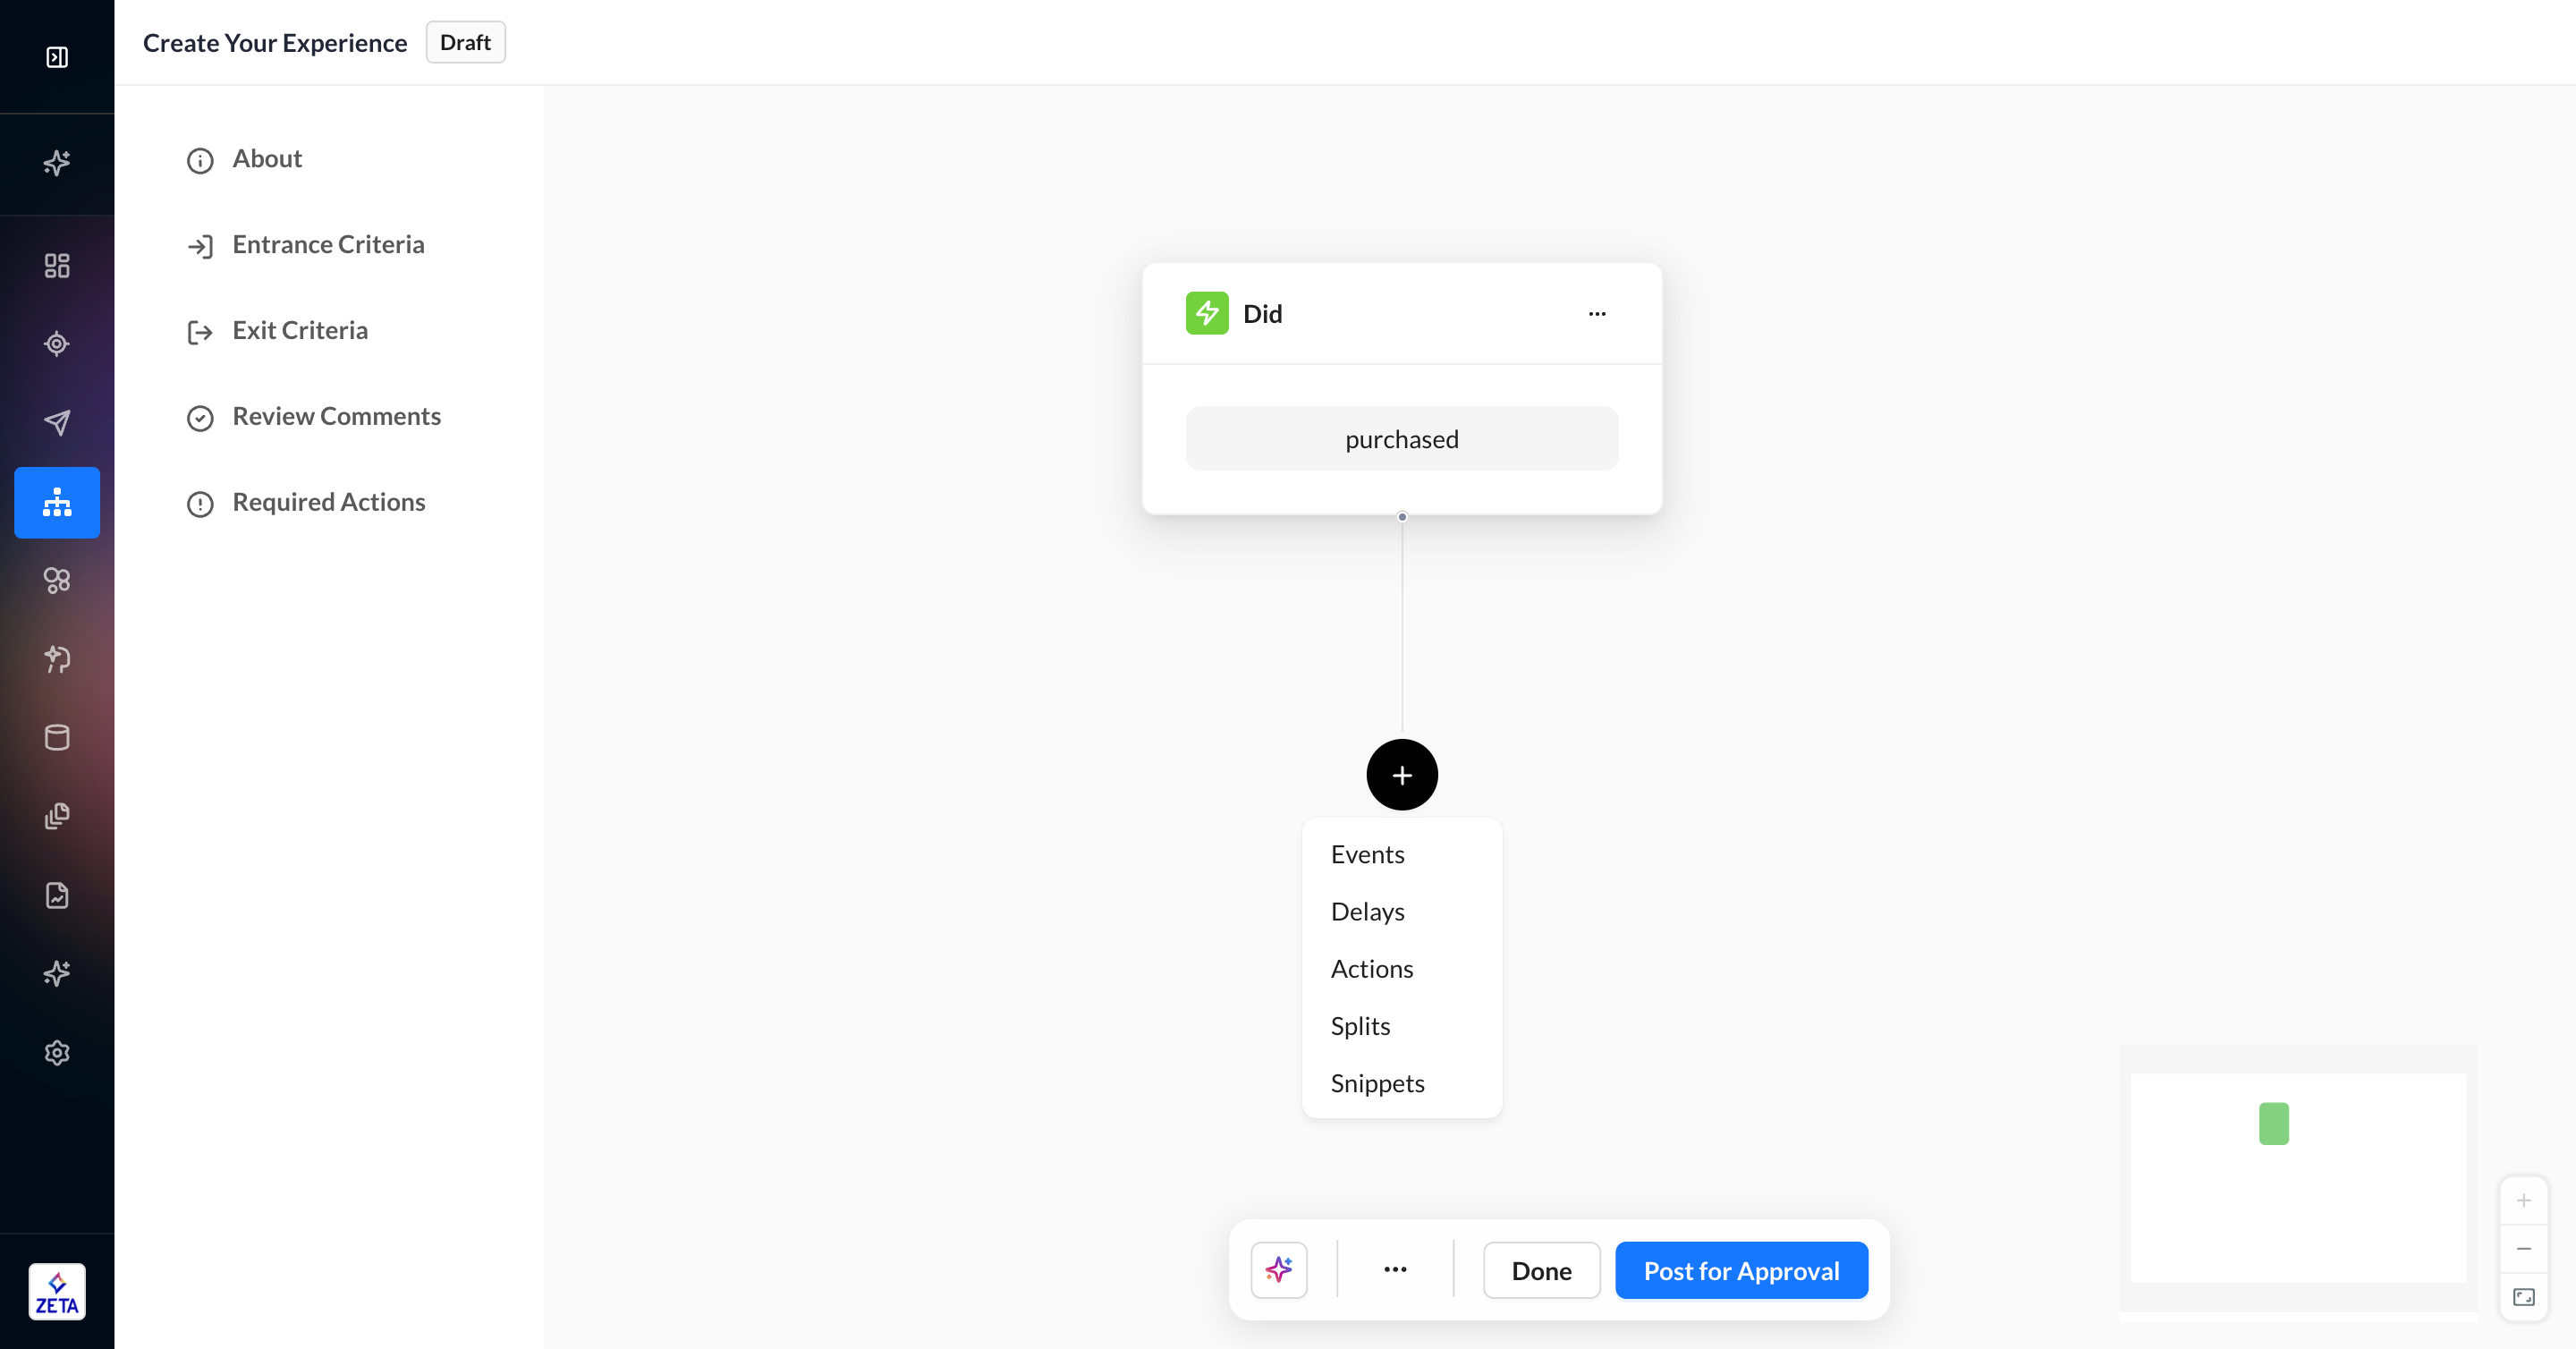
Continue reading to learn more about each trigger node type.
The Track unknown people toggle is available as a separate feature. Talk to your Account Manager to learn more about Support for Unknown Users.
Account Events
Learn More about how to set up custom events for your account.
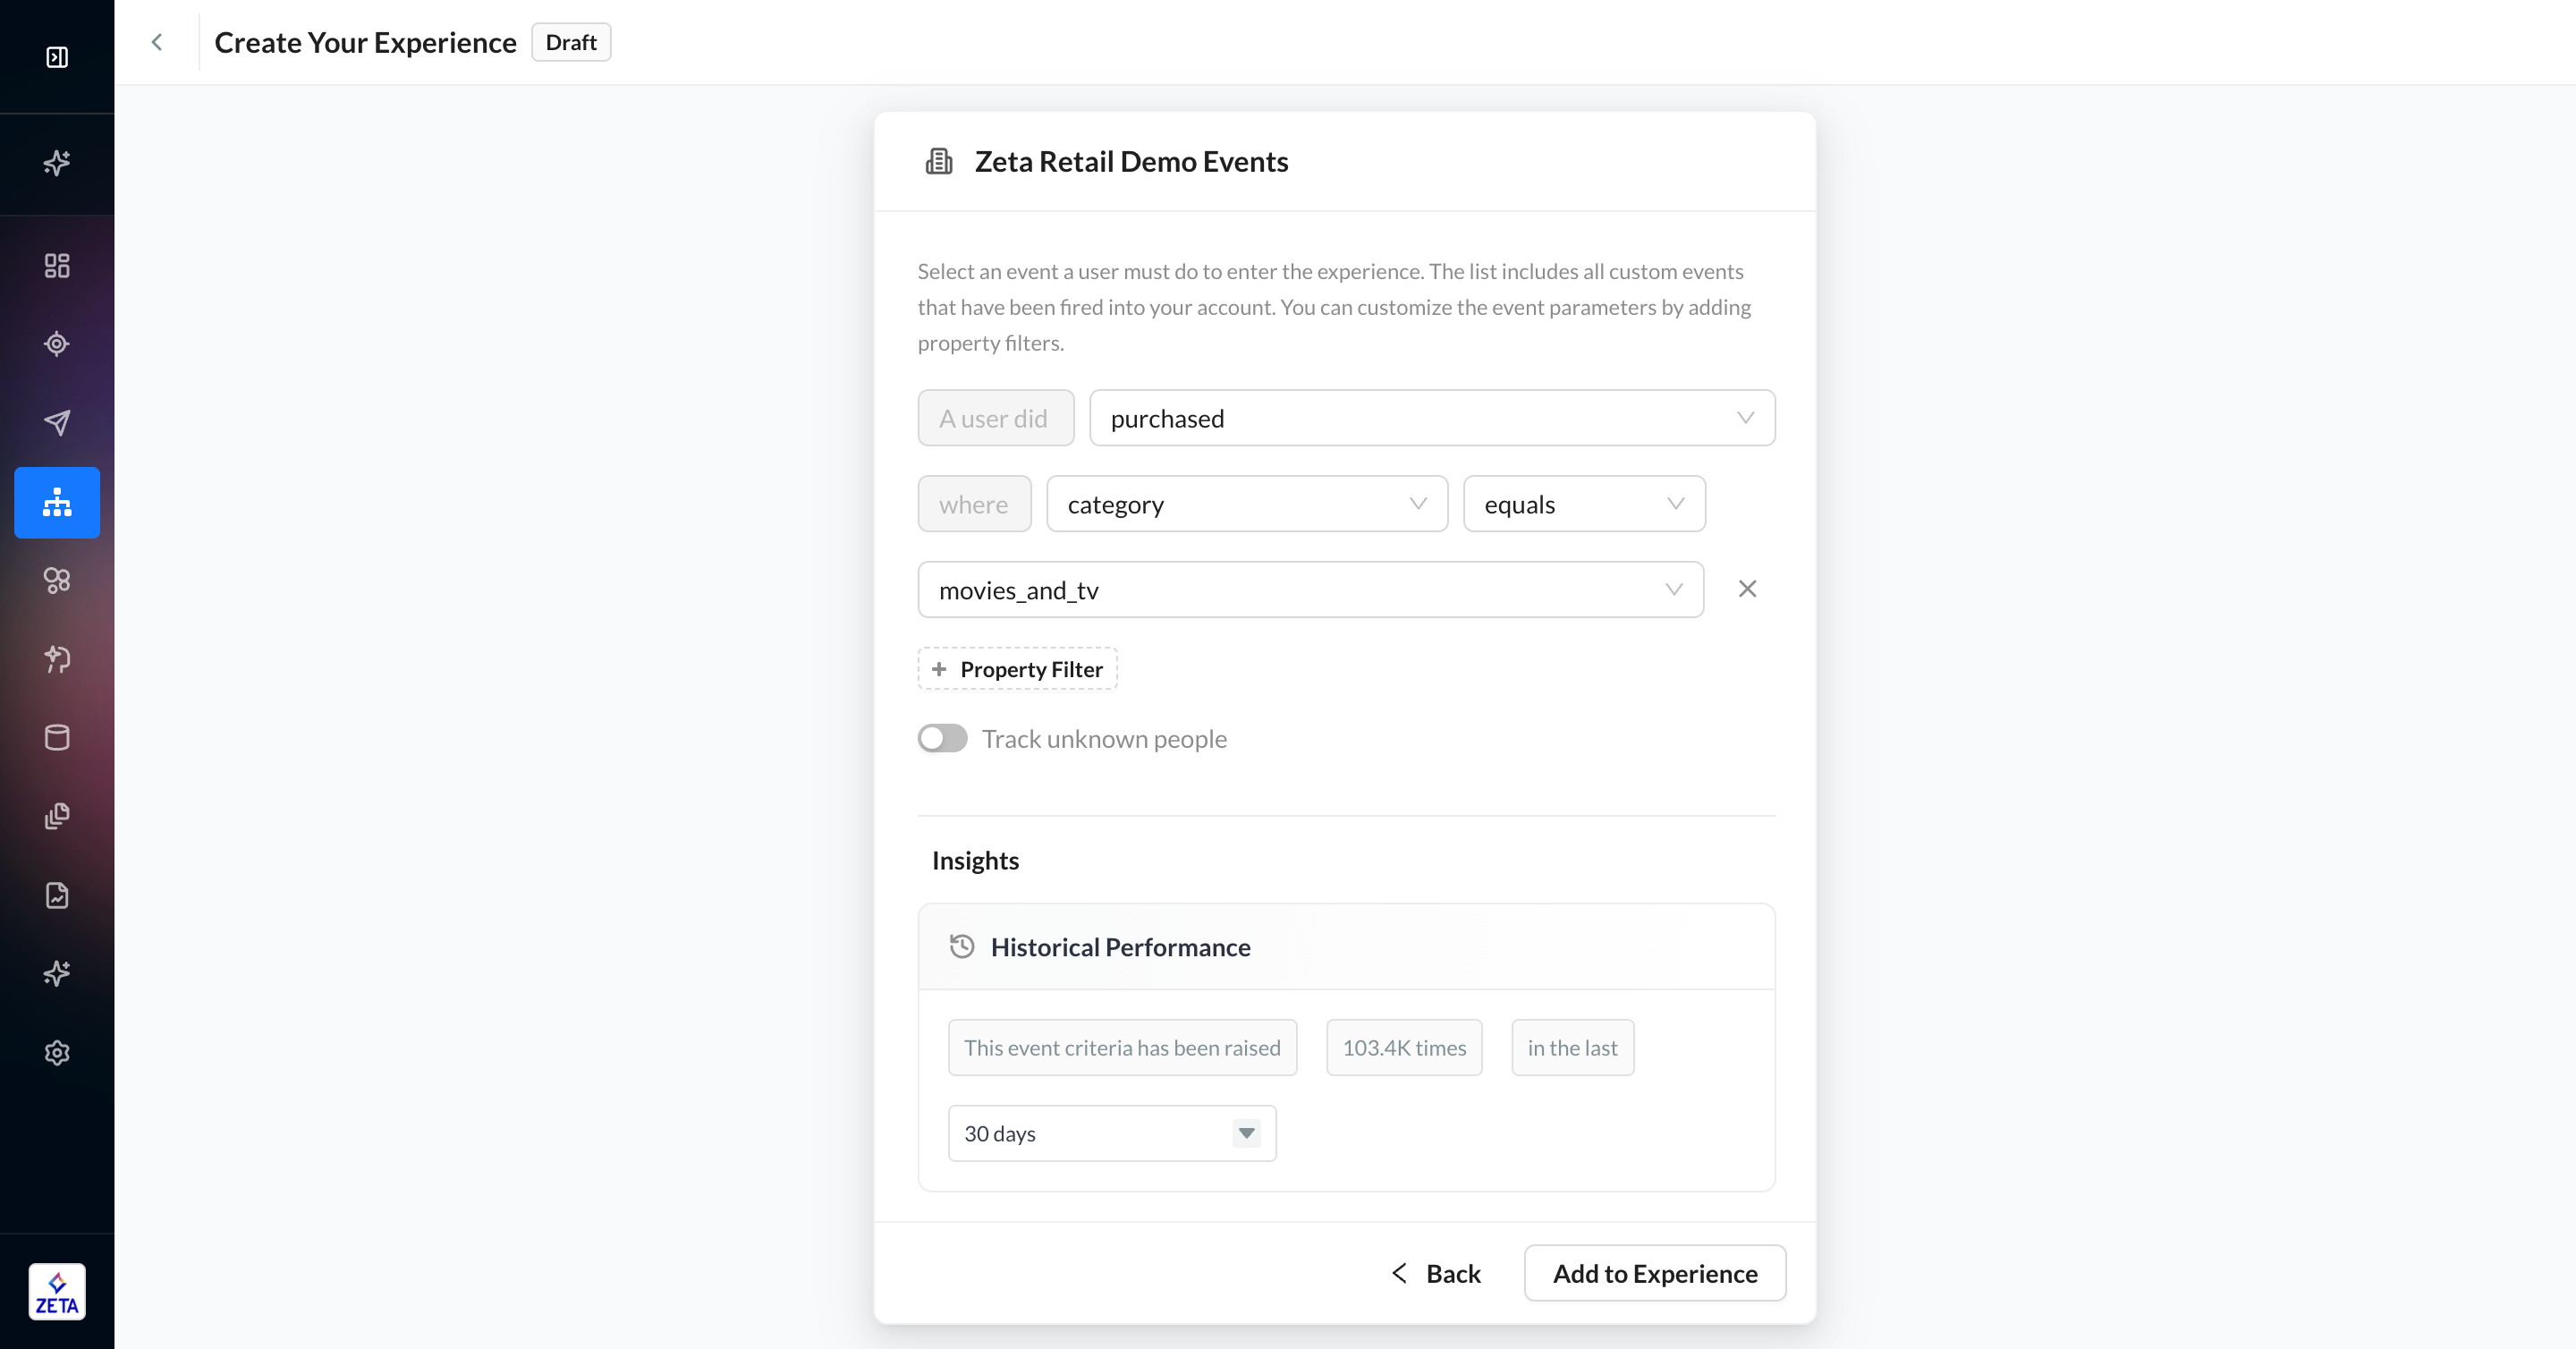
Account events refer to actions that your users are taking — signups, purchases, page views, and more. Any events you can configure to be sent to ZMP can be found in the Account Events trigger type. This is displayed as [Your Account Name] Events.
1. From the trigger panel, select [Your Account Name] Events.
2. By default, the operator is set to A user did. You can select Did Not or Did or Did Not in the events node later in the experience.
3. Select the event for which you want to trigger the experience. An event must be fired at least once into ZMP in order for it to appear in this list. This list also includes system events, such as Experience Entered, which are standardized, and you don’t need to configure them yourself.
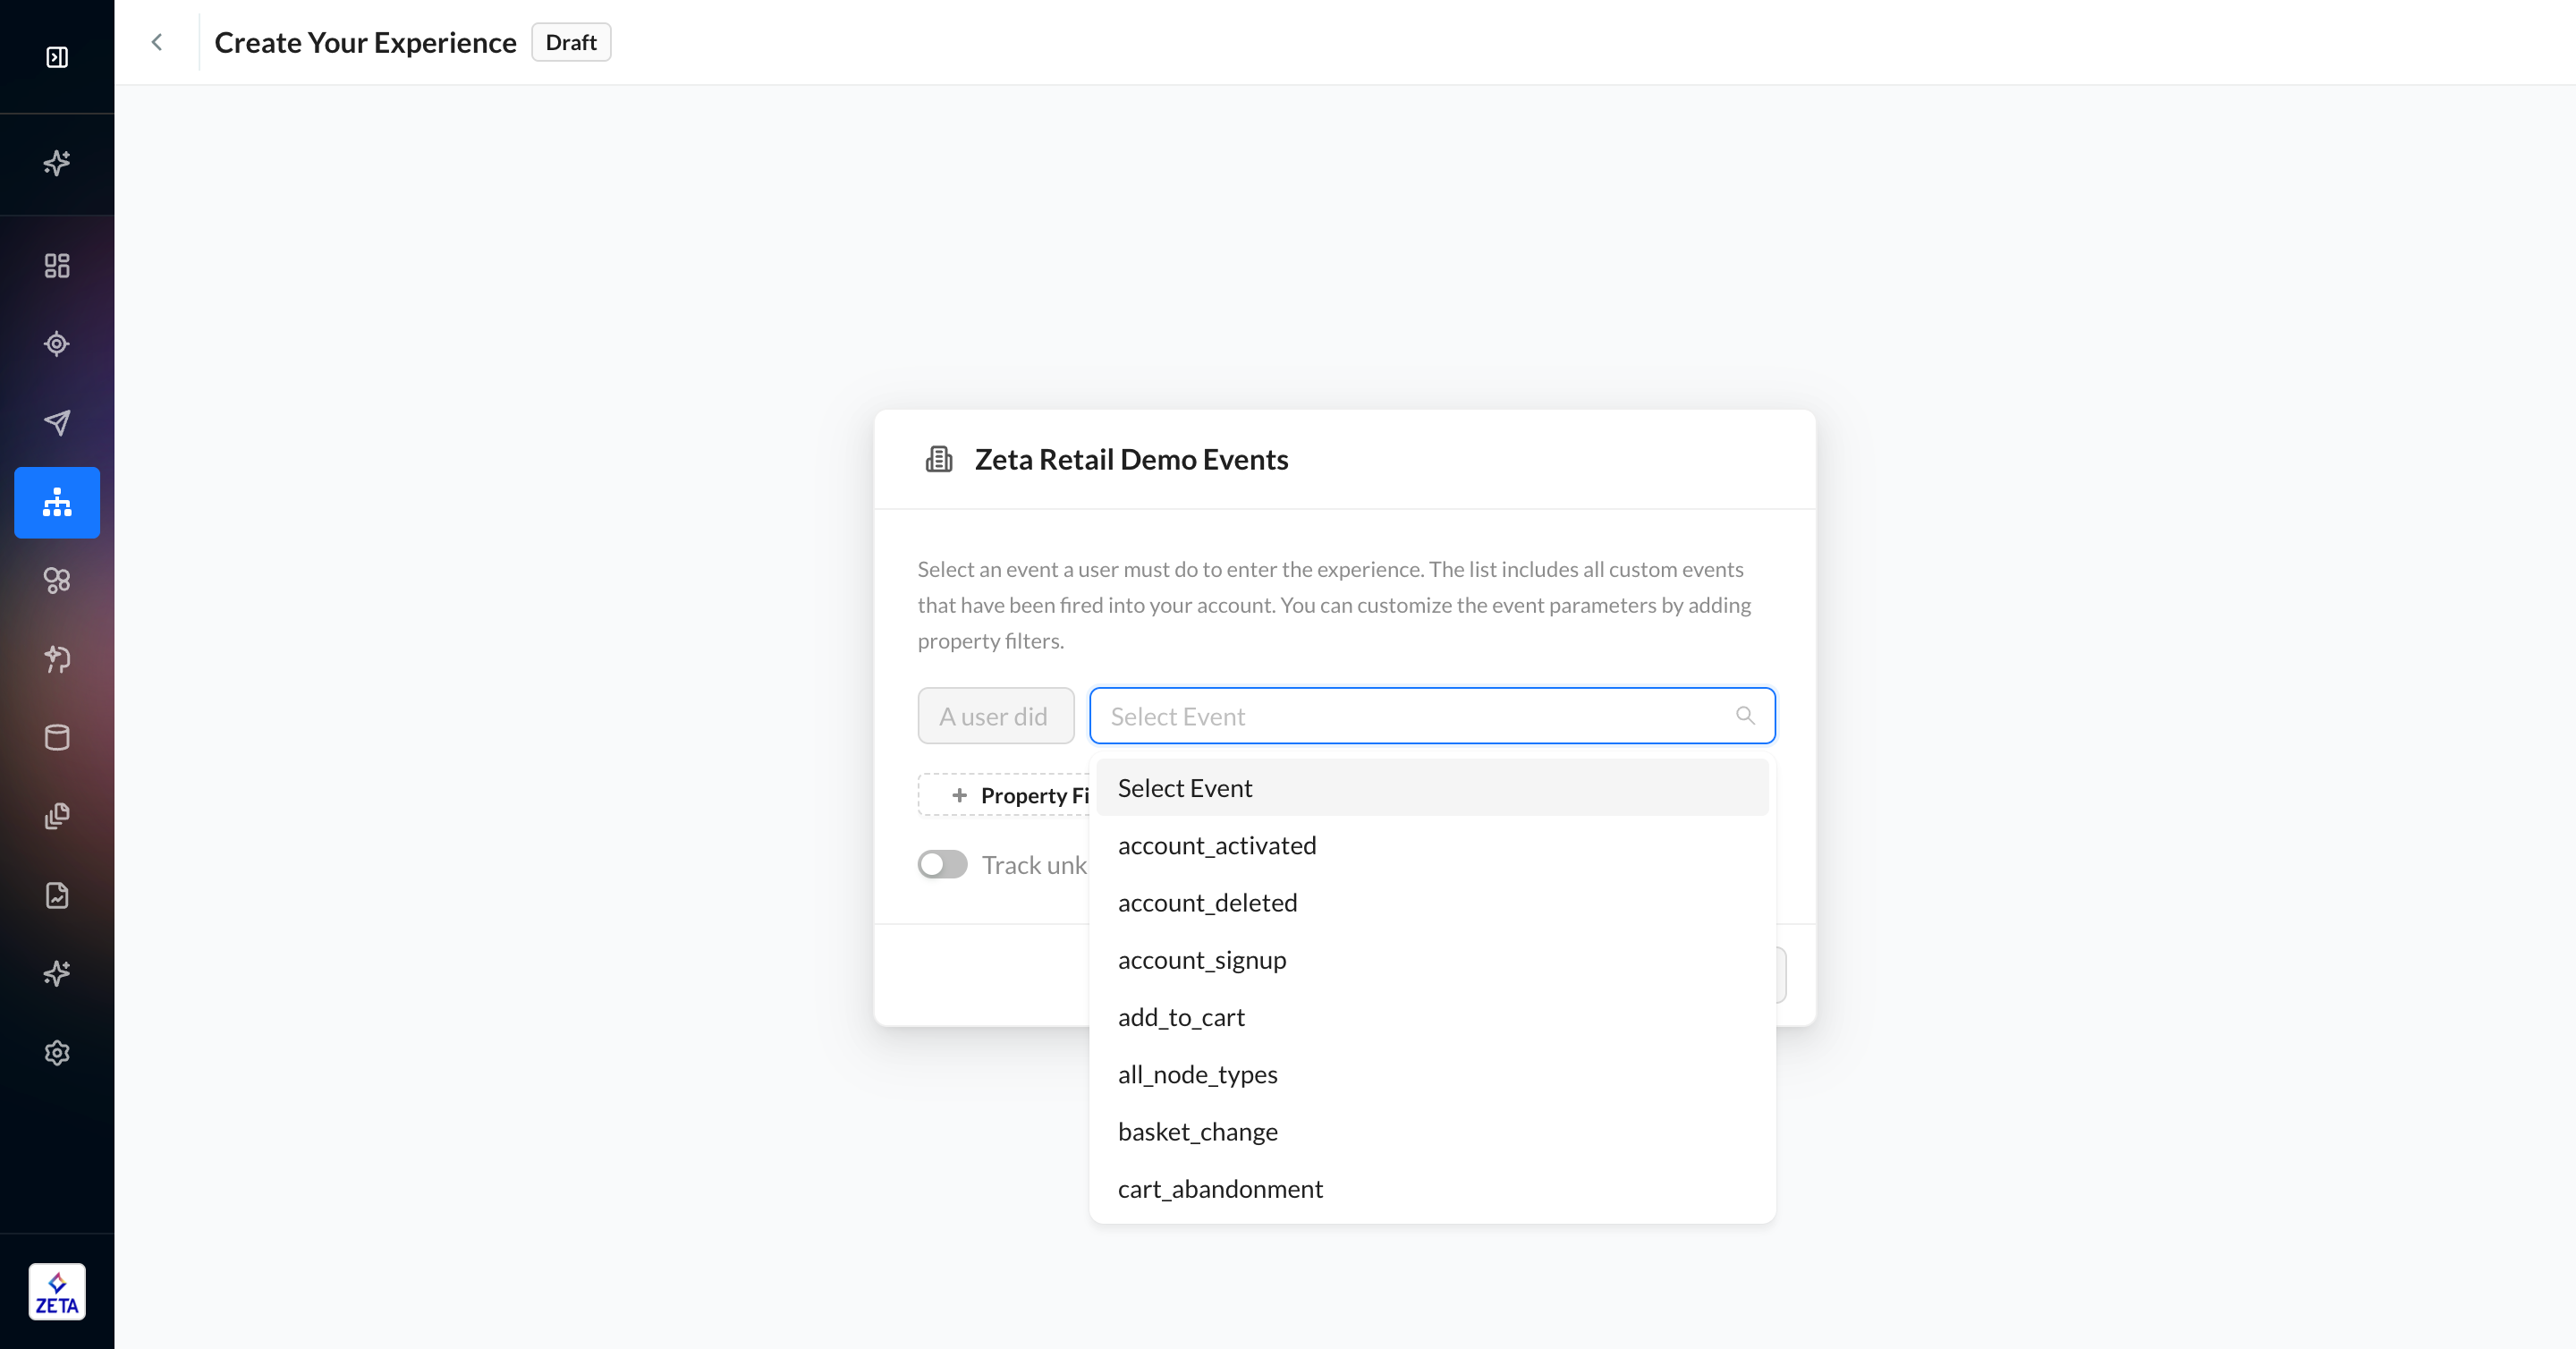
4. Once you select your event, you can add optional property filters. The filters are populated by the objects in the event payload. You will see a lookback at historical and forecasted performance for this event and its filters.
5. If you have the feature, enable the Track unknown people toggle to allow site visitors to enter the experience.
6. Click on Add to Experience to create your experience.
Campaign Events
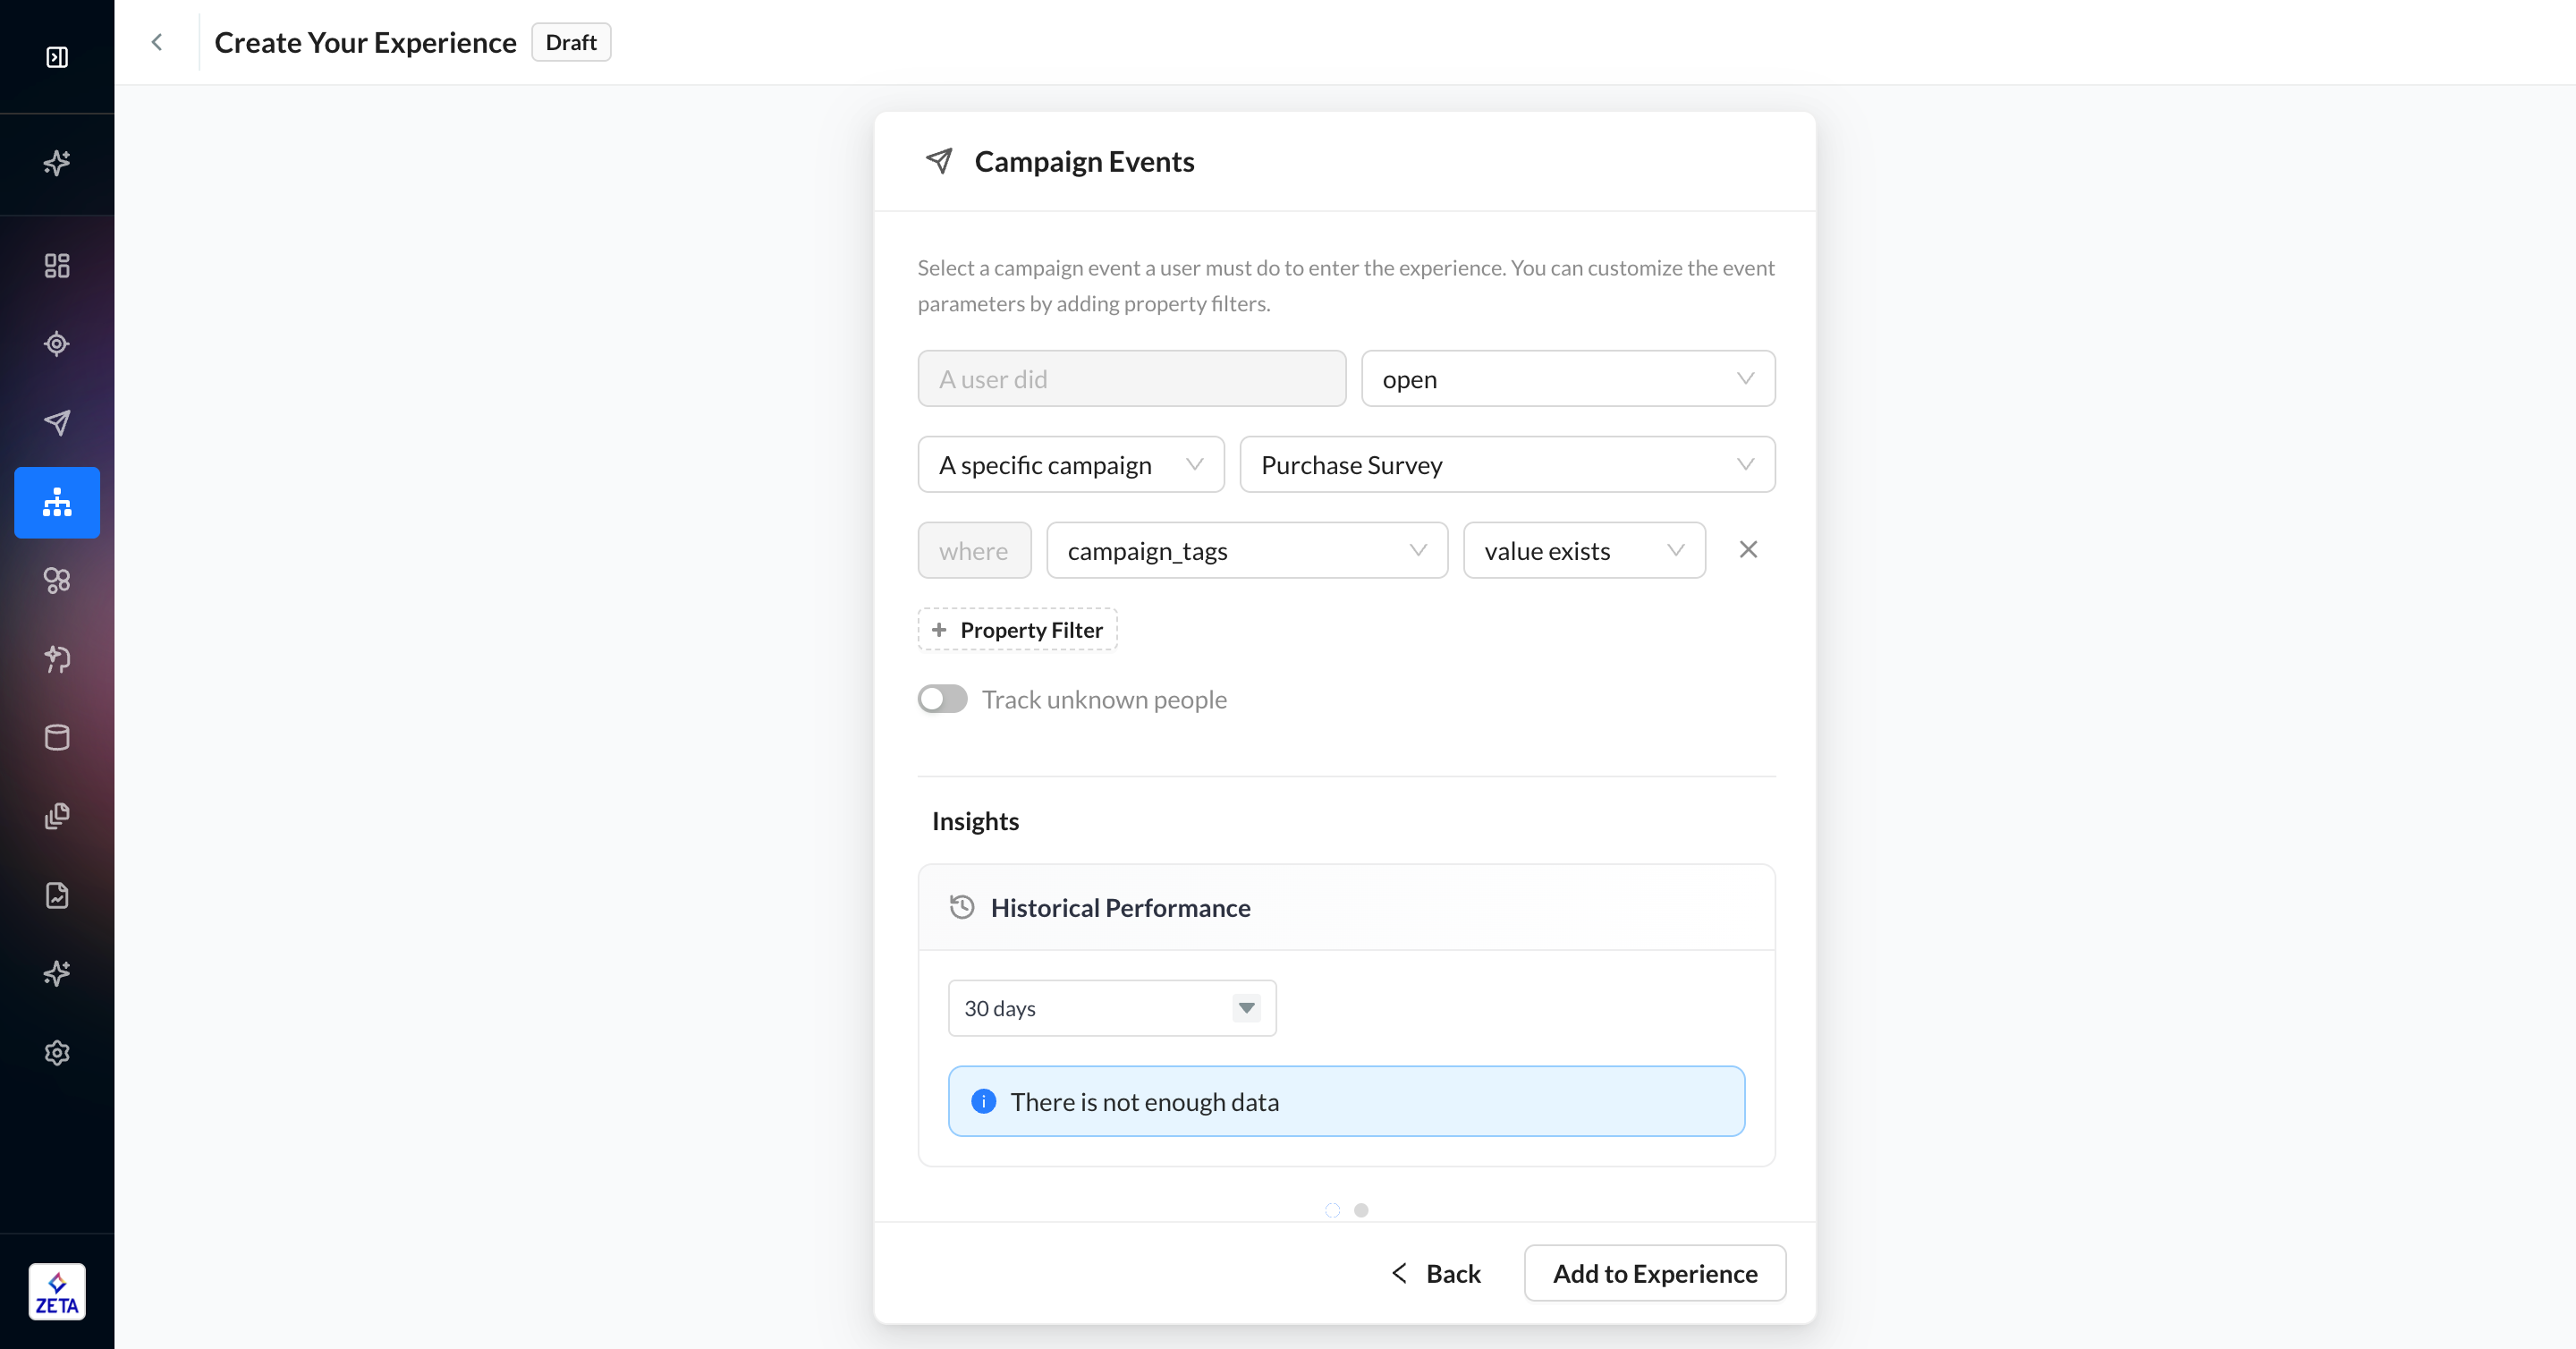
Campaign events are standardized events that are fired when users interact with your Broadcast Campaigns — opens, clicks, bounces, unsubscribes, and more.
1. From the trigger panel, select Campaign Events.
2. By default, the operator is set to A user did. You can select Did Not or Did or Did Not in the events node later in the experience.
3. Select the campaign event you want to trigger the experience for.
-
click
-
open
-
send
-
skip
-
unsubscribe
-
bounce
-
deliver
4. Select whether you want the experience to track this event across a single campaign, any campaign, or any campaign that has a specific tag(s).
5. Once you select your event, you can add optional property filters. The filters are populated by the objects in the event payload.
6. If you have the feature, enable the Track unknown people toggle to allow site visitors to enter the experience.
7. Click on Add to Experience to create your experience.
Segment Entry/Exit Events
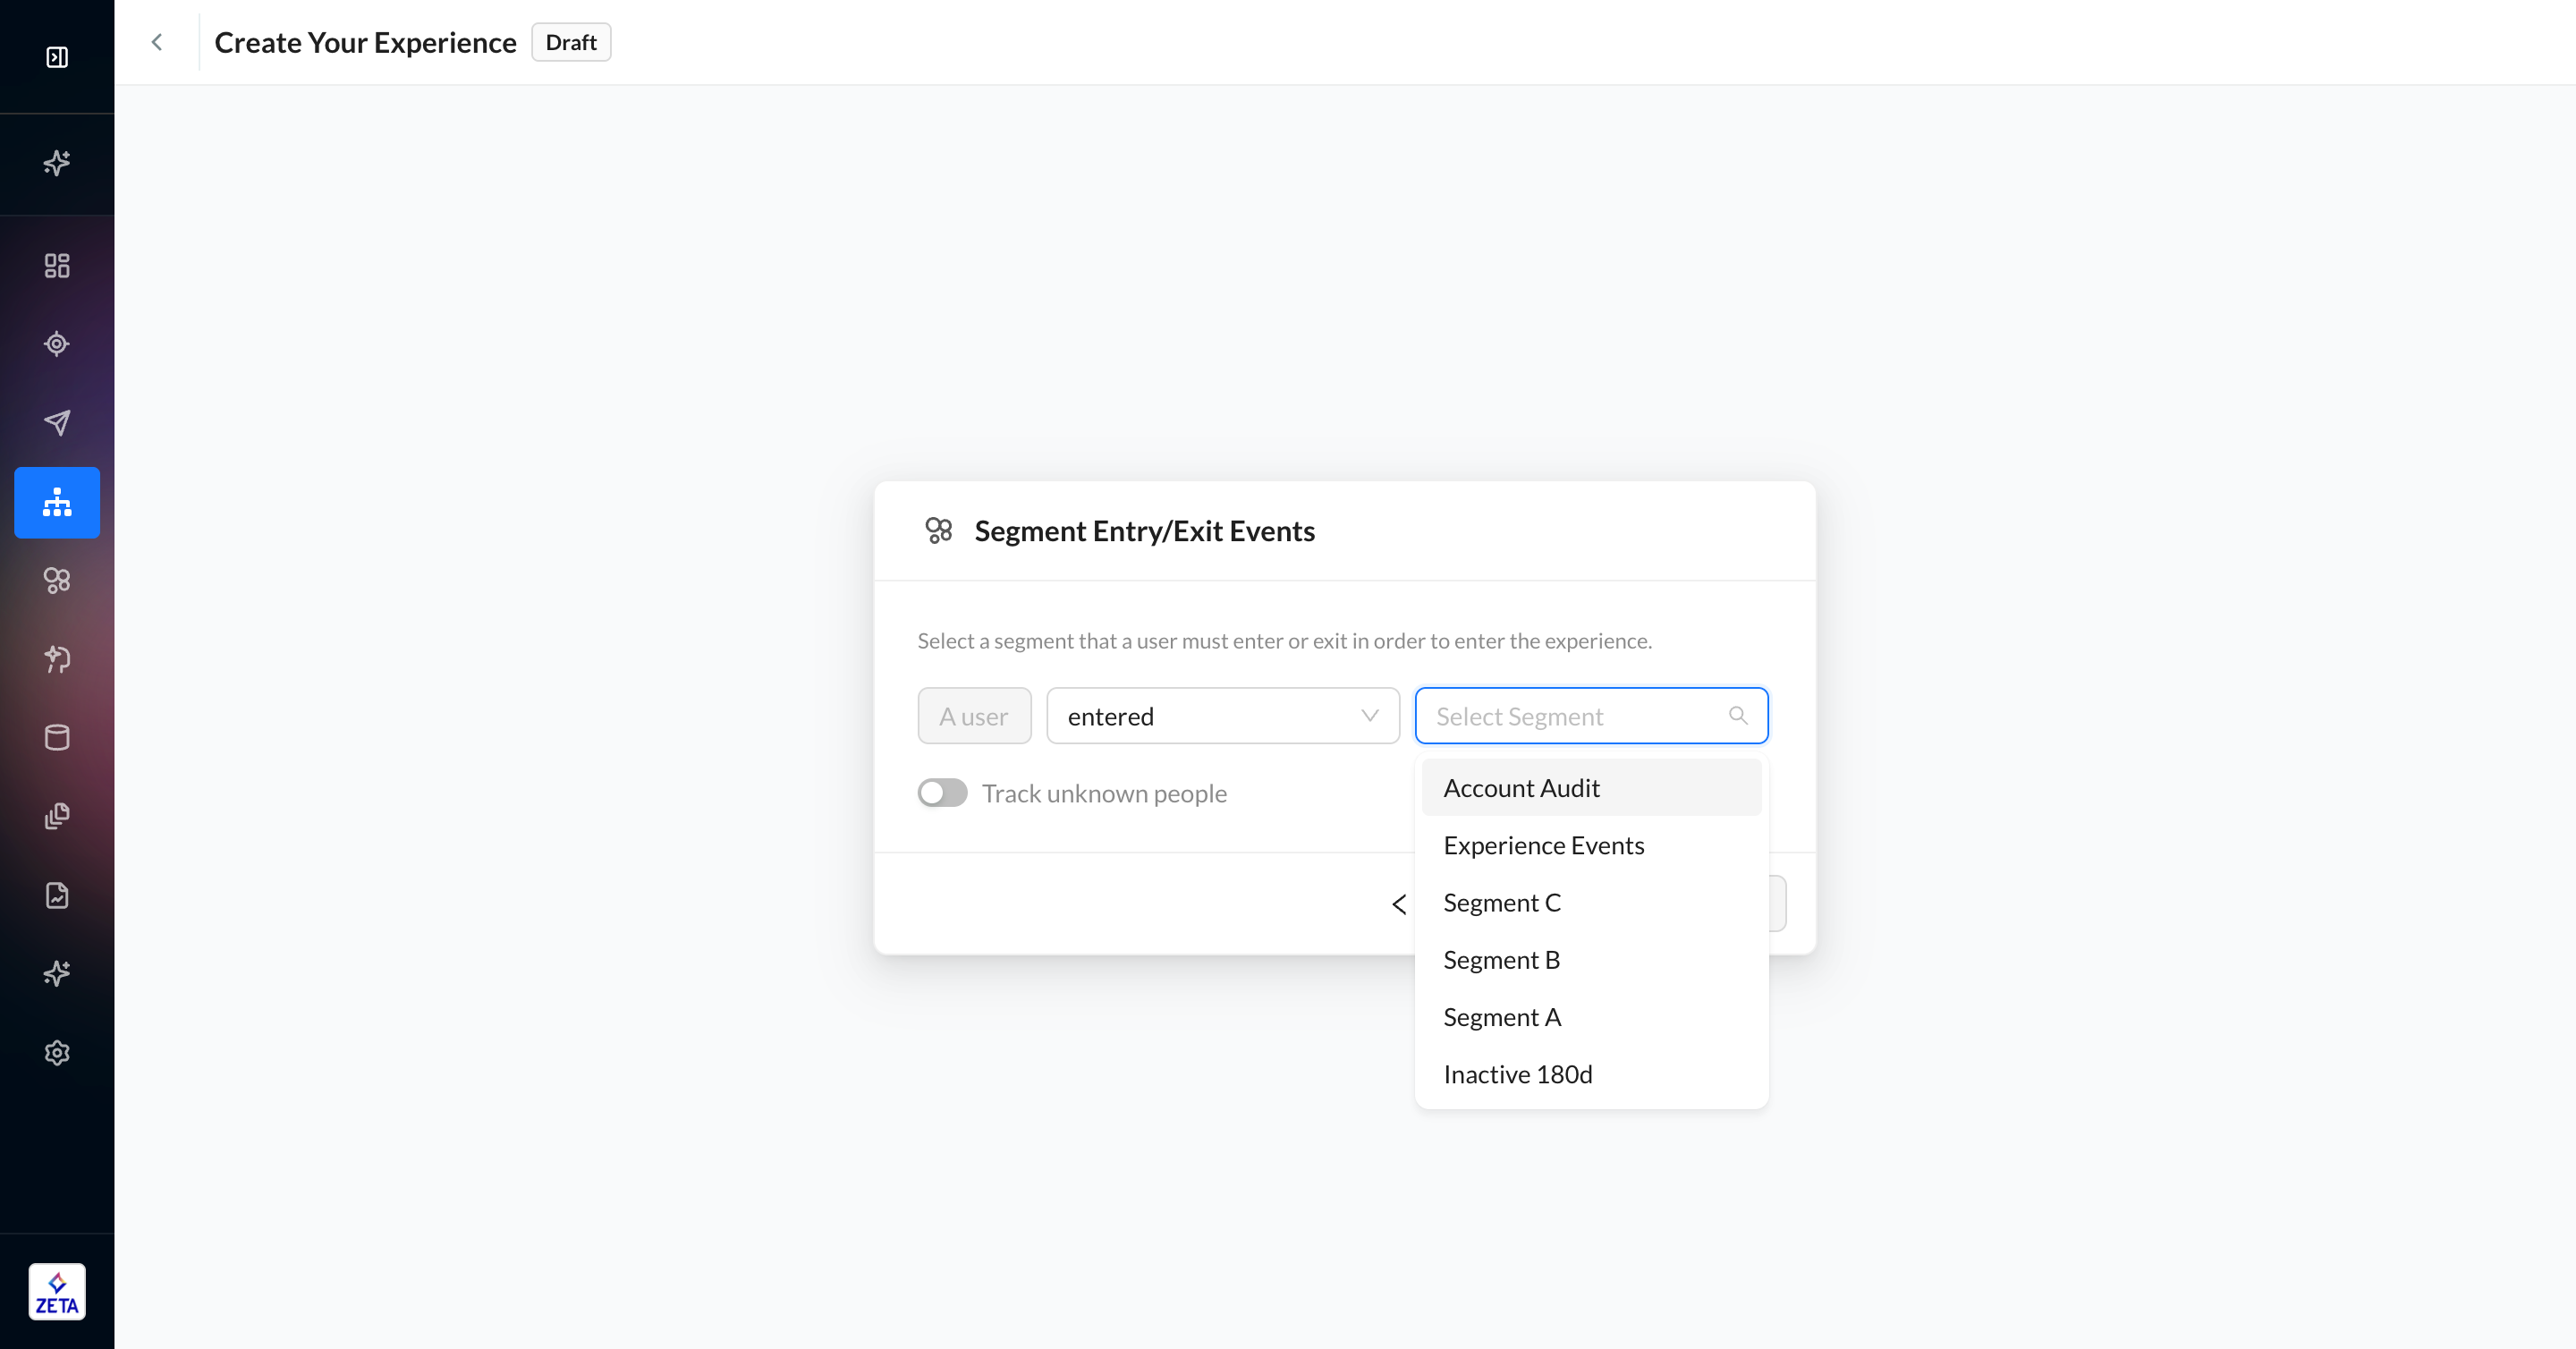
Segment Entry/Exit Events are standardized events that are fired when users enter or exit Customer Segments with tracking enabled. To change the settings on a Customer Segment, open it in Audience Explorer.
1. From the trigger panel, select Segment Entry/Exit Events.
2. By default, the operator is set to A user did. You can select Did Not or Did or Did Not in the events node later in the experience.
3. Select the secondary operator that tracks whether a user entered or exited a segment.
4. Select the segment that you want to trigger your experience for when the membership changes. Only Customer Segments that have tracking enabled will be listed.
5. If you have the feature, enable the Track unknown people toggle to allow site visitors to enter the experience.
6. Click on Add to Experience to create your experience.
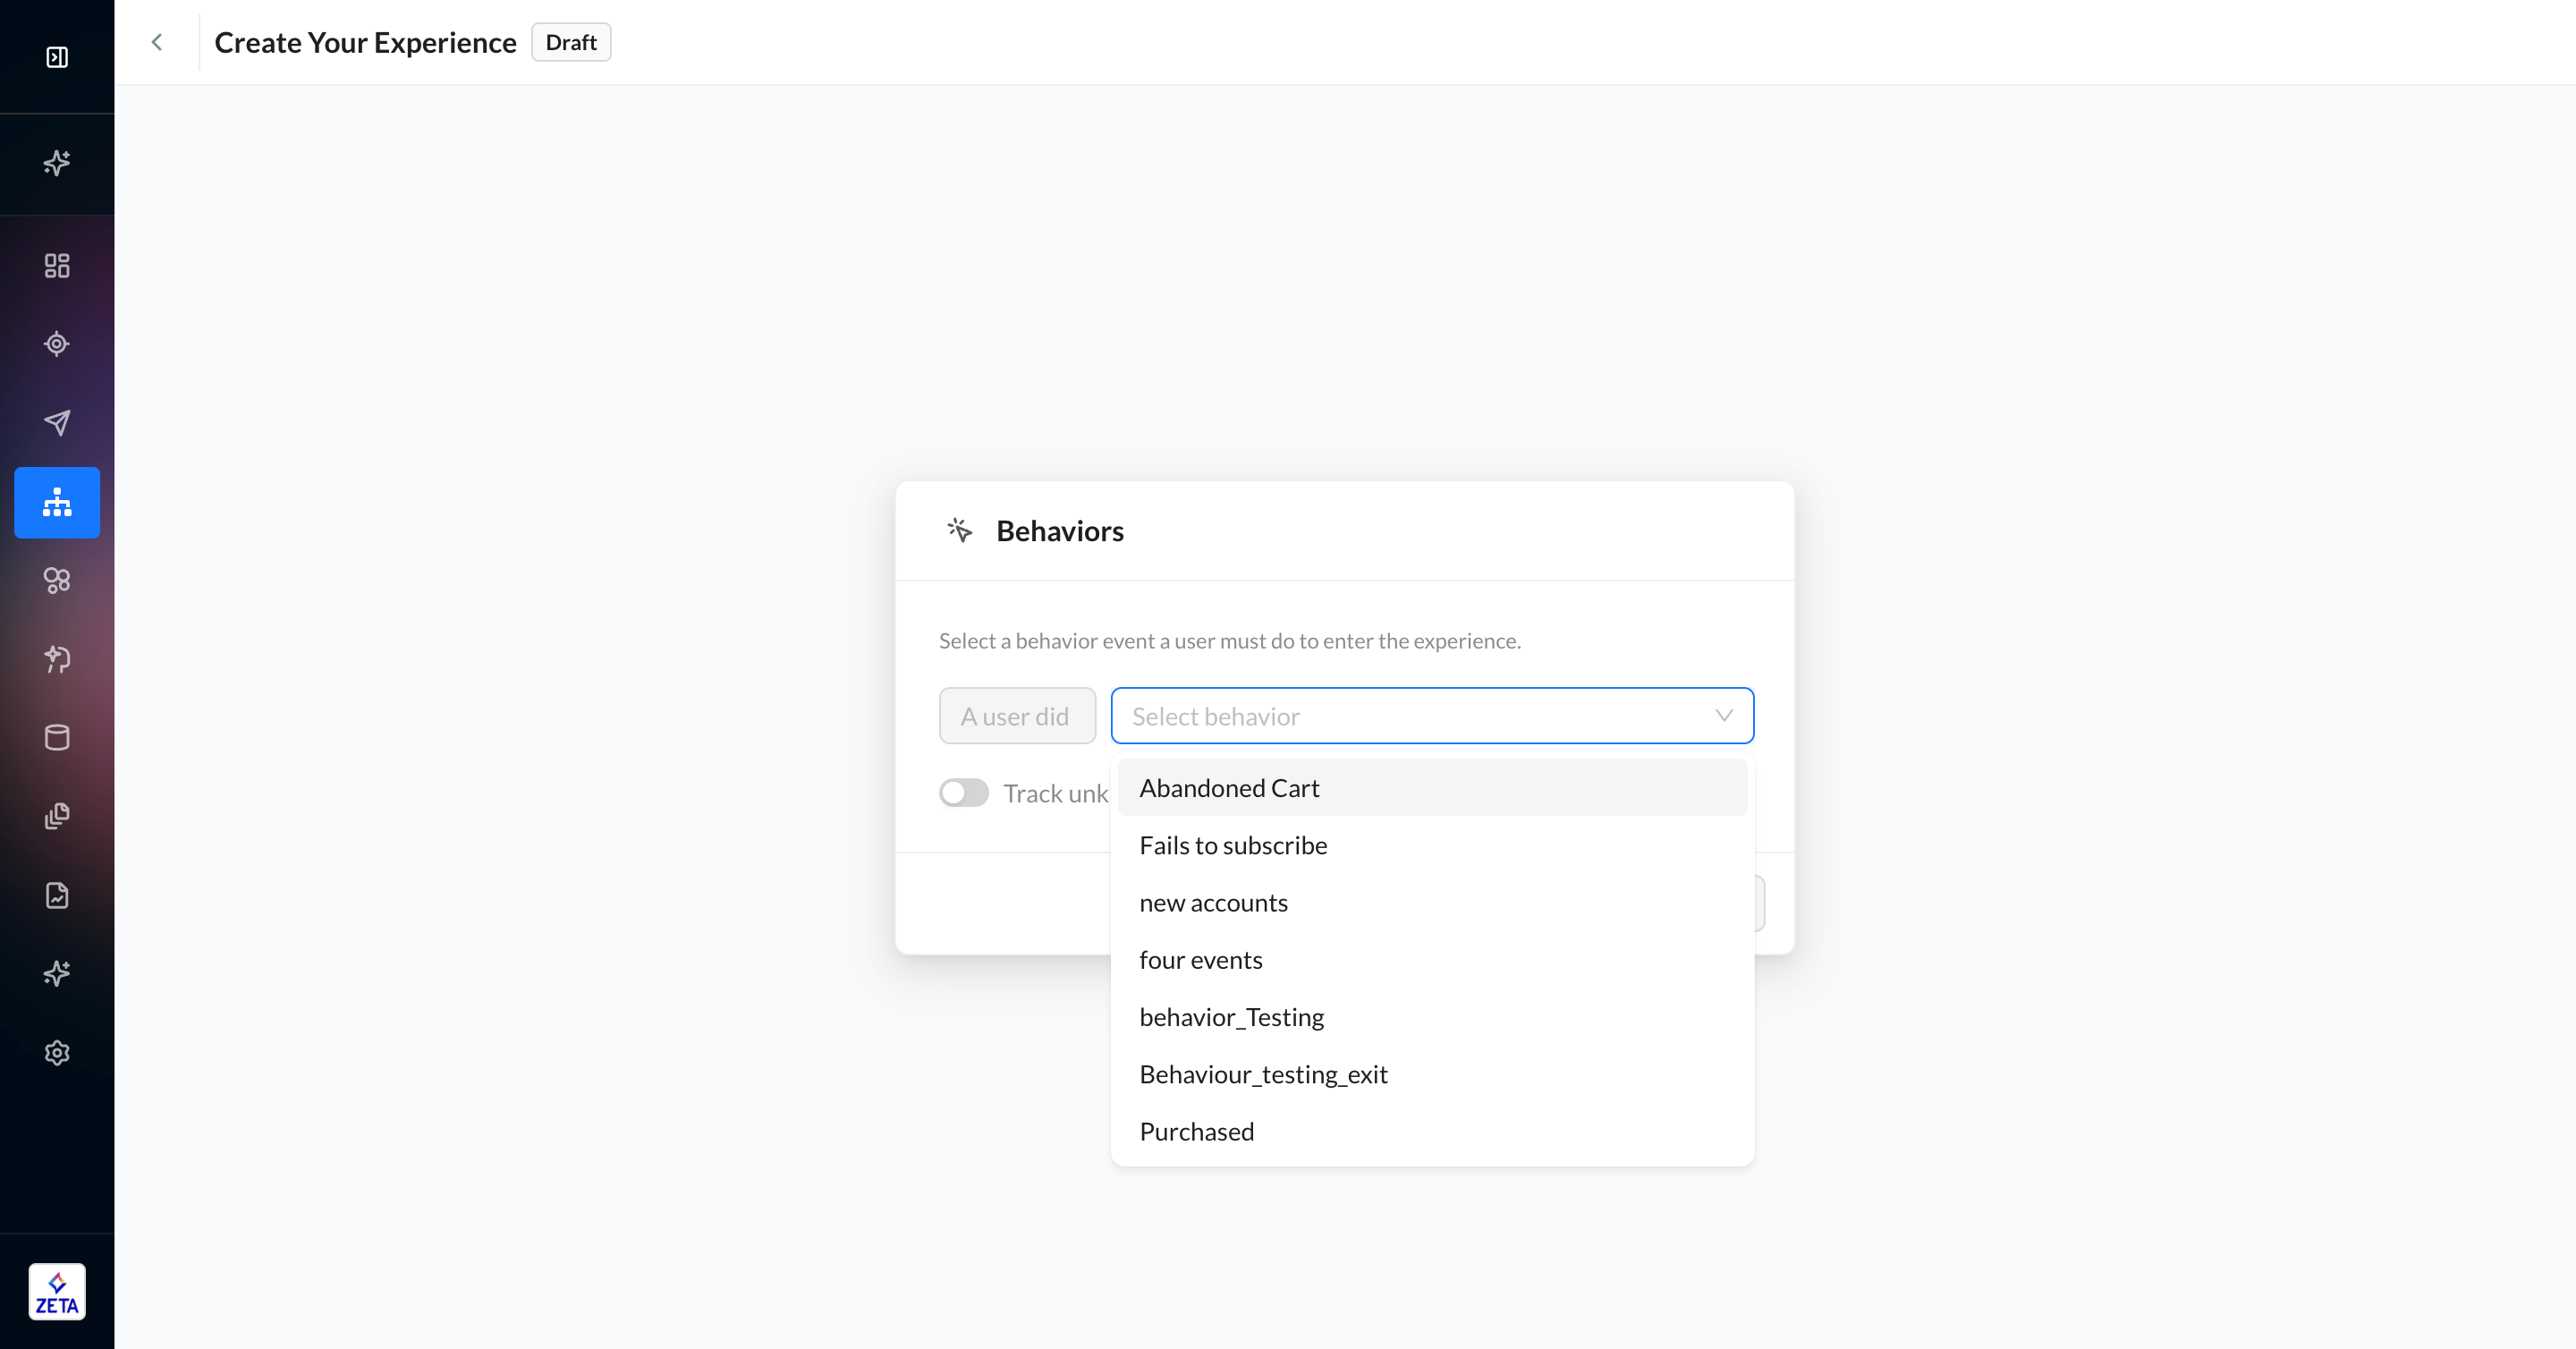
Behaviors
Learn more about Behaviors, which require a UID, so unknown users will be skipped.
Behaviors are an advanced event type that can listen to multiple events at once. Use them to configure event sequences or “OR” events (eg, the user did page_view OR click).
1. From the trigger panel, select Behaviors.
2. By default, the operator is set to A user did. You can select Did Not or Did or Did Not in the events node later in the experience.
3. If you have the feature, the Track Unknown People toggle to allow site visitors to enter the experience will be disabled because behaviors cannot track unknown users.
4. Click Add to Experience to create your experience.
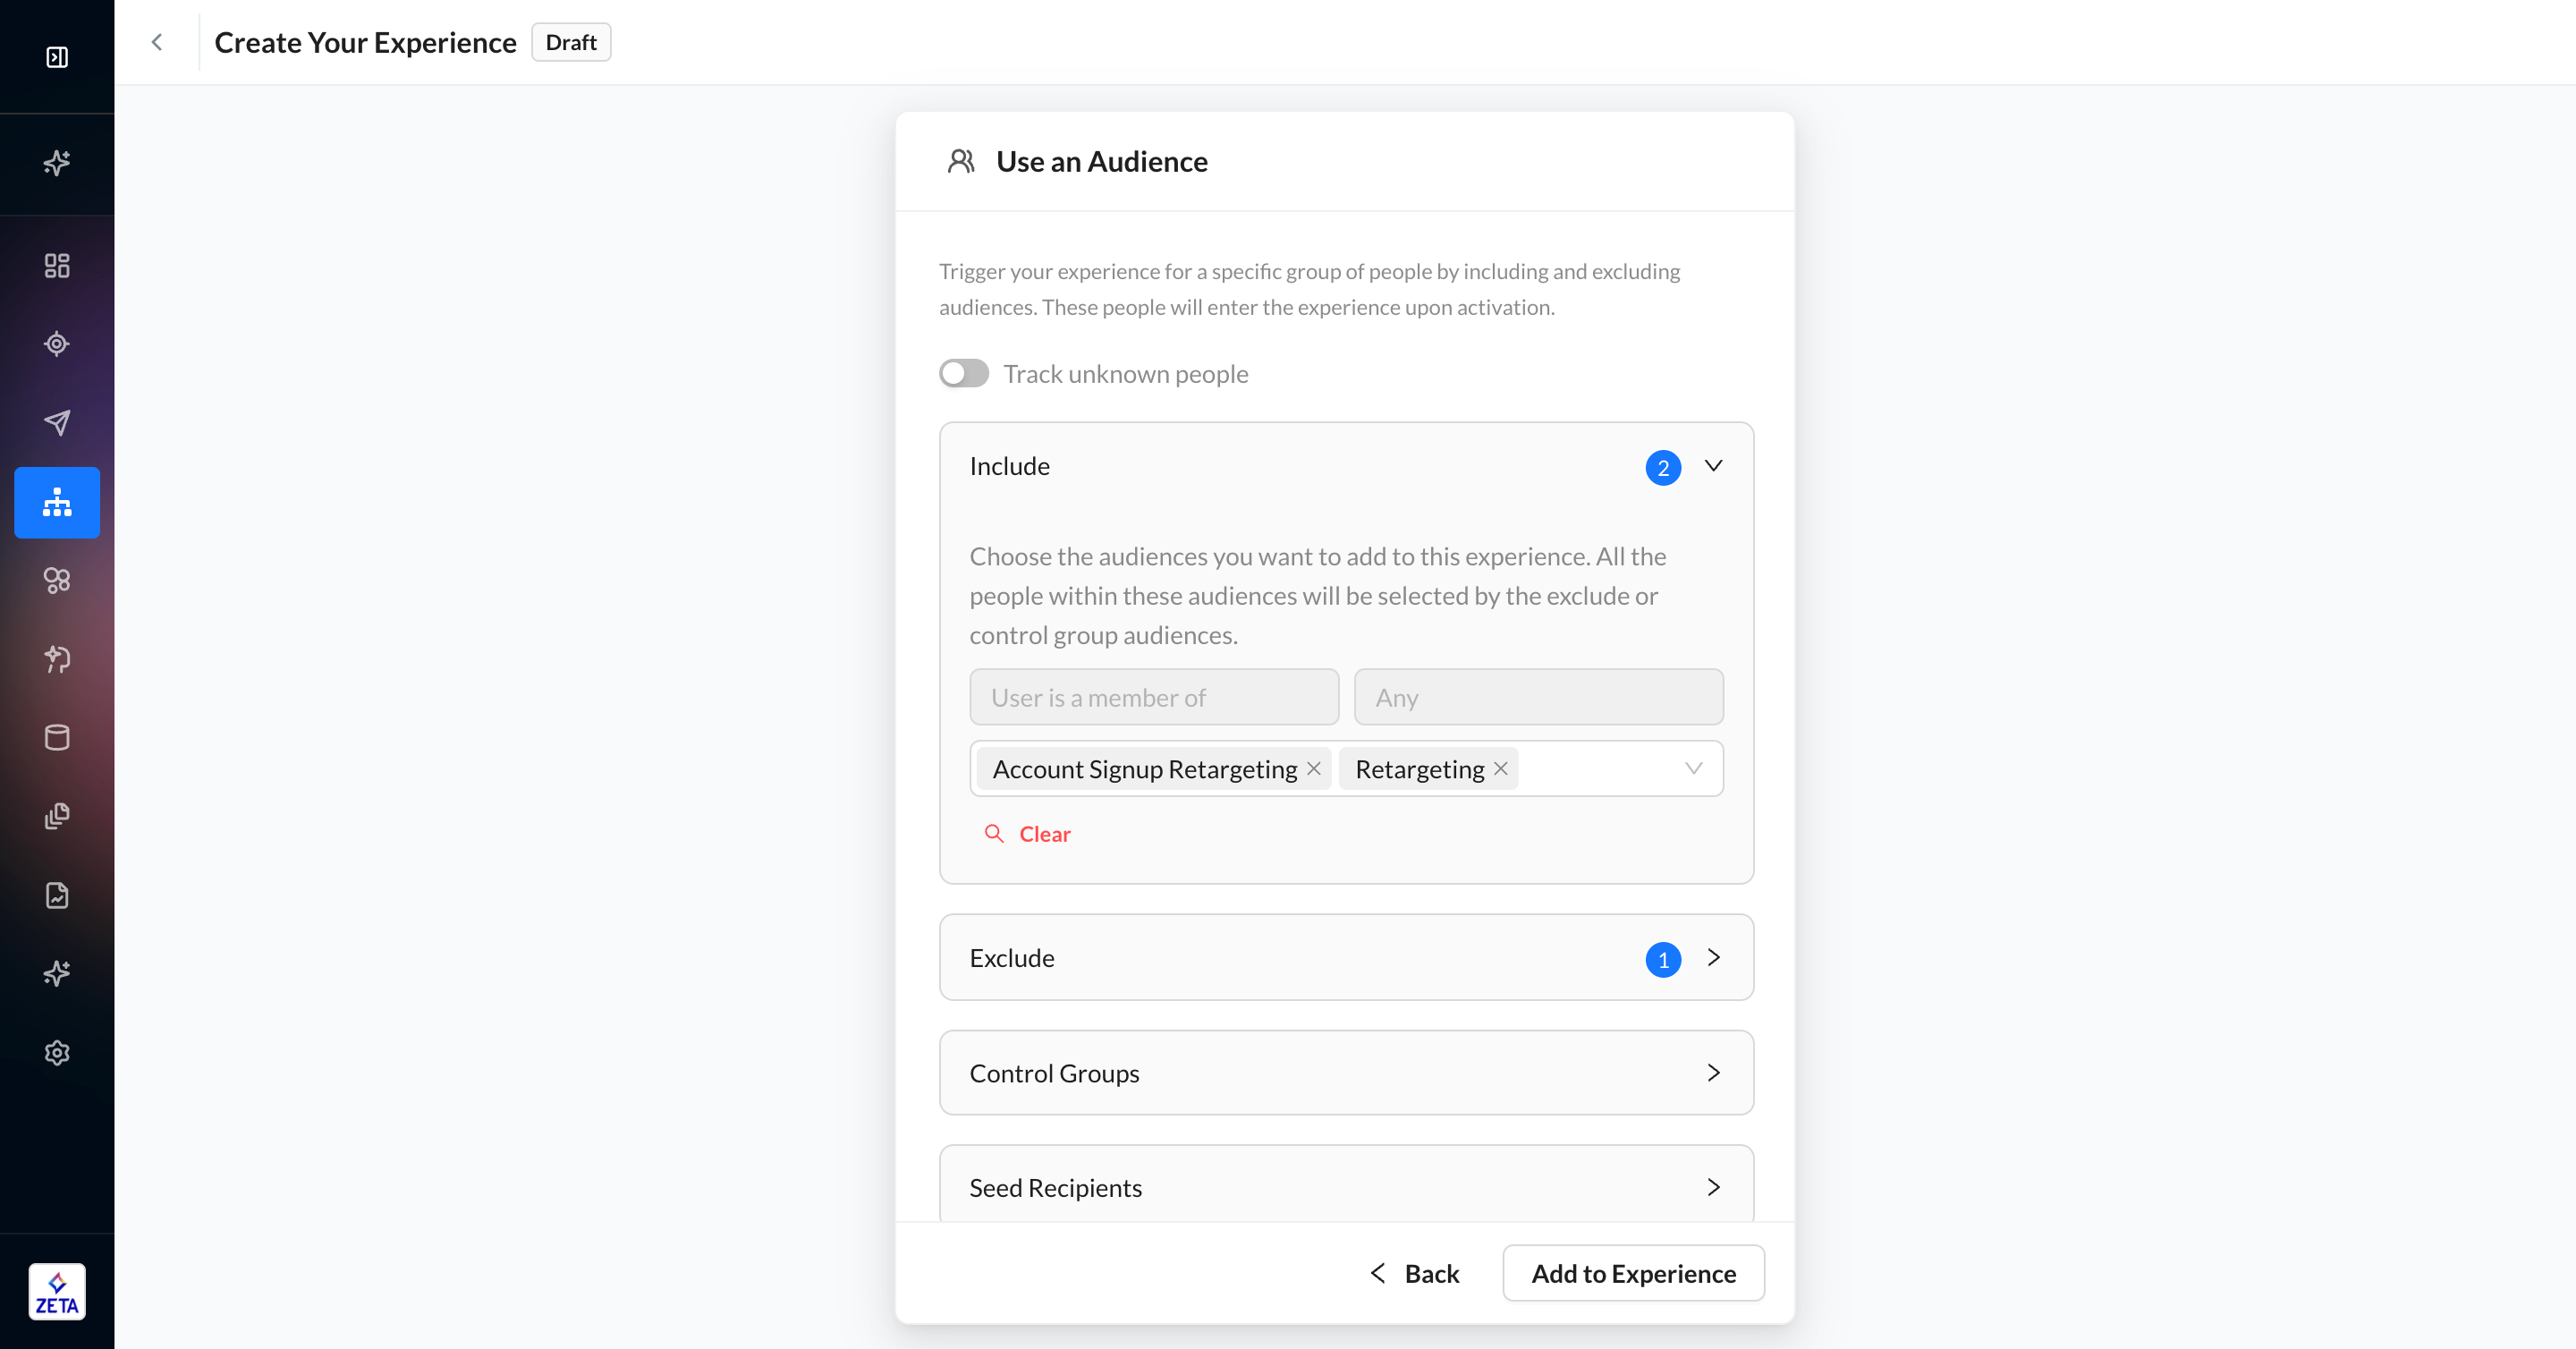
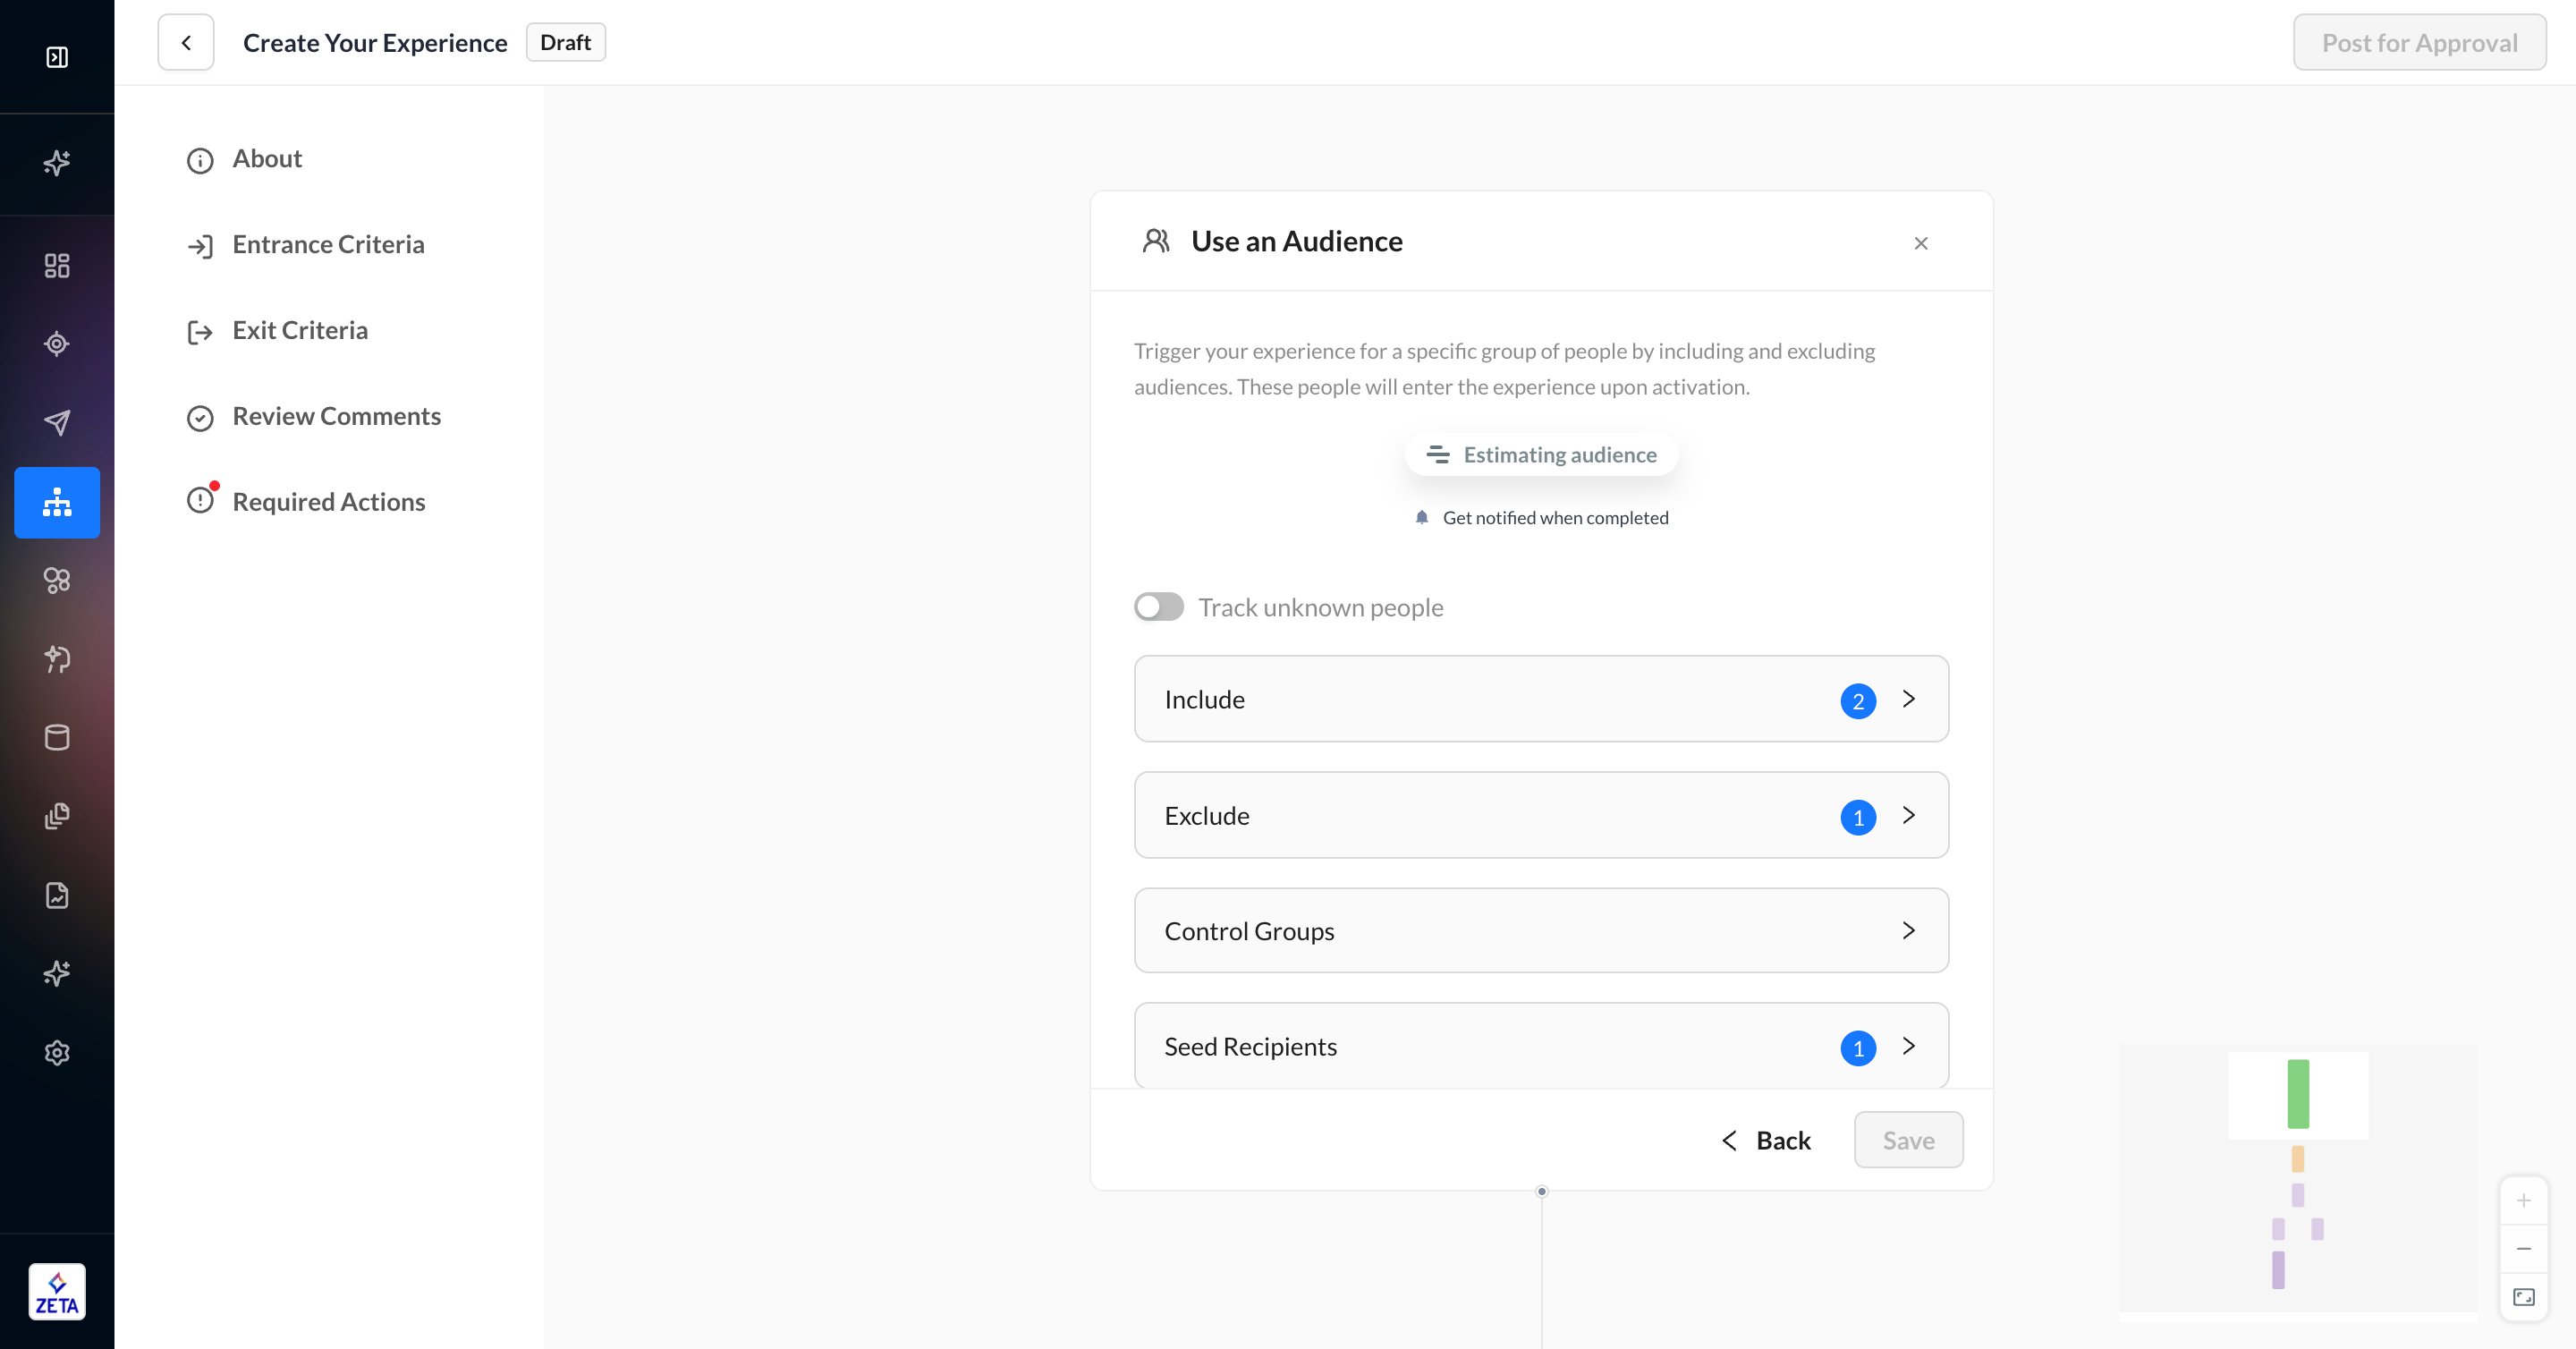
Use an Audience
Instead of using an async event, you can trigger an experience for a fixed set of people with the Use an Audience trigger. You can include and exclude users based on segment membership.
1. From the trigger panel, select Use an Audience.
2. Select segments to be added to the Include criteria.
3. You can optionally add segments that you would like to Exclude, which will be deduplicated against and removed from users in the Include list.
4. You can optionally add segments that you would like to use as a Control Group, which will be deduplicated against and removed from users in the Include list.
A user must appear in both a Control Group and Include segment in order to be triggered into the experience as a Control Group member. All other Control Group users will be discarded.
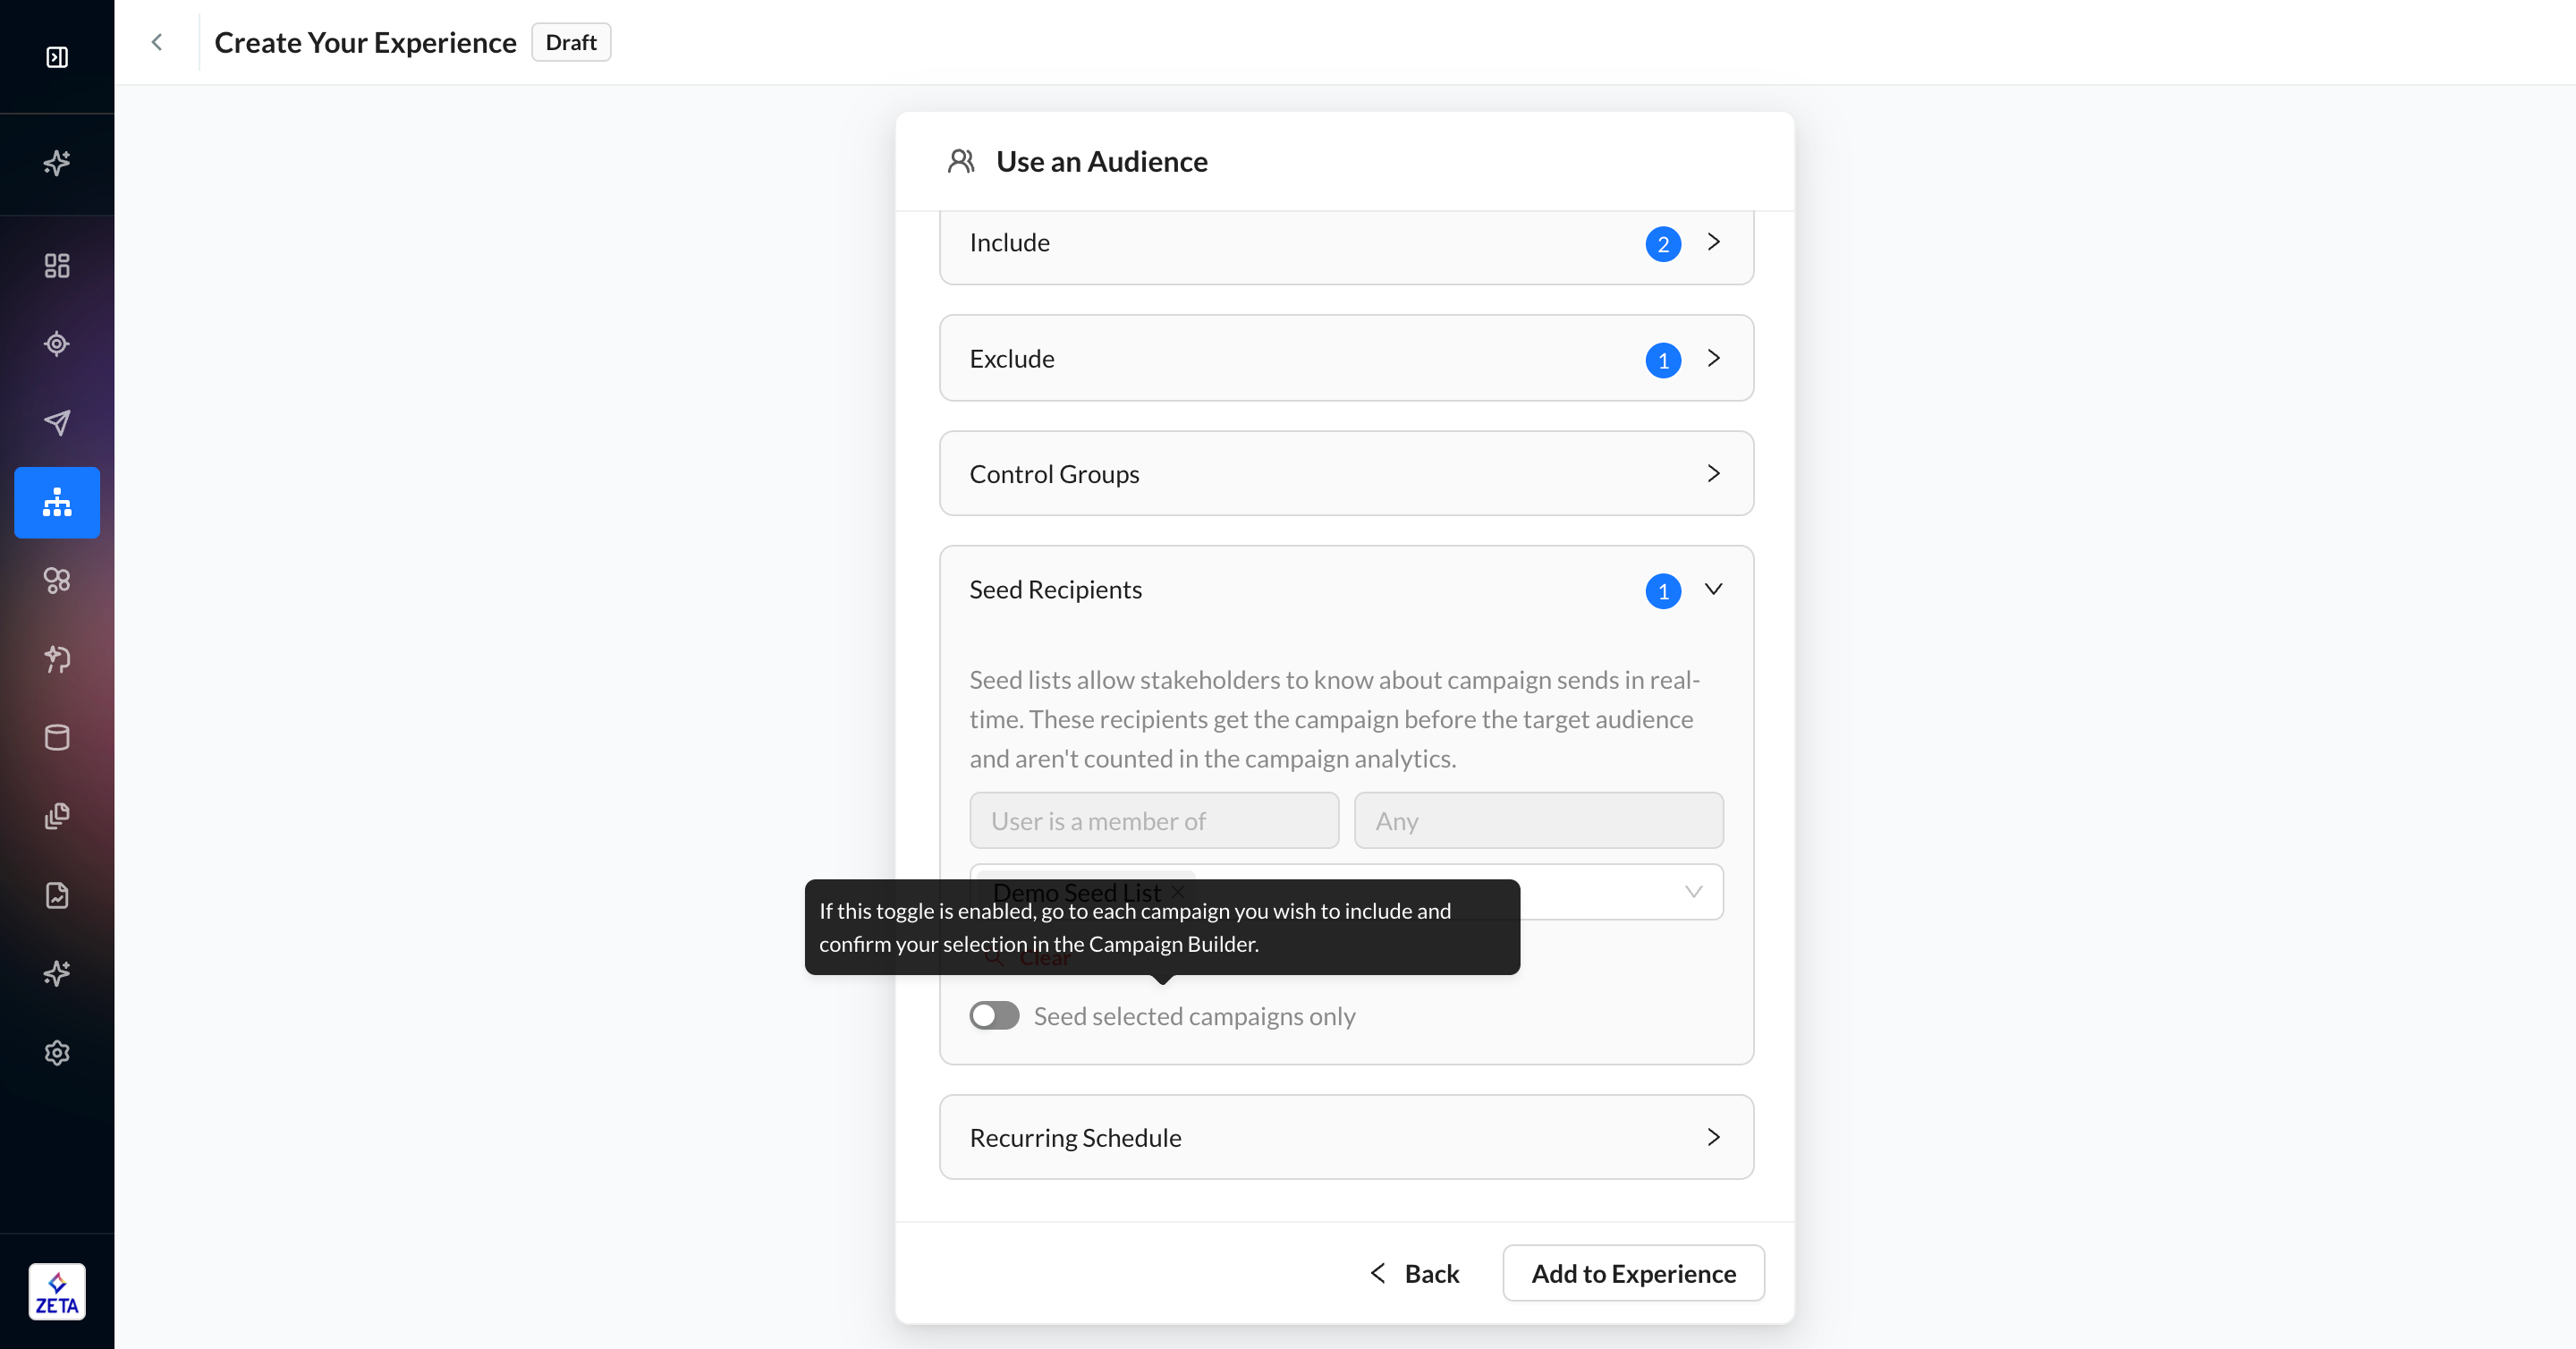
5. You can optionally add segments that you would like to use as Seed Recipients, which will be deduplicated against and removed from users in the Include list.
6. If you intend to run this audience over time, you can set up an optional Recurring Schedule so it can run again at the cadence you specify.
7. Click on Add to Experience to create your experience.
The Use an Audience trigger requires a Delay via Throttle node as the second node to ensure fair usage rules. Experiences activated prior to June 2025 will continue to work as instrumented but cannot be re-activated without the Delay via Throttle node directly after the Use an Audience node. Contact your Account Manager for more information.
Audience Types
If you use a combination of segments, this won’t be saved as a new audience to be reused later. To do this, you’ll need to save it as a new Customer Segment in the Audience Explorer.
To create your audience trigger, select first-party Customer Audiences that meet your criteria.
-
Customer Segment
-
Customer List
-
Query Segment
Upon saving your audience, an estimation query will begin to run immediately.
Prioritization Order
To remove duplicate people and respect each type of segment, we use a waterfall model that prioritizes segments in the following order:
-
If a person appears in a Seed Recipients segment, they won’t be eligible for any other section. They will not enter the experience but they will receive campaigns at the time of activation.
-
If a person appears in a Control Groups segment, they won’t be eligible for the Excluded or Included sections. They will enter the experience but they will not trigger any campaigns or actions. They must also be a part of an Included segment in order to be triggered as part of the control group.
-
If a person appears in an Excluded segment, they won’t be eligible for the Included section. They will not enter the experience.
-
If a person appears in an Included segment, they will only be eligible for the Included section. They will enter the experience as intended, so long as they meet the Entrance Criteria.
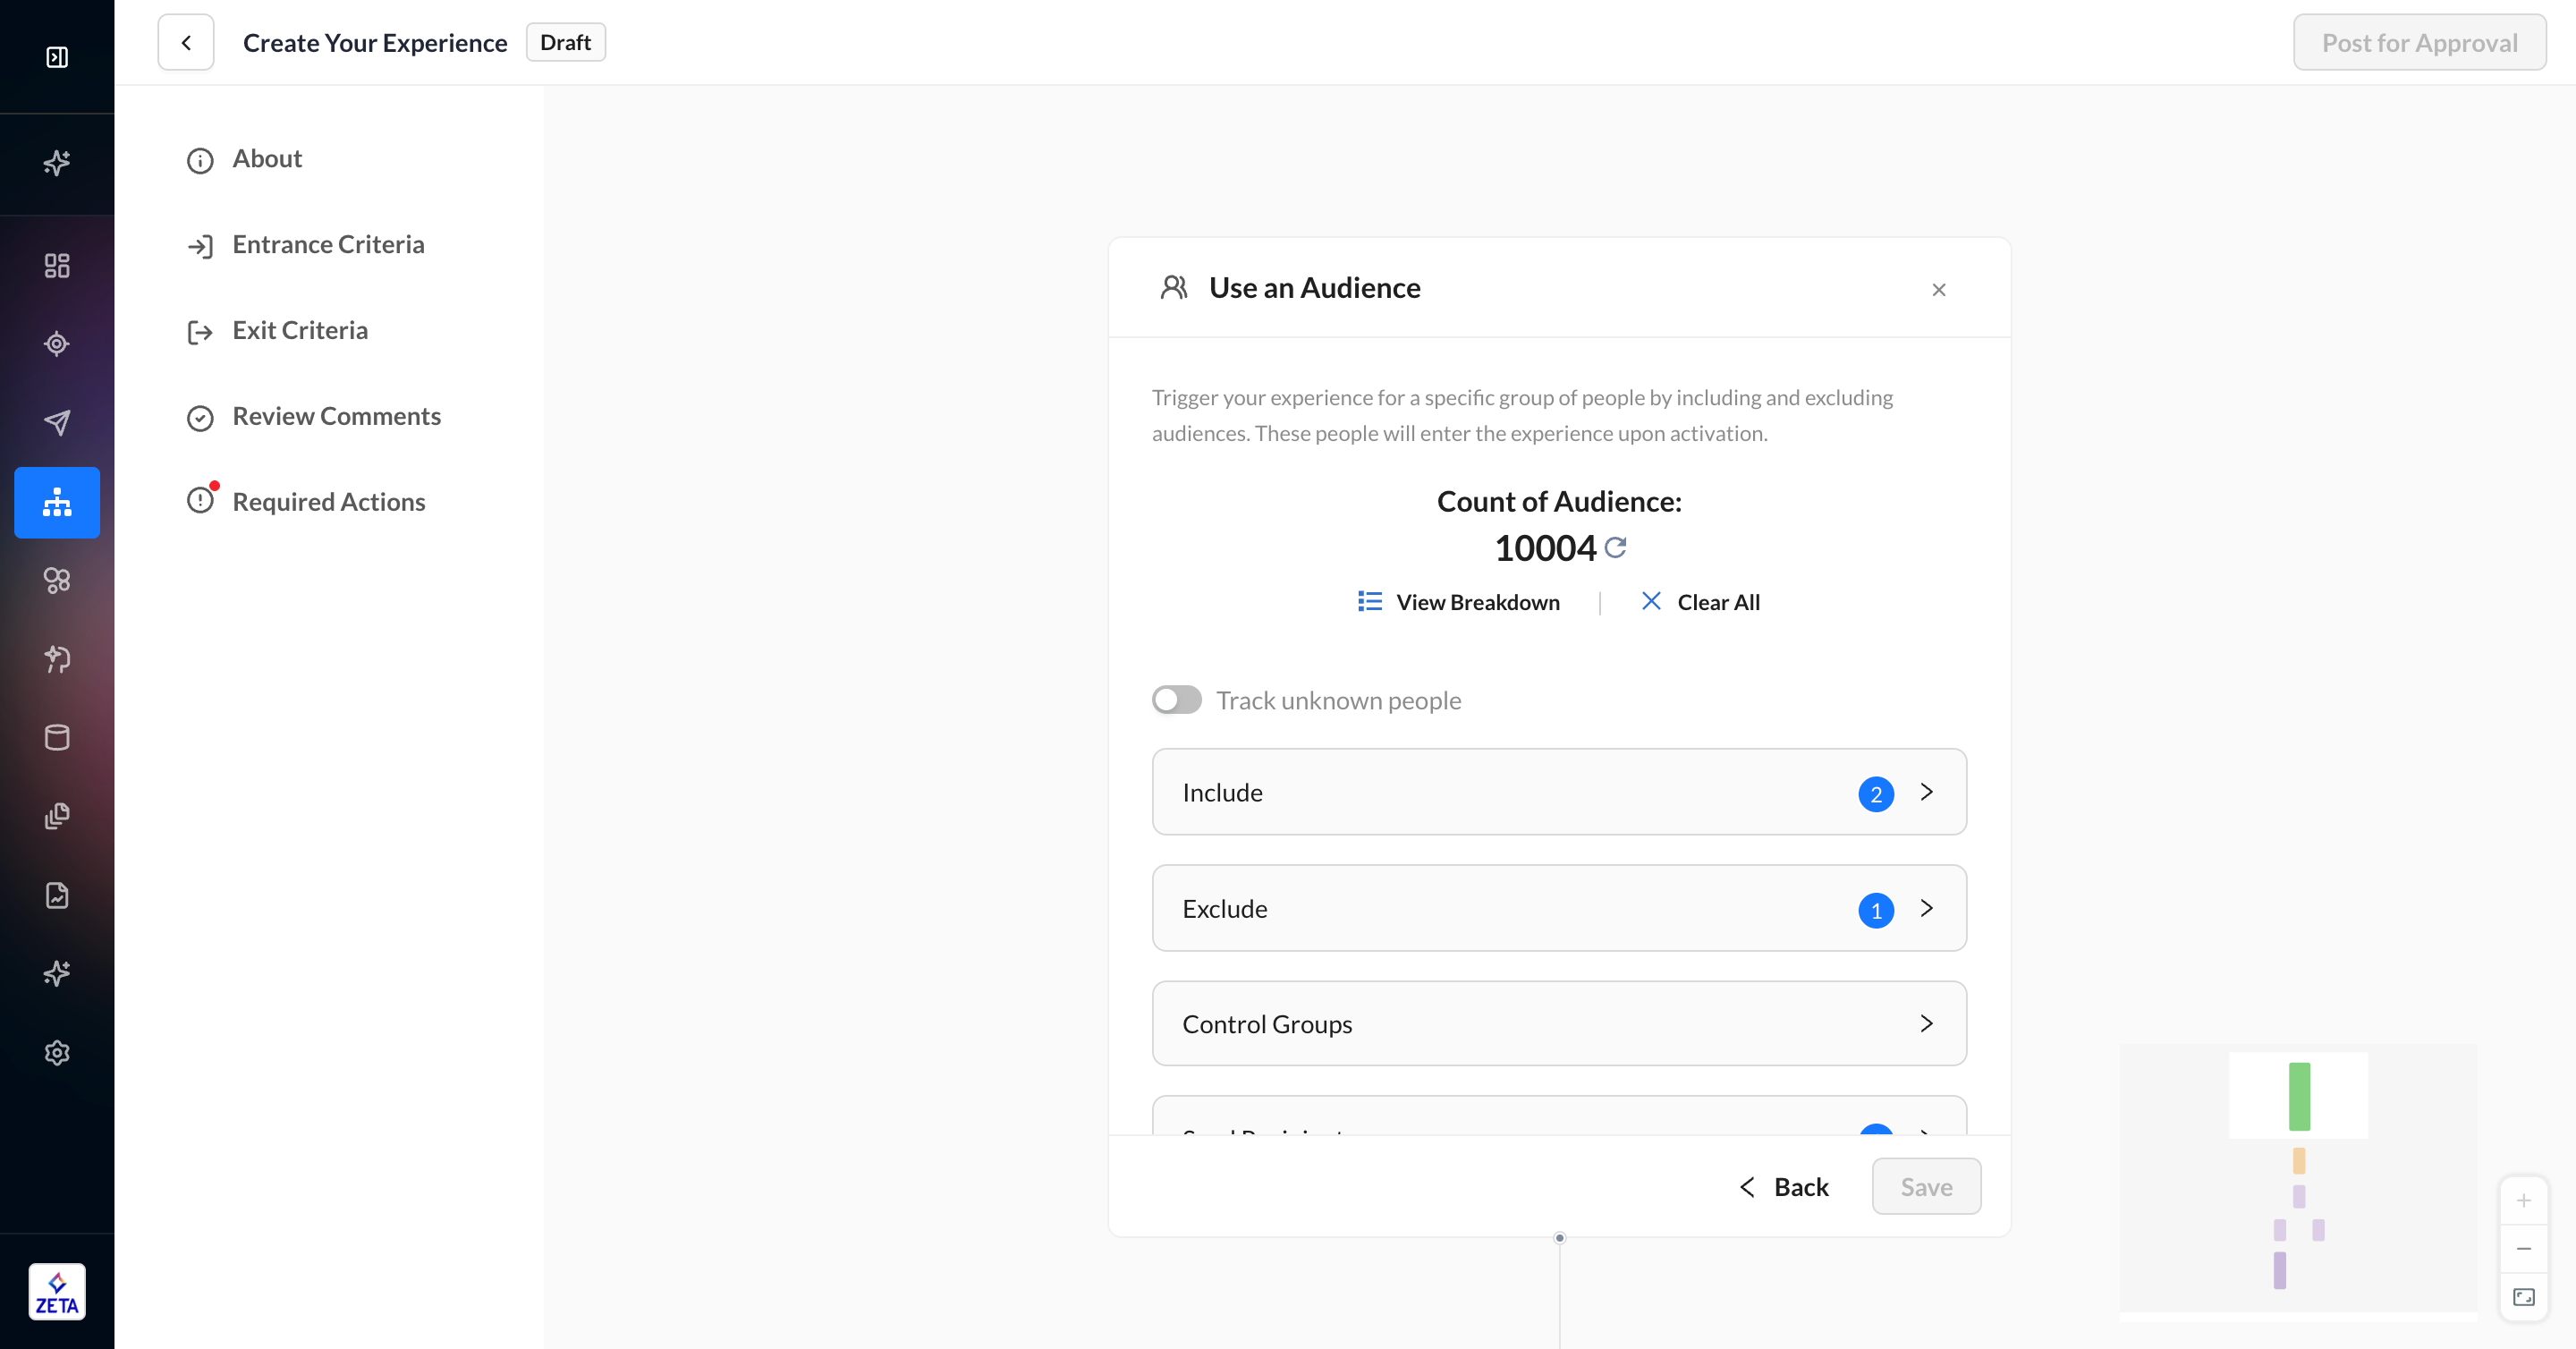
Audience Breakdown
Once the audience estimation is complete, there will be an audience breakdown panel for you to check your segment counts and final audience. Click on each section header to expand it, which will reveal the individual segments and their counts that make up each audience group.
|
Audience Breakdown Sections |
Definition |
Eligible Audience Types |
|---|---|---|
|
Included |
Every segment that will be included in your audience. The counts you see in this section are deduped between each other as well as segments in the Excluded, Control Groups, and Seed Recipients sections. This is the only section that is required to be filled before you can save the audience selection. |
|
|
Excluded |
Every segment that will be excluded from your audience. The counts you see in this section are deduped between each other as well as segments in the Included, Control Groups, and Seed Recipients sections. |
|
|
Control Groups |
Every segment will act as a Control Group. The counts you see in this section are deduped between each other as well as segments in the Included, Excluded, and Seed Recipients sections. The people in these segments will enter the experience and go through decisioning nodes, but they will skip campaigns and action nodes so that you can measure lift. A user must be part of both an Included segment and a Control Groups segment in order to be triggered as a Control Group user. Any Control Group user that does not also appear in an Included segment will be discarded. |
|
|
Seed Recipients |
Every segment that will act as a Seed Recipients audience. The counts you see in this section are deduped between each other as well as segments in the Included, Excluded, and Control Groups sections. The people in these segments will not enter the experience. They will get a copy of every campaign in the experience upon activation. |
|
|
Duplicates Removed |
Every segment from the Included and Seed Recipients sections will be listed here. If a person appears more than once across these segments, each subsequent appearance will be counted in each relevant segment. If a person appears in an Excluded segment as well as an Included segment, they won’t count as a duplicate because they’re not eligible for the experience. |
|
|
Eligible Audience |
This count will add up all Included and Seed Recipients sections after deduplication. It does not expand into a detailed list of segments. |
|
|
Net Addressable Audience |
This count will display the number of people who are eligible to enter the experience, deduped, plus seeds. This count does not include Control Groups. It does not expand into a detailed list of segments. After deduping: Included (minus) Excluded (plus) Seed Recipients |
|
How Seed Recipients work
Learn more about Seeds and how to create them in your Account Settings.
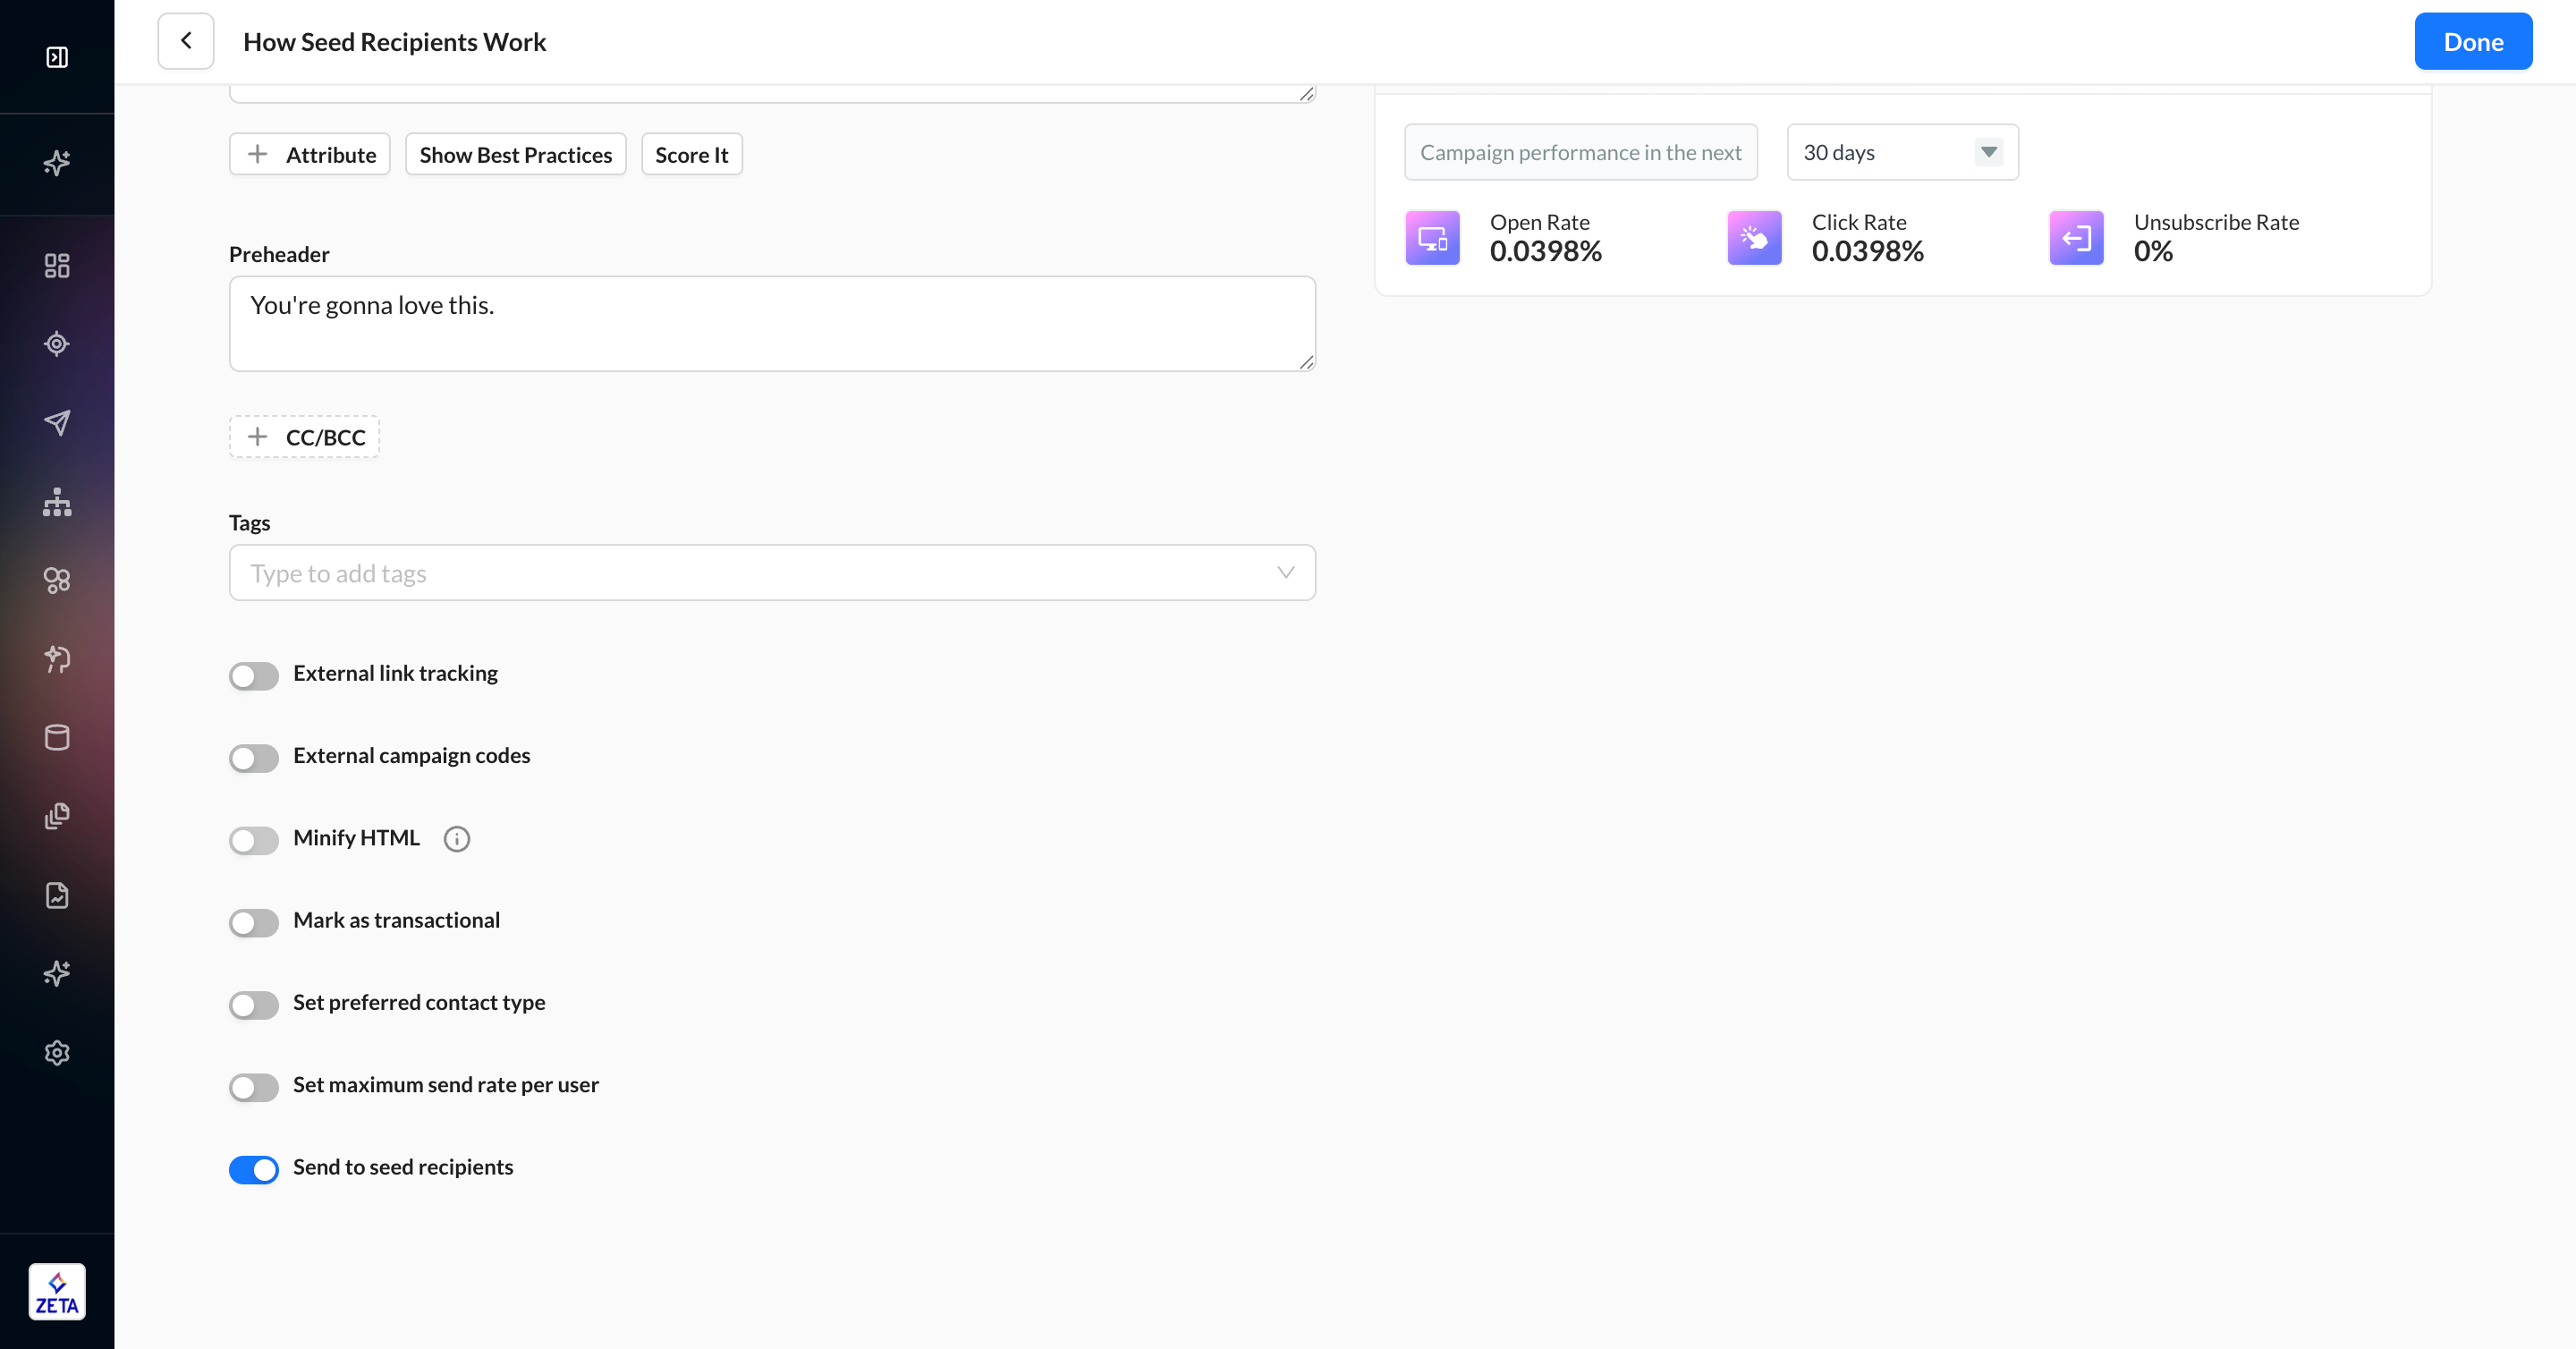
A traditional feature of Broadcast Campaigns, seeds allow certain internal stakeholders to receive a copy of the campaign upon activation. However, an experience can have many campaigns that trigger at all sorts of times, so this functionality hasn’t been available until now.
When you add Seed List segments to the Seed Recipients section of the audience selection trigger, these people will receive every campaign in your experience at launch. Depending on how your campaigns are set up, some of these campaigns may contain empty values. To avoid these scenarios, try adding Zeta Markup Language to set up default values in your campaigns for seeds.
While all campaigns are sent to seed recipients by default, you can choose to only send certain campaigns by toggling ON Seed selected campaigns only in your Seed Recipients segment builder. When this setting is enabled, you’ll need to go to every campaign and confirm you want that campaign sent to your seed recipients by toggling ON Send to seed recipients.
Audience Notifications
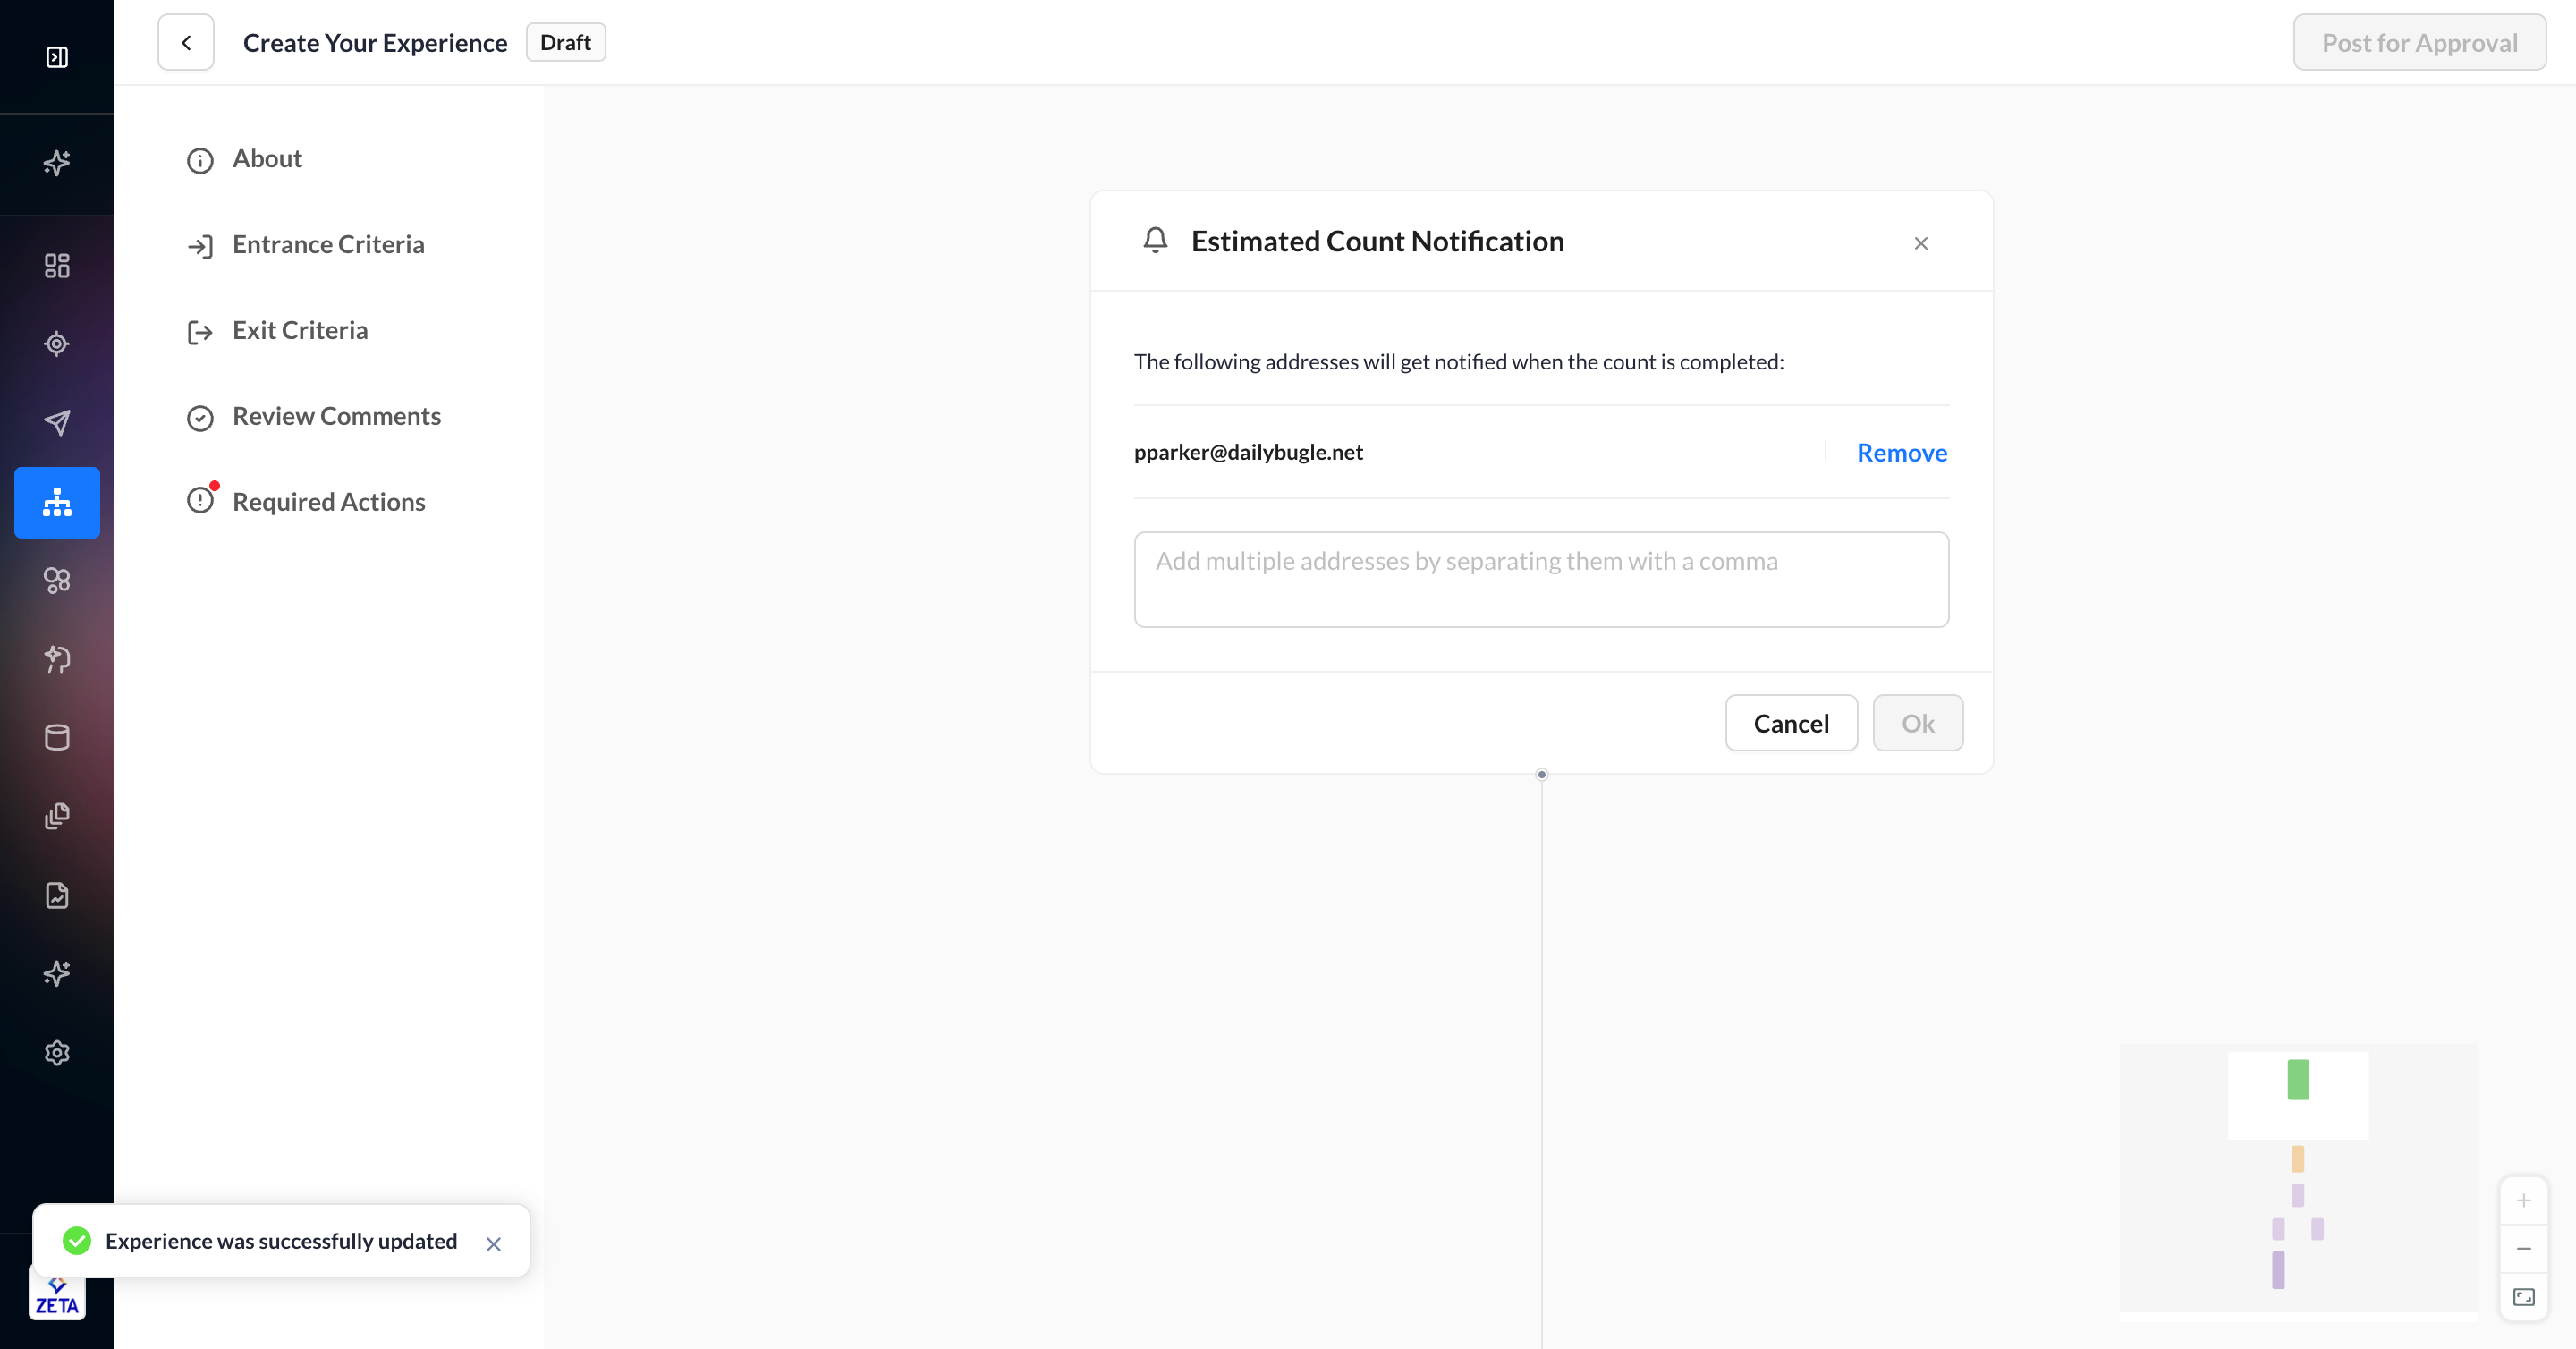
Any time you make changes to your audience selection, the estimation will run again. This can take a few seconds to a few hours, depending on how complex your audience selection and segment types are.
Instead of checking the experience repeatedly, you can choose to get an email when your estimation is done by clicking on Get notified when completed below the estimation loader. Your email address will automatically be added, but you can add other people by separating email addresses with commas. Once you save, you’ll get an email that your audience count is ready.
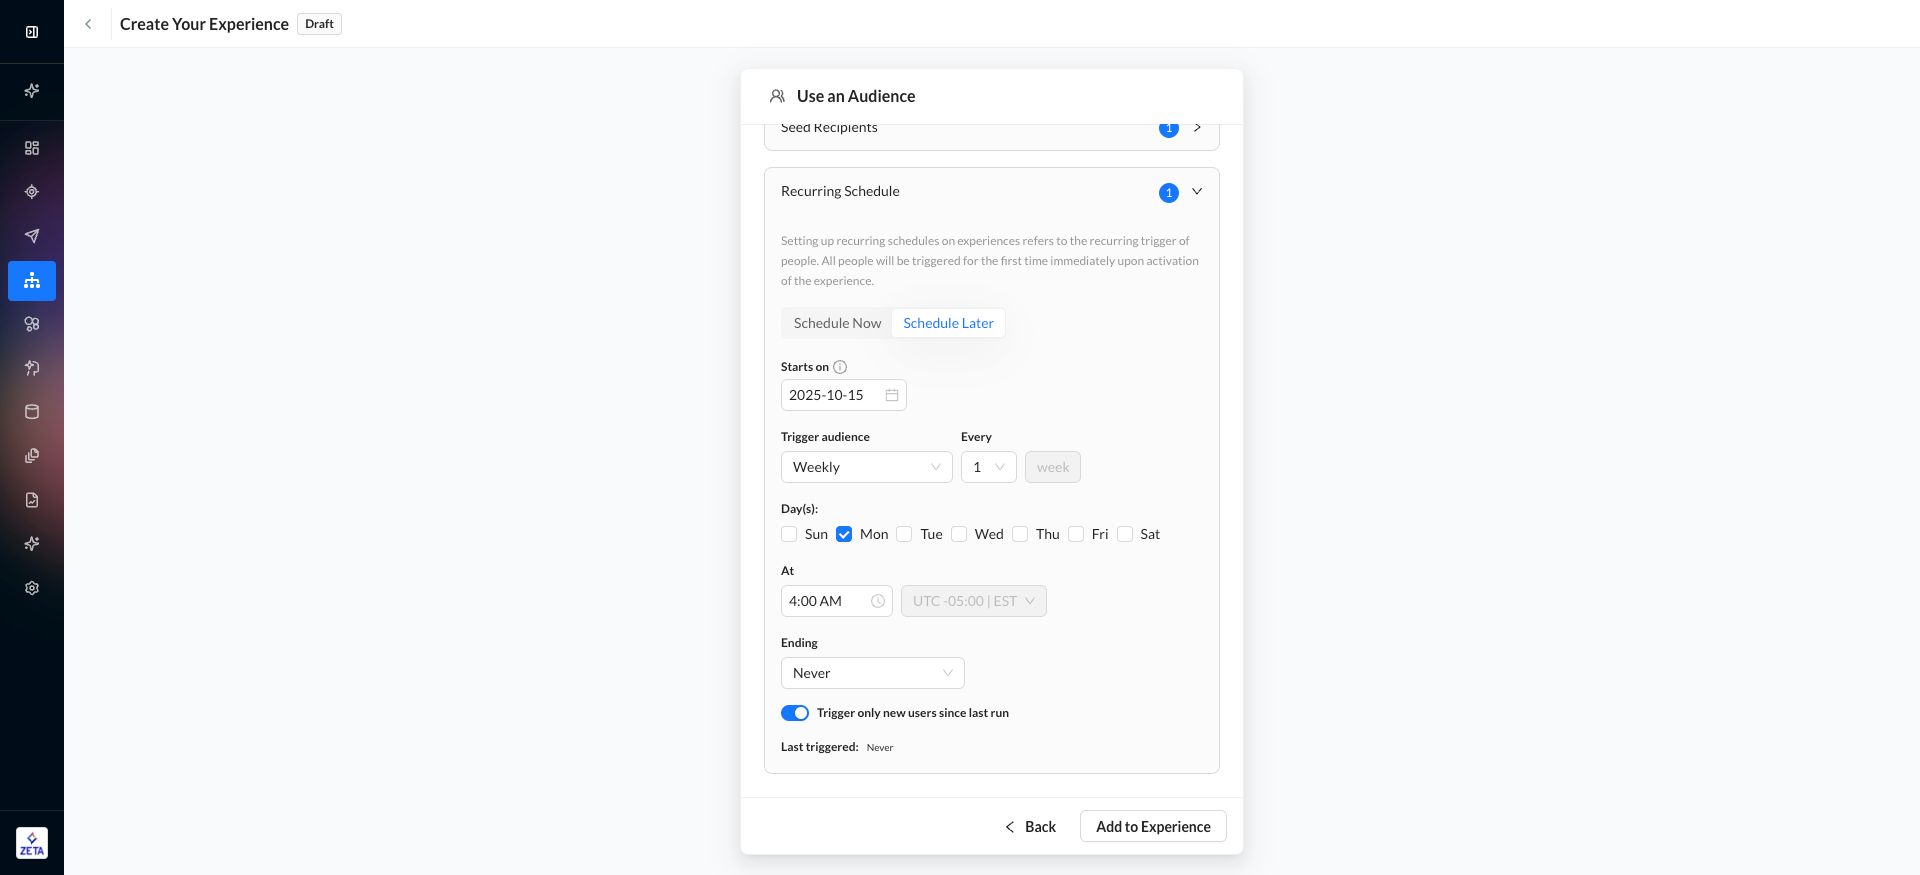
Recurring Schedule
You can update the recurring schedule at any time, even after activation.
All users will be triggered into the experience immediately upon activation. To trigger the audience again, set up an automated cadence in the Recurring Schedule panel below the audience selections. This refers to the second and subsequent times the audience is triggered.
1. Toggle Set up recurring schedule to ON.
2. Set the Starts on date, which will configure when the recurring schedule should become active
-
The audience will always trigger immediately upon activation and is not bound to the Starts on date. This schedule refers to every subsequent trigger post-activation.
3. Set the cadence:
-
Daily - runs every 24 hours
-
Weekly - 1-5 week(s) + day of week
-
Monthly - day of the month
4. Set the time
5. Set the ending date
-
Never
-
On a date
-
After a certain number of occurrences
6. To Trigger only new users since last run, meaning you don’t want to re-trigger users who were already in the audience the last time it was run, toggle this setting to ON.
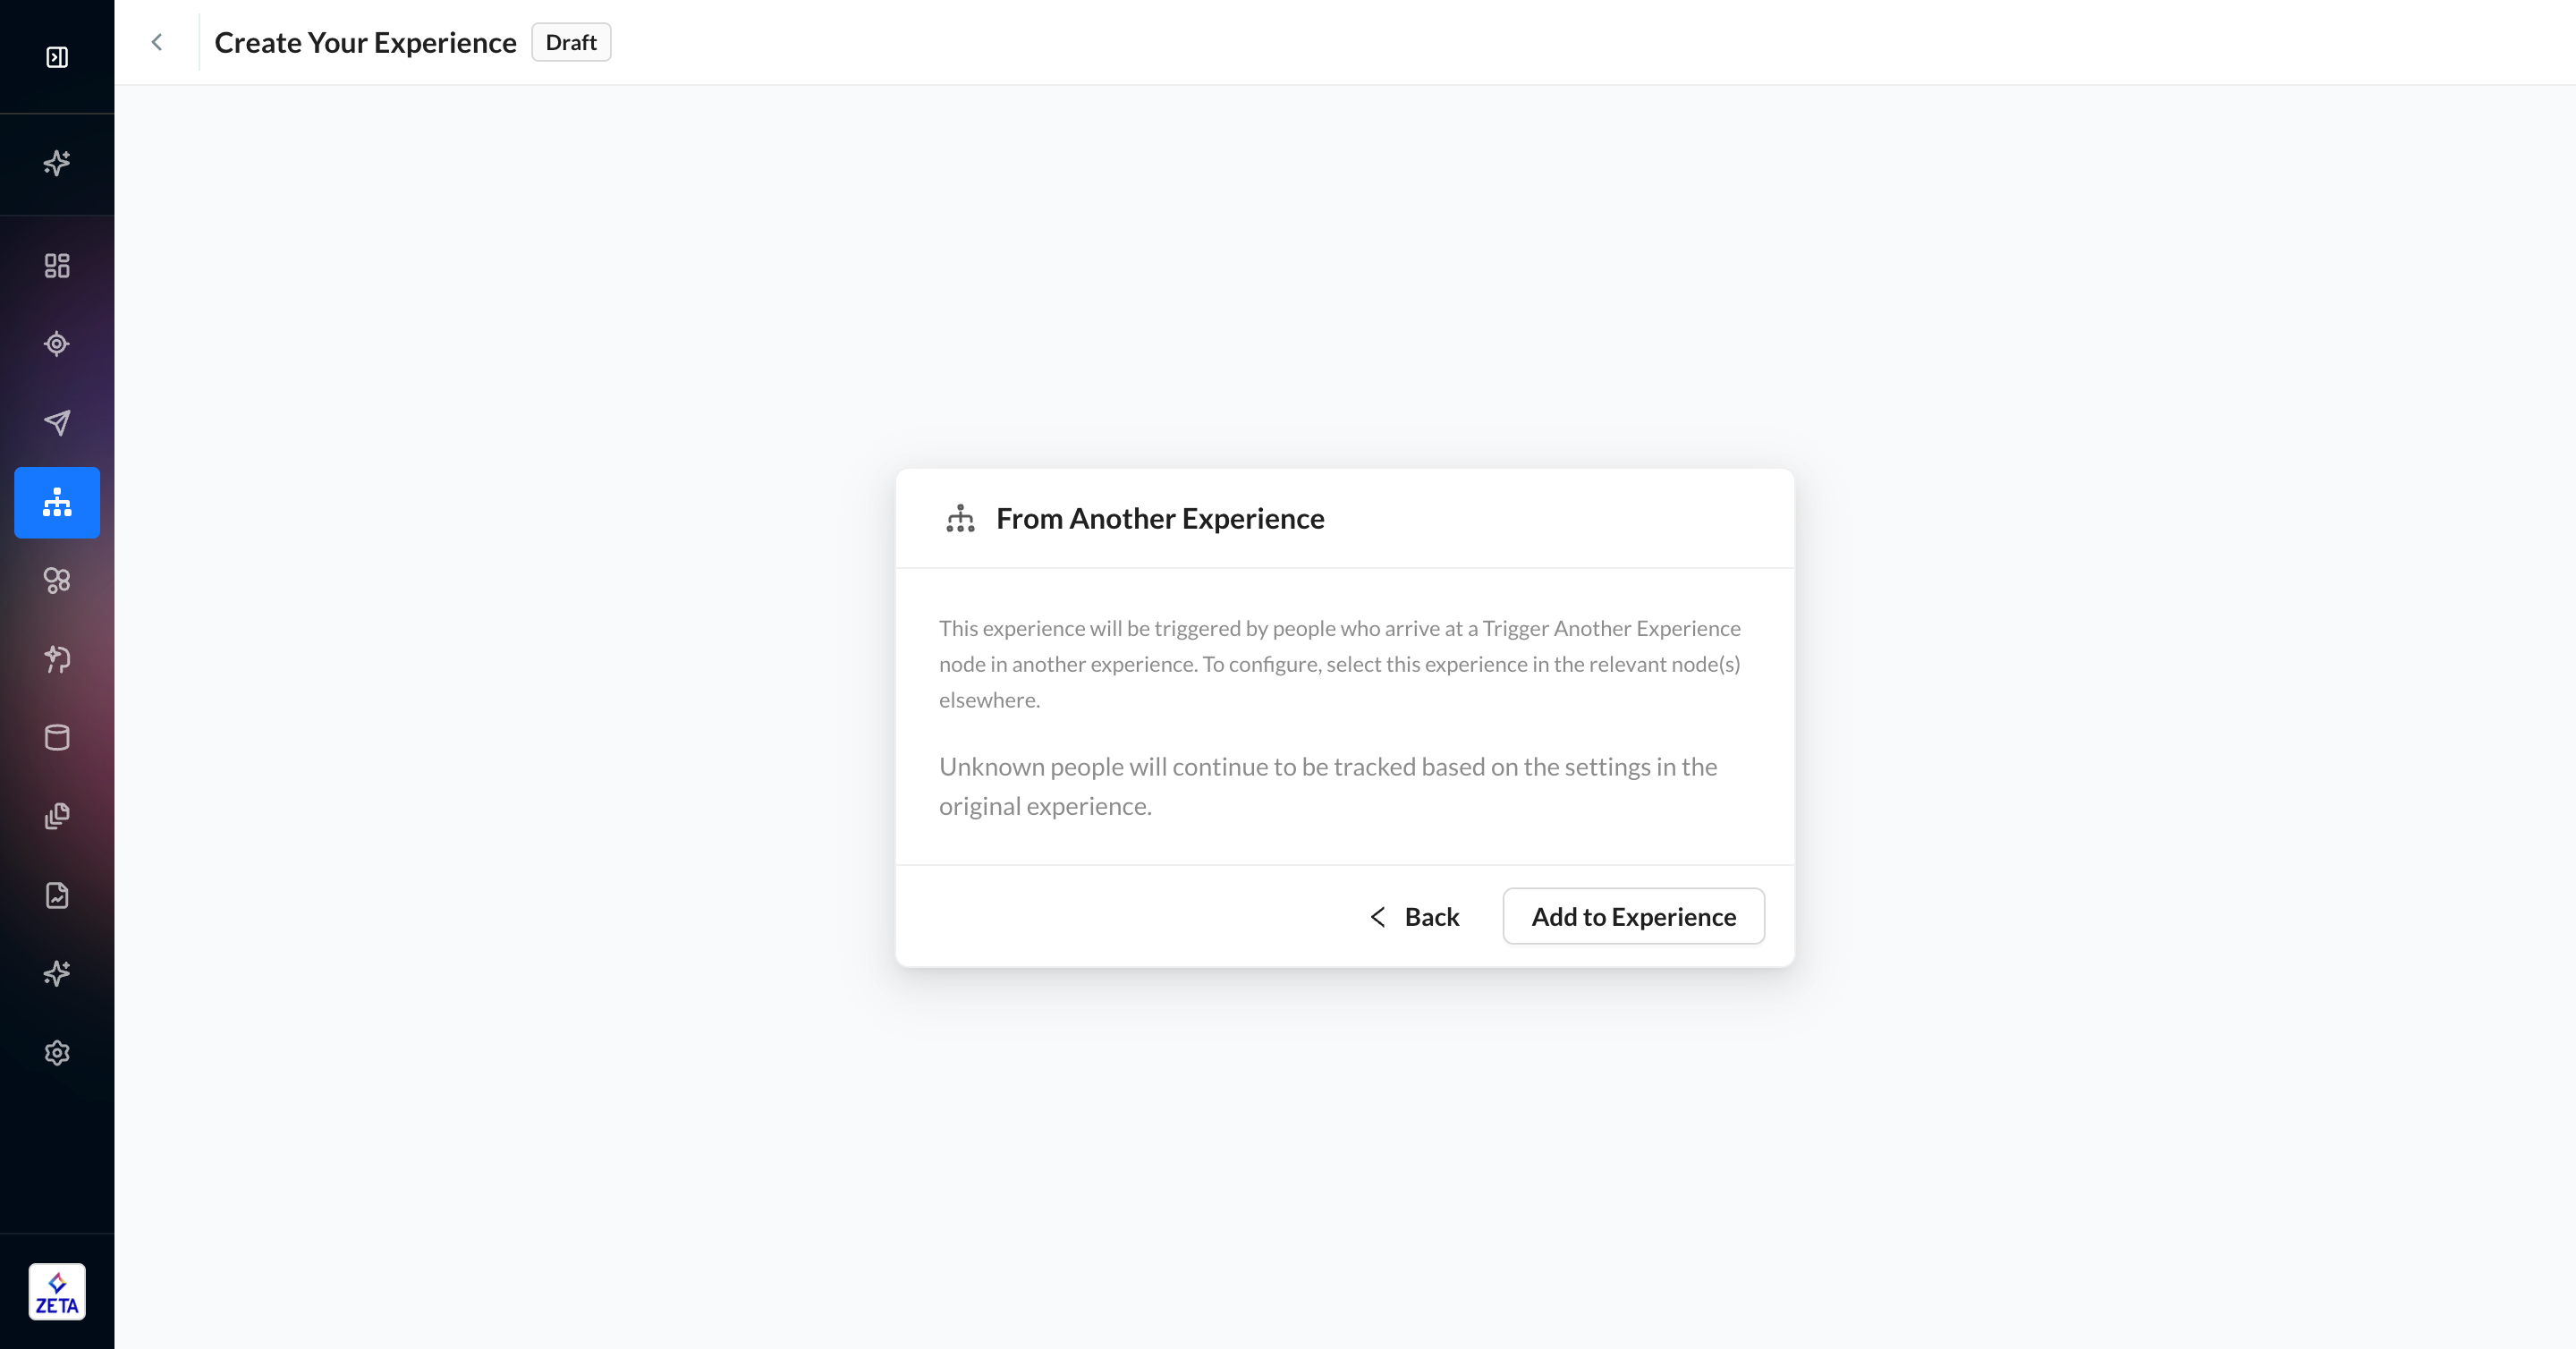
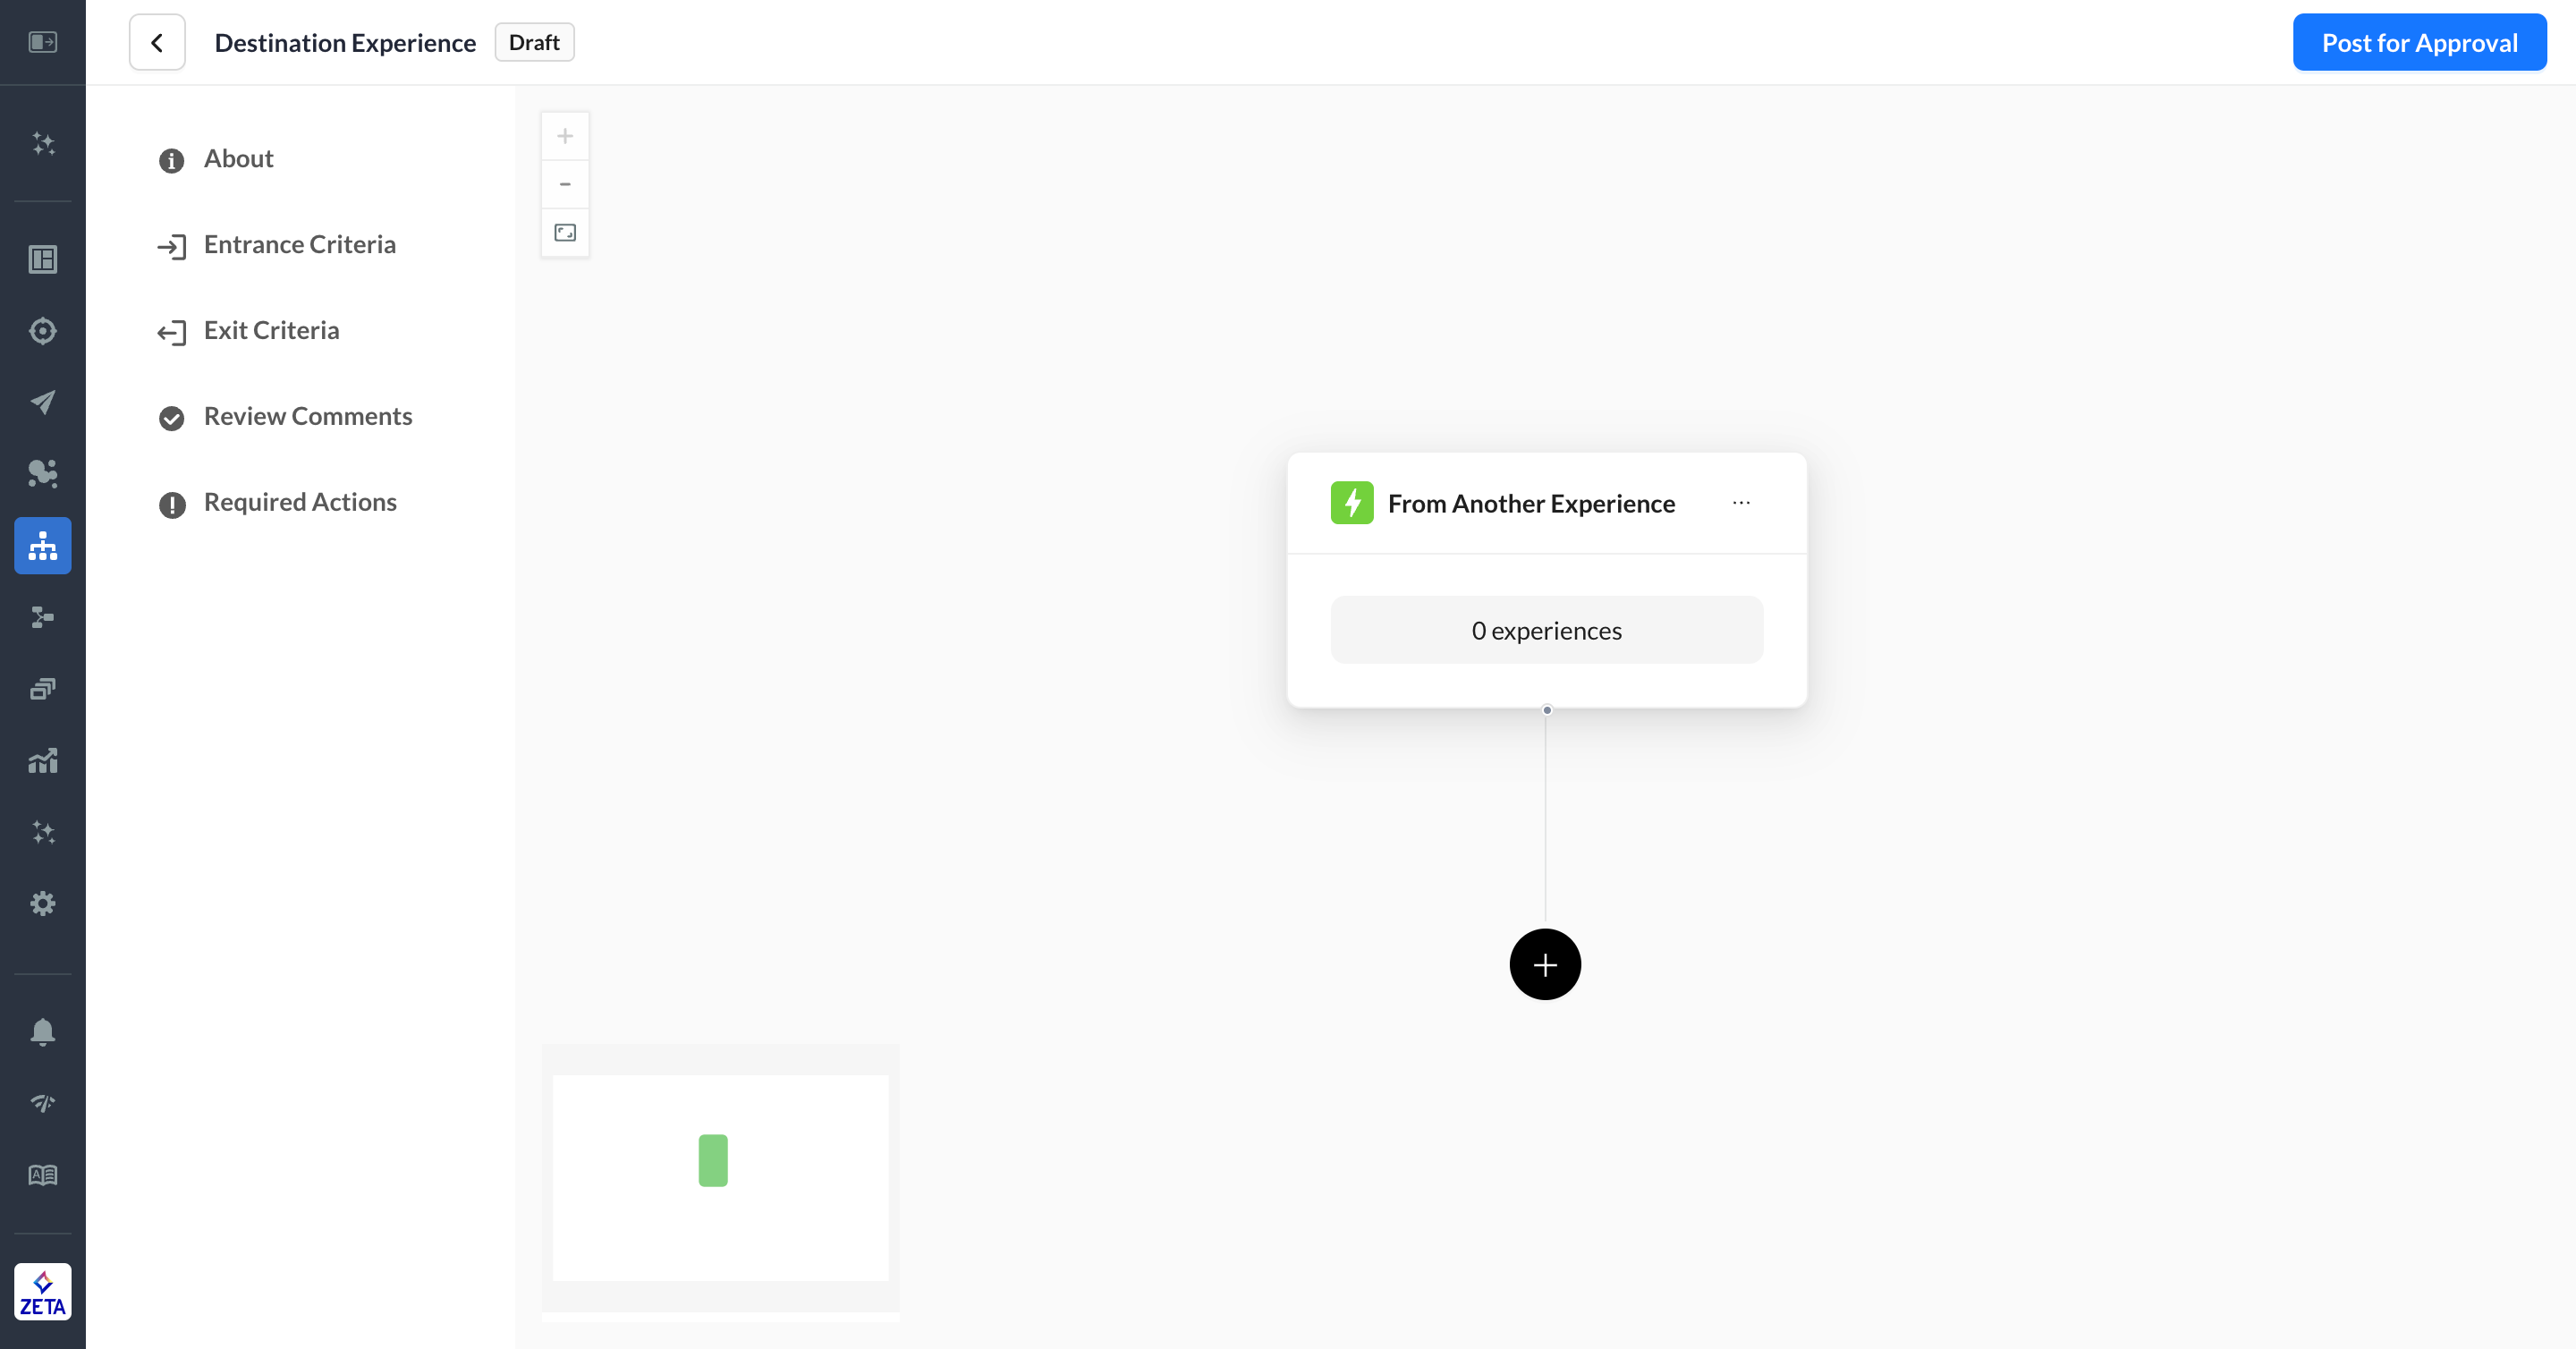
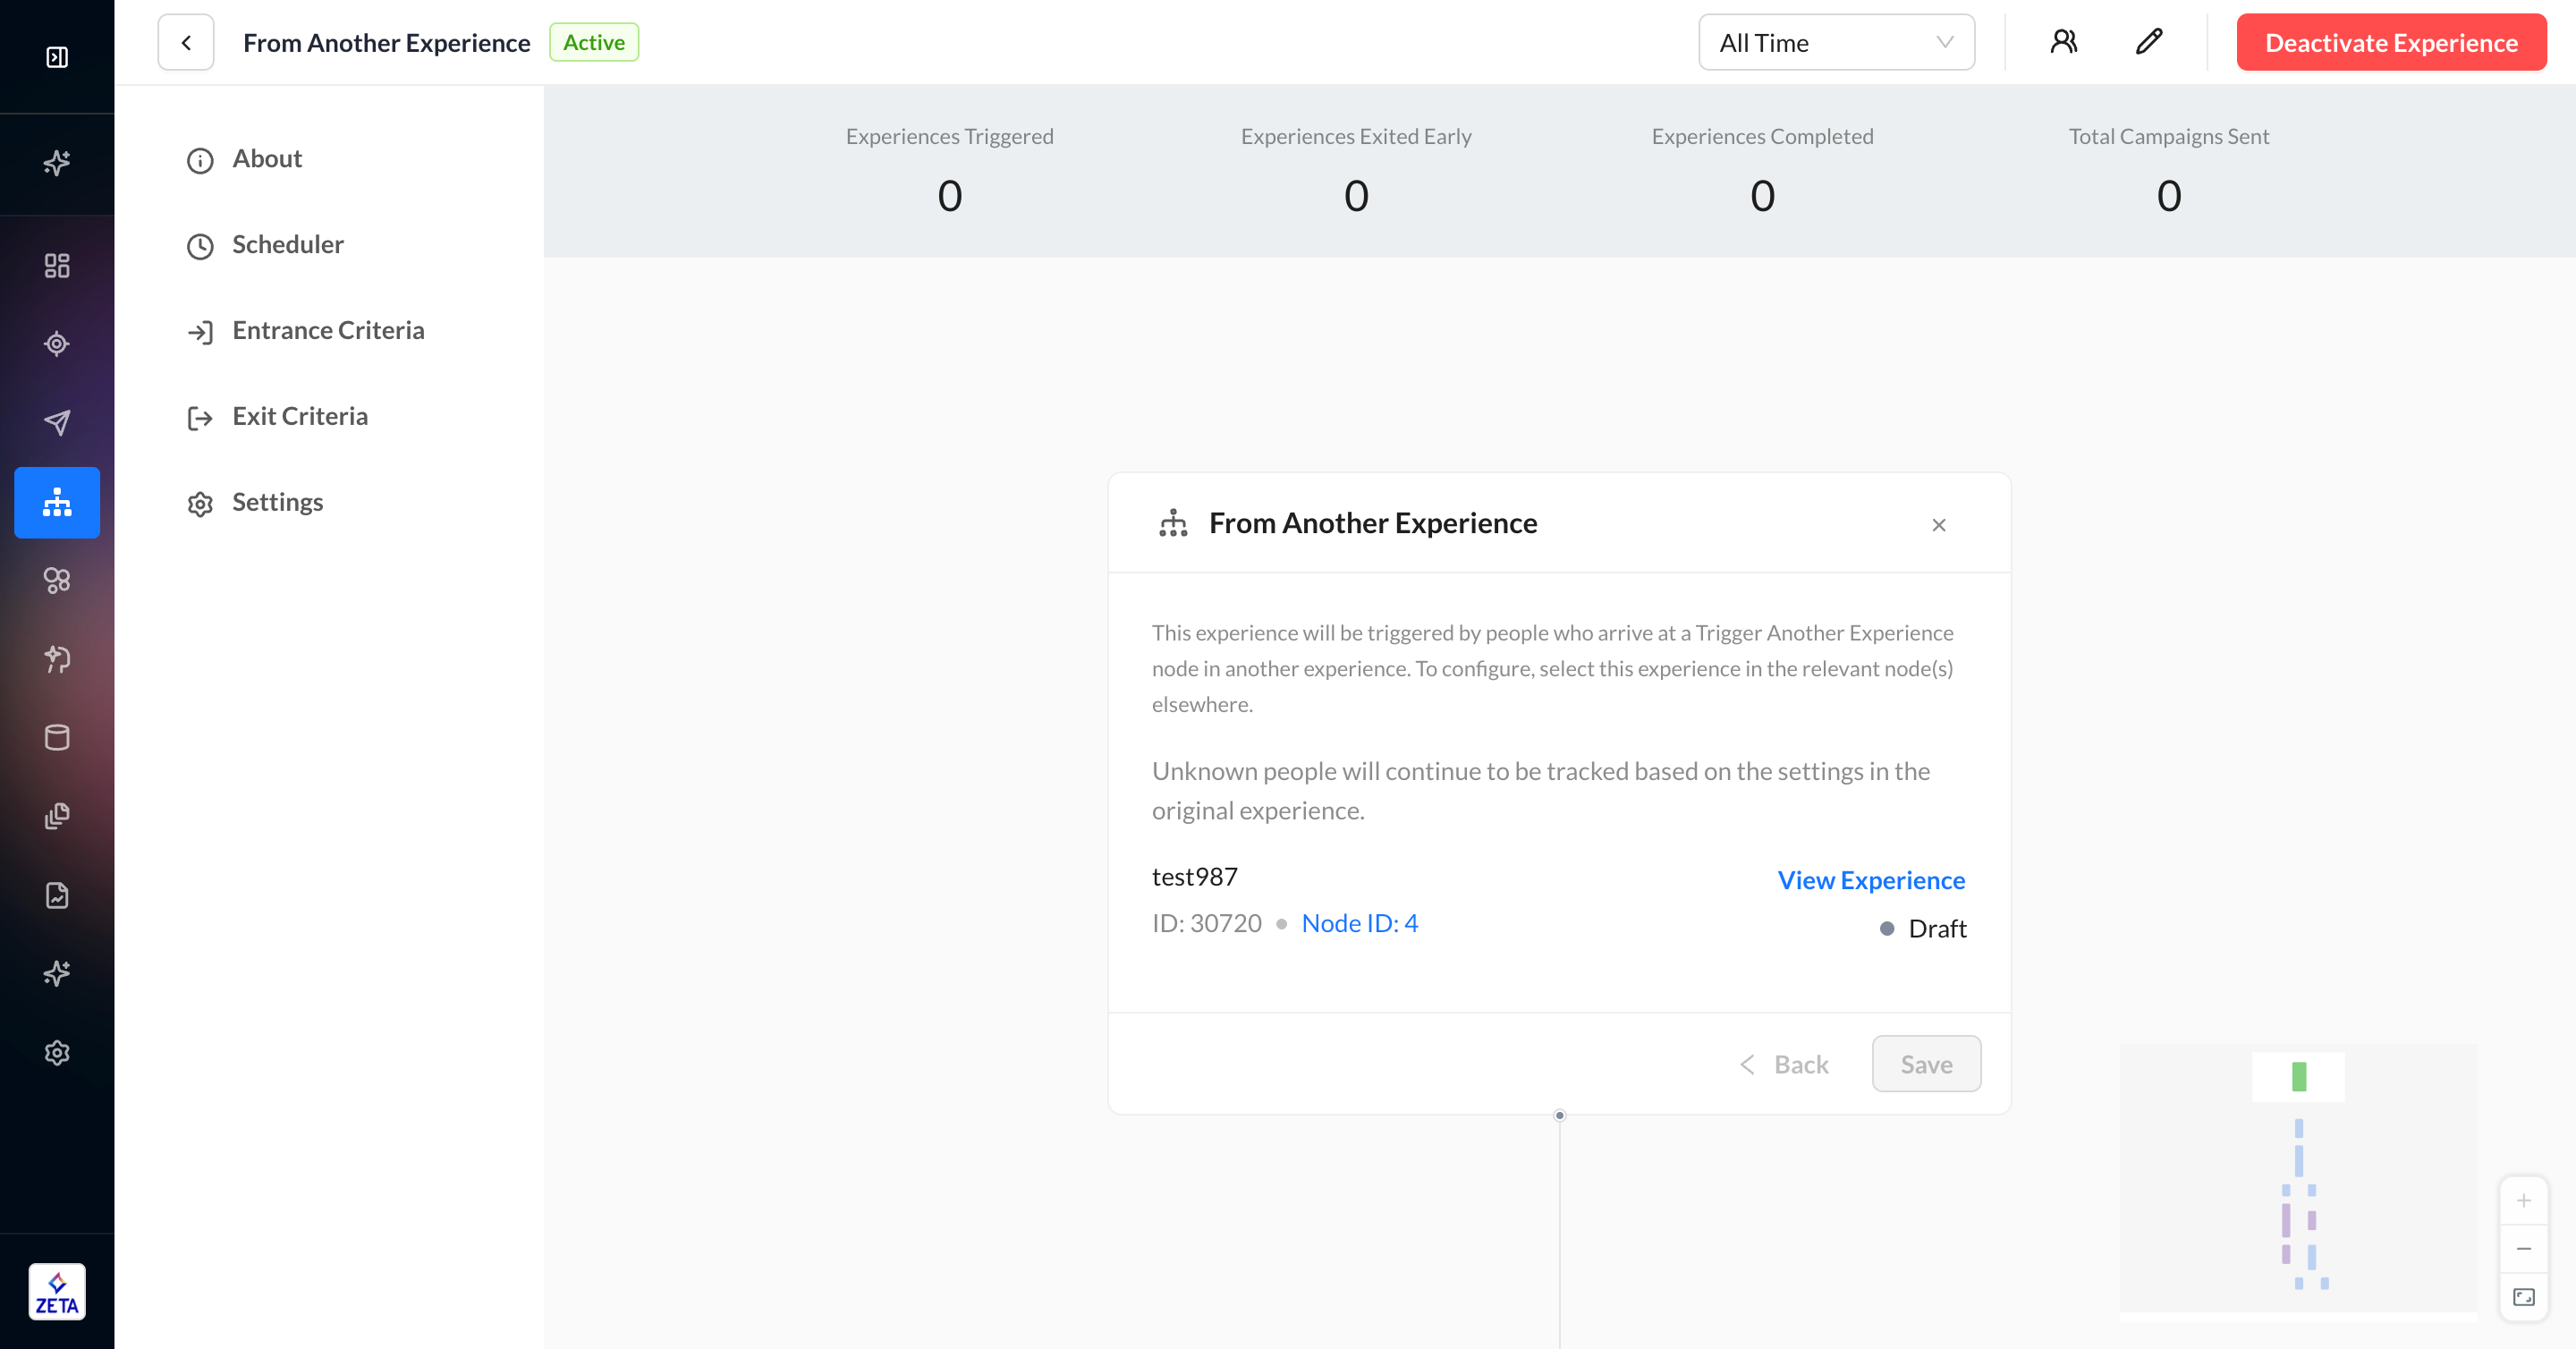
From Another Experience
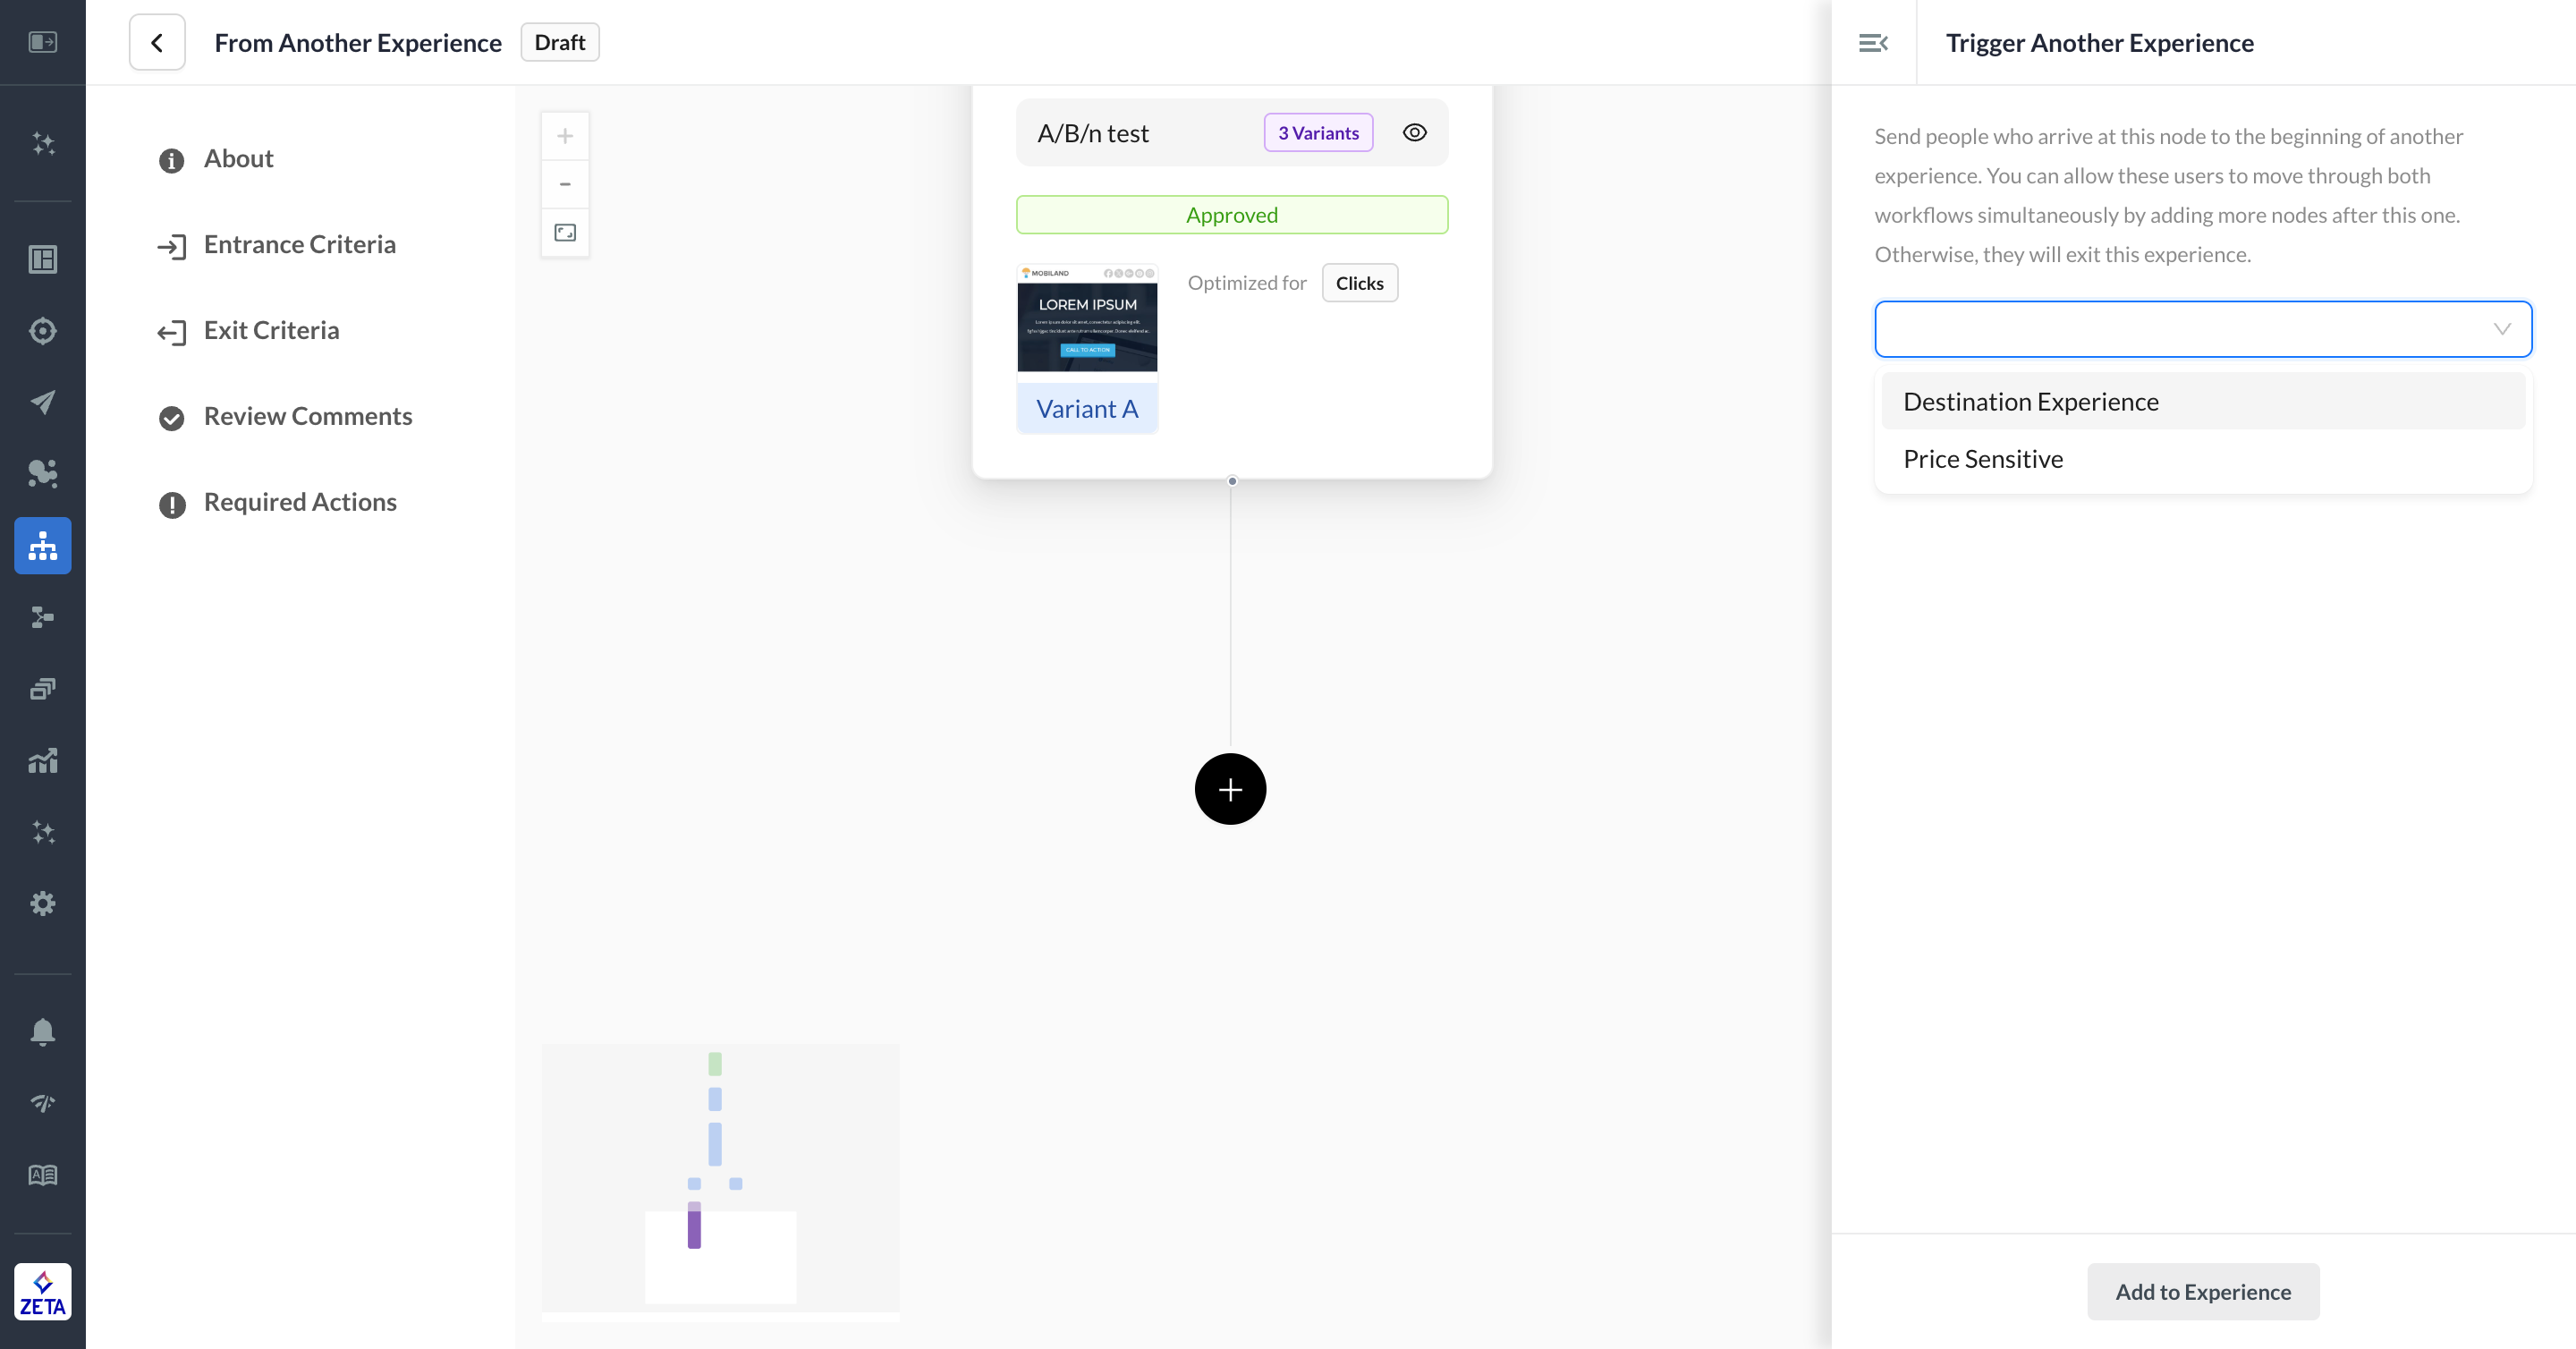
To chain experiences together, connect them via the Trigger Another Experience action node in one experience and the From Another Experience trigger node in the second experience. This feature allows you to configure users to travel seamlessly between workflows.
1. From the trigger panel, select From Another Experience.
2. By default, 0 experiences are selected. By creating an experience with this trigger node, you make it eligible to be selected in another experience’s Trigger Another Experience action node.
3. Click Add to Experience to create your experience.
4. In a different experience, add this experience to the Trigger Another Experience action node. There is no limit to the number of experiences that a From Another Experience trigger node can accept.
5. As other experiences select this experience to trigger users to, the count and experiences will appear automatically in this trigger node. You can view the names, IDs, node ID, and status of each experience, as well as a link.
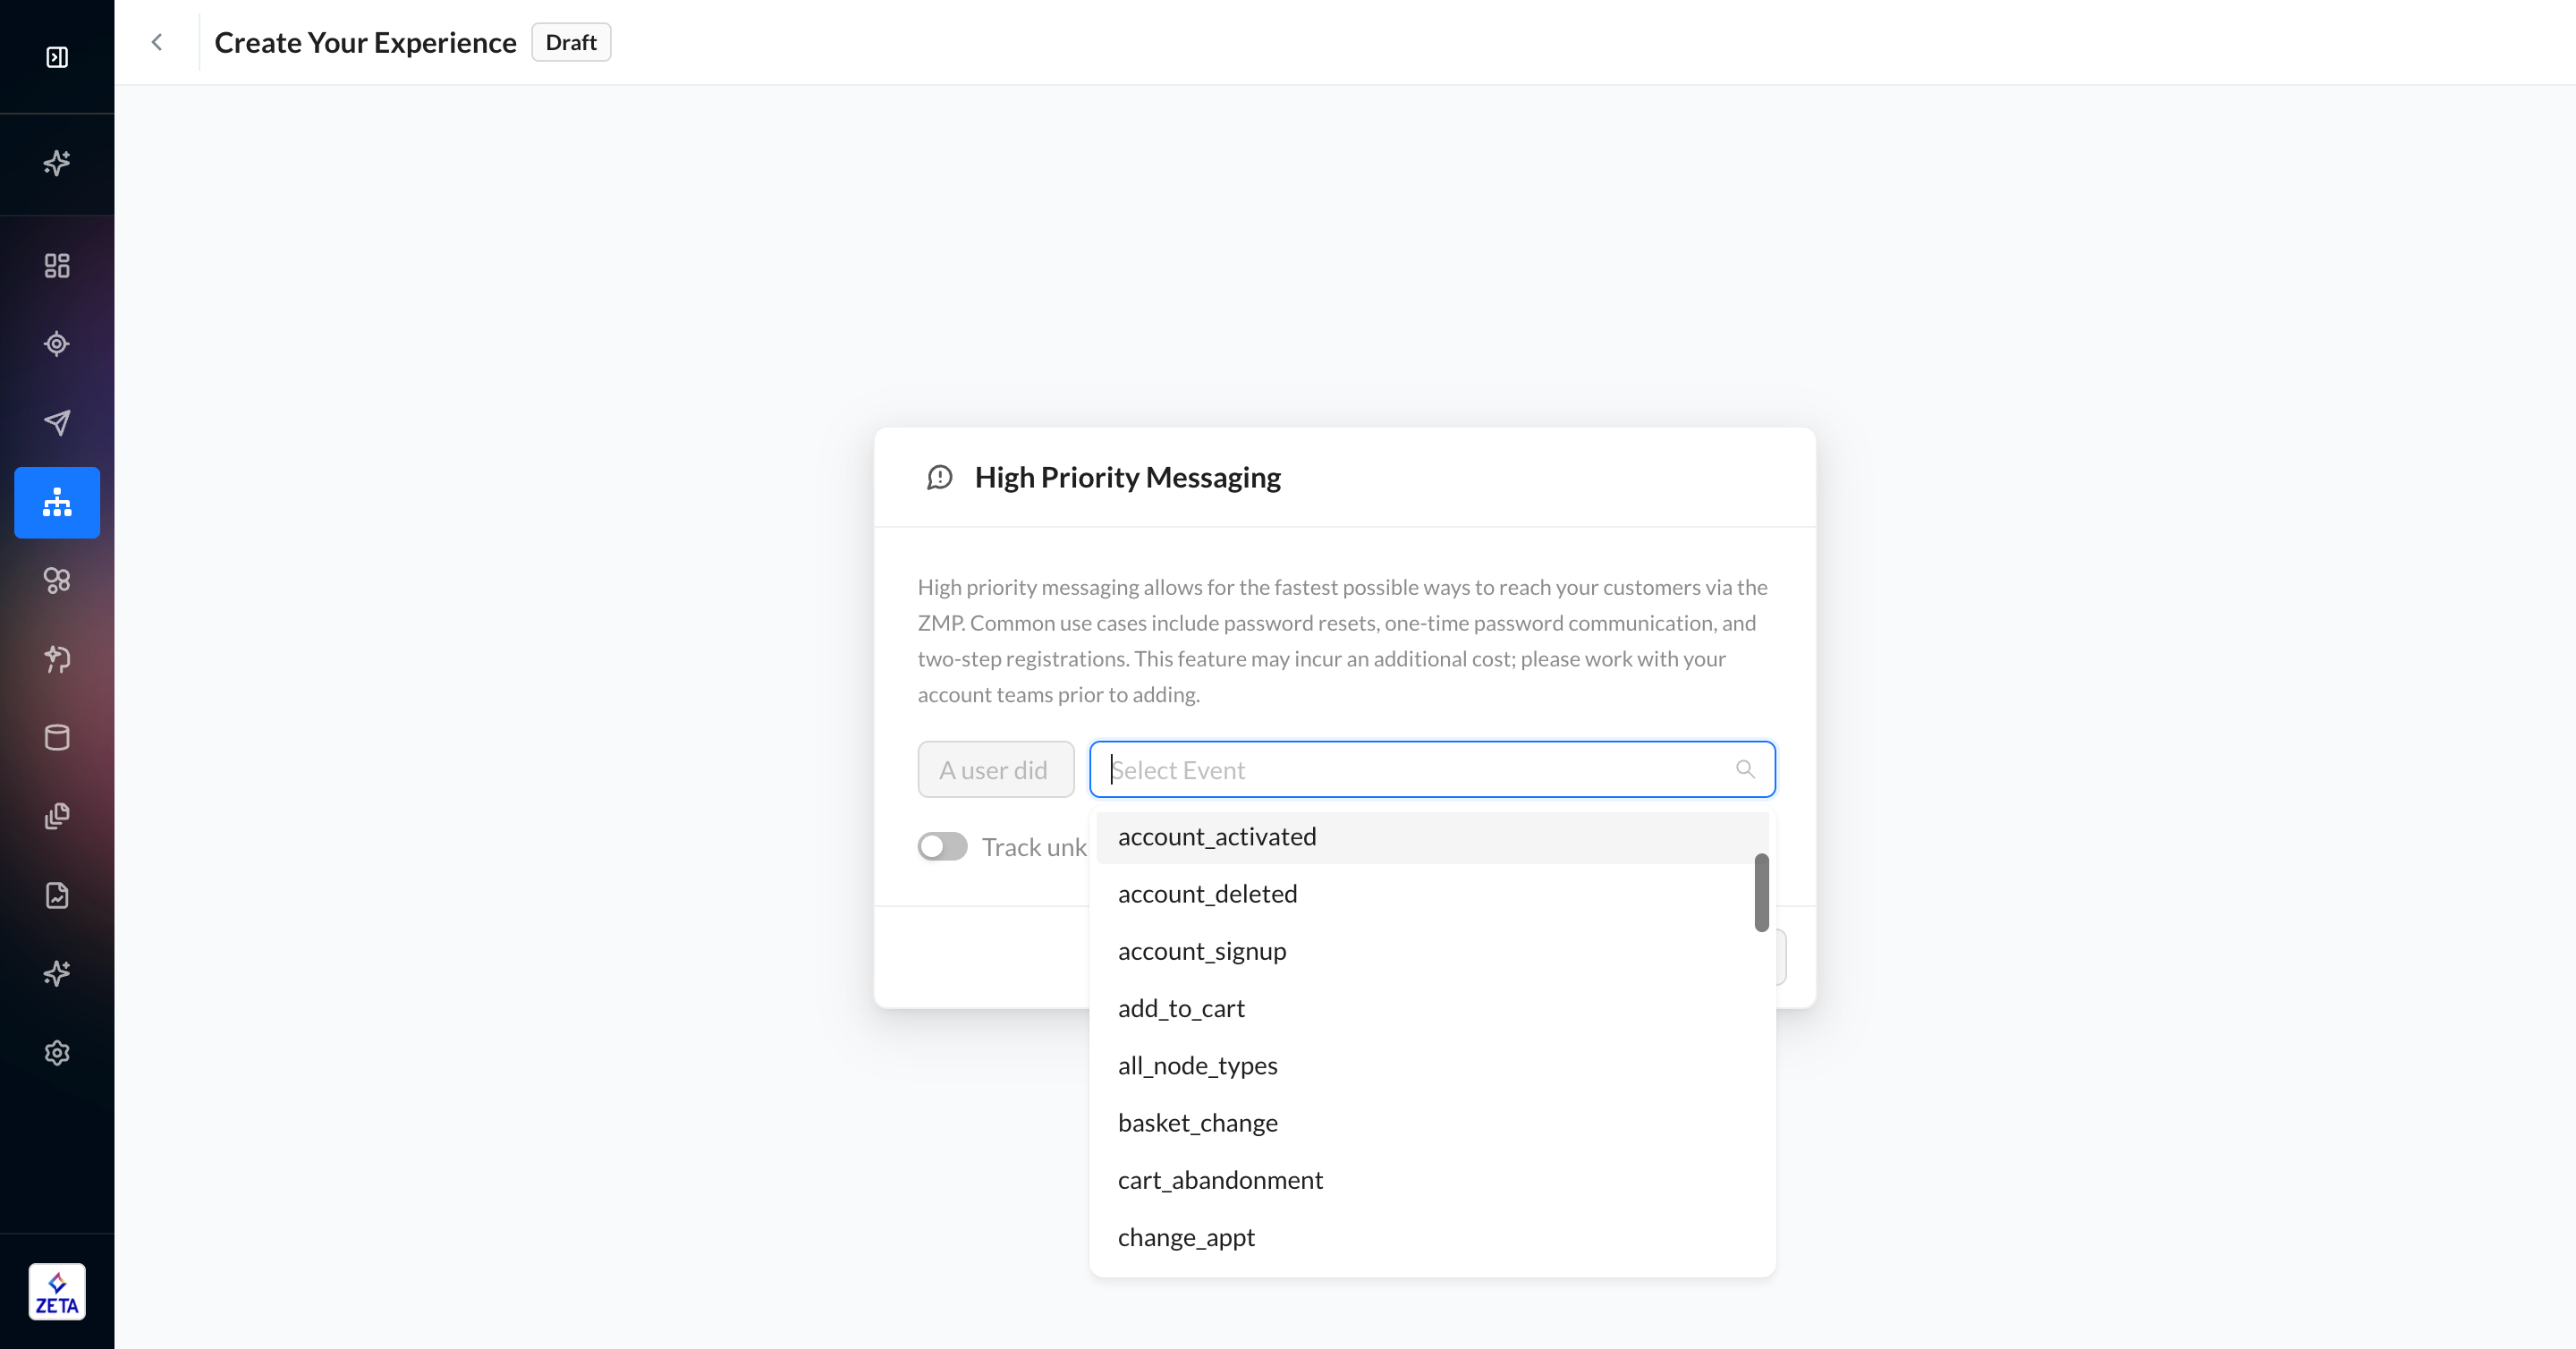
High Priority Messaging
Learn More about High Priority Messaging and talk to your Account Manager to get it enabled.
High Priority Messaging is a special kind of trigger node that can deliver sub-second messaging upon a user doing an event. It is only available as a trigger node, meaning that you can’t add a second High Priority Messaging node later in the experience.
1. Select the Account Event to trigger the experience using High Priority Messaging.
2. If you have the feature, enable the Track unknown people toggle to allow site visitors to enter the experience.