Exporting Audiences

After you have your desired audience in the Zeta Marketing Platform, you may want to export those contacts. You can export an entire audience, a segment, or a list. Audiences (Segments & Lists) can be exported out of the ZMP via either of the following methods:
One Time
Automated on a repeat schedule
Export Audiences
The process for setting up an export for both a Segment and a List is the same
1. Navigate to Audiences > Segments & Lists on the left sidebar. This will open the Segments and Lists summary.
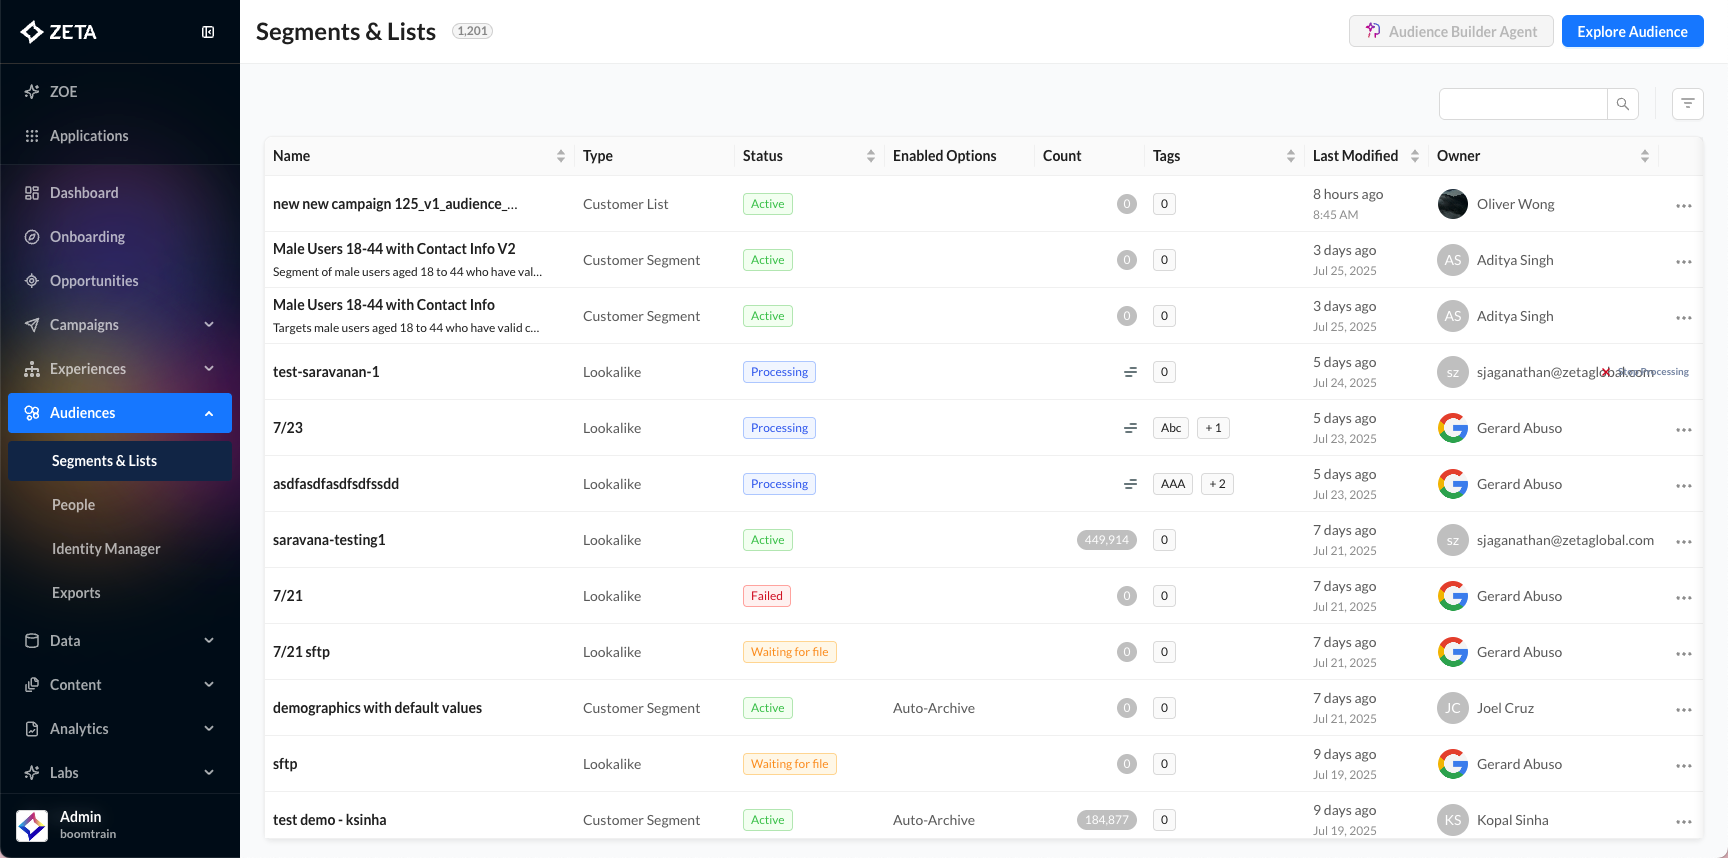
2. Locate the Segment or List you want to set up an export for, and click anywhere on the respective row outside of the name of the Segment.
-20250728-083733.gif?inst-v=268a9387-48fb-4bc7-b288-e5006def4796)
3. Within the Connect Audience tab of the right-side panel, choose the appropriate Destination for your export from the options listed under Available Connectors, configure its specifications, and click Connect.
-20250728-084117.gif?inst-v=268a9387-48fb-4bc7-b288-e5006def4796)
If your Partner Connector has multiple accounts set up, you’ll be prompted to select one before you see a list of audiences in the destination.
4. Click on Connect to export your audience.
If you've renamed the segment and are attempting to export the audience, please use the updated segment name in the export instead of the previous one.
Custom Export Operators
When exporting data to Partner or Programmatic destinations, you can choose how the data is sent using these options:
Add – Add people from your ZMP audience to the destination audience (default setting).
Remove – Take out people from the destination audience if they exist in your ZMP audience.
Replace – Swap out the entire destination audience with the people in your ZMP audience.
By default, ZMP uses the Add option unless you change it.
The Remove and Replace options only work if the destination audience already has people in it. If it’s brand new or empty, these options won’t be available.
✅ Audience has people → You can Remove or Replace.
❌ Audience is empty → You can only Add.
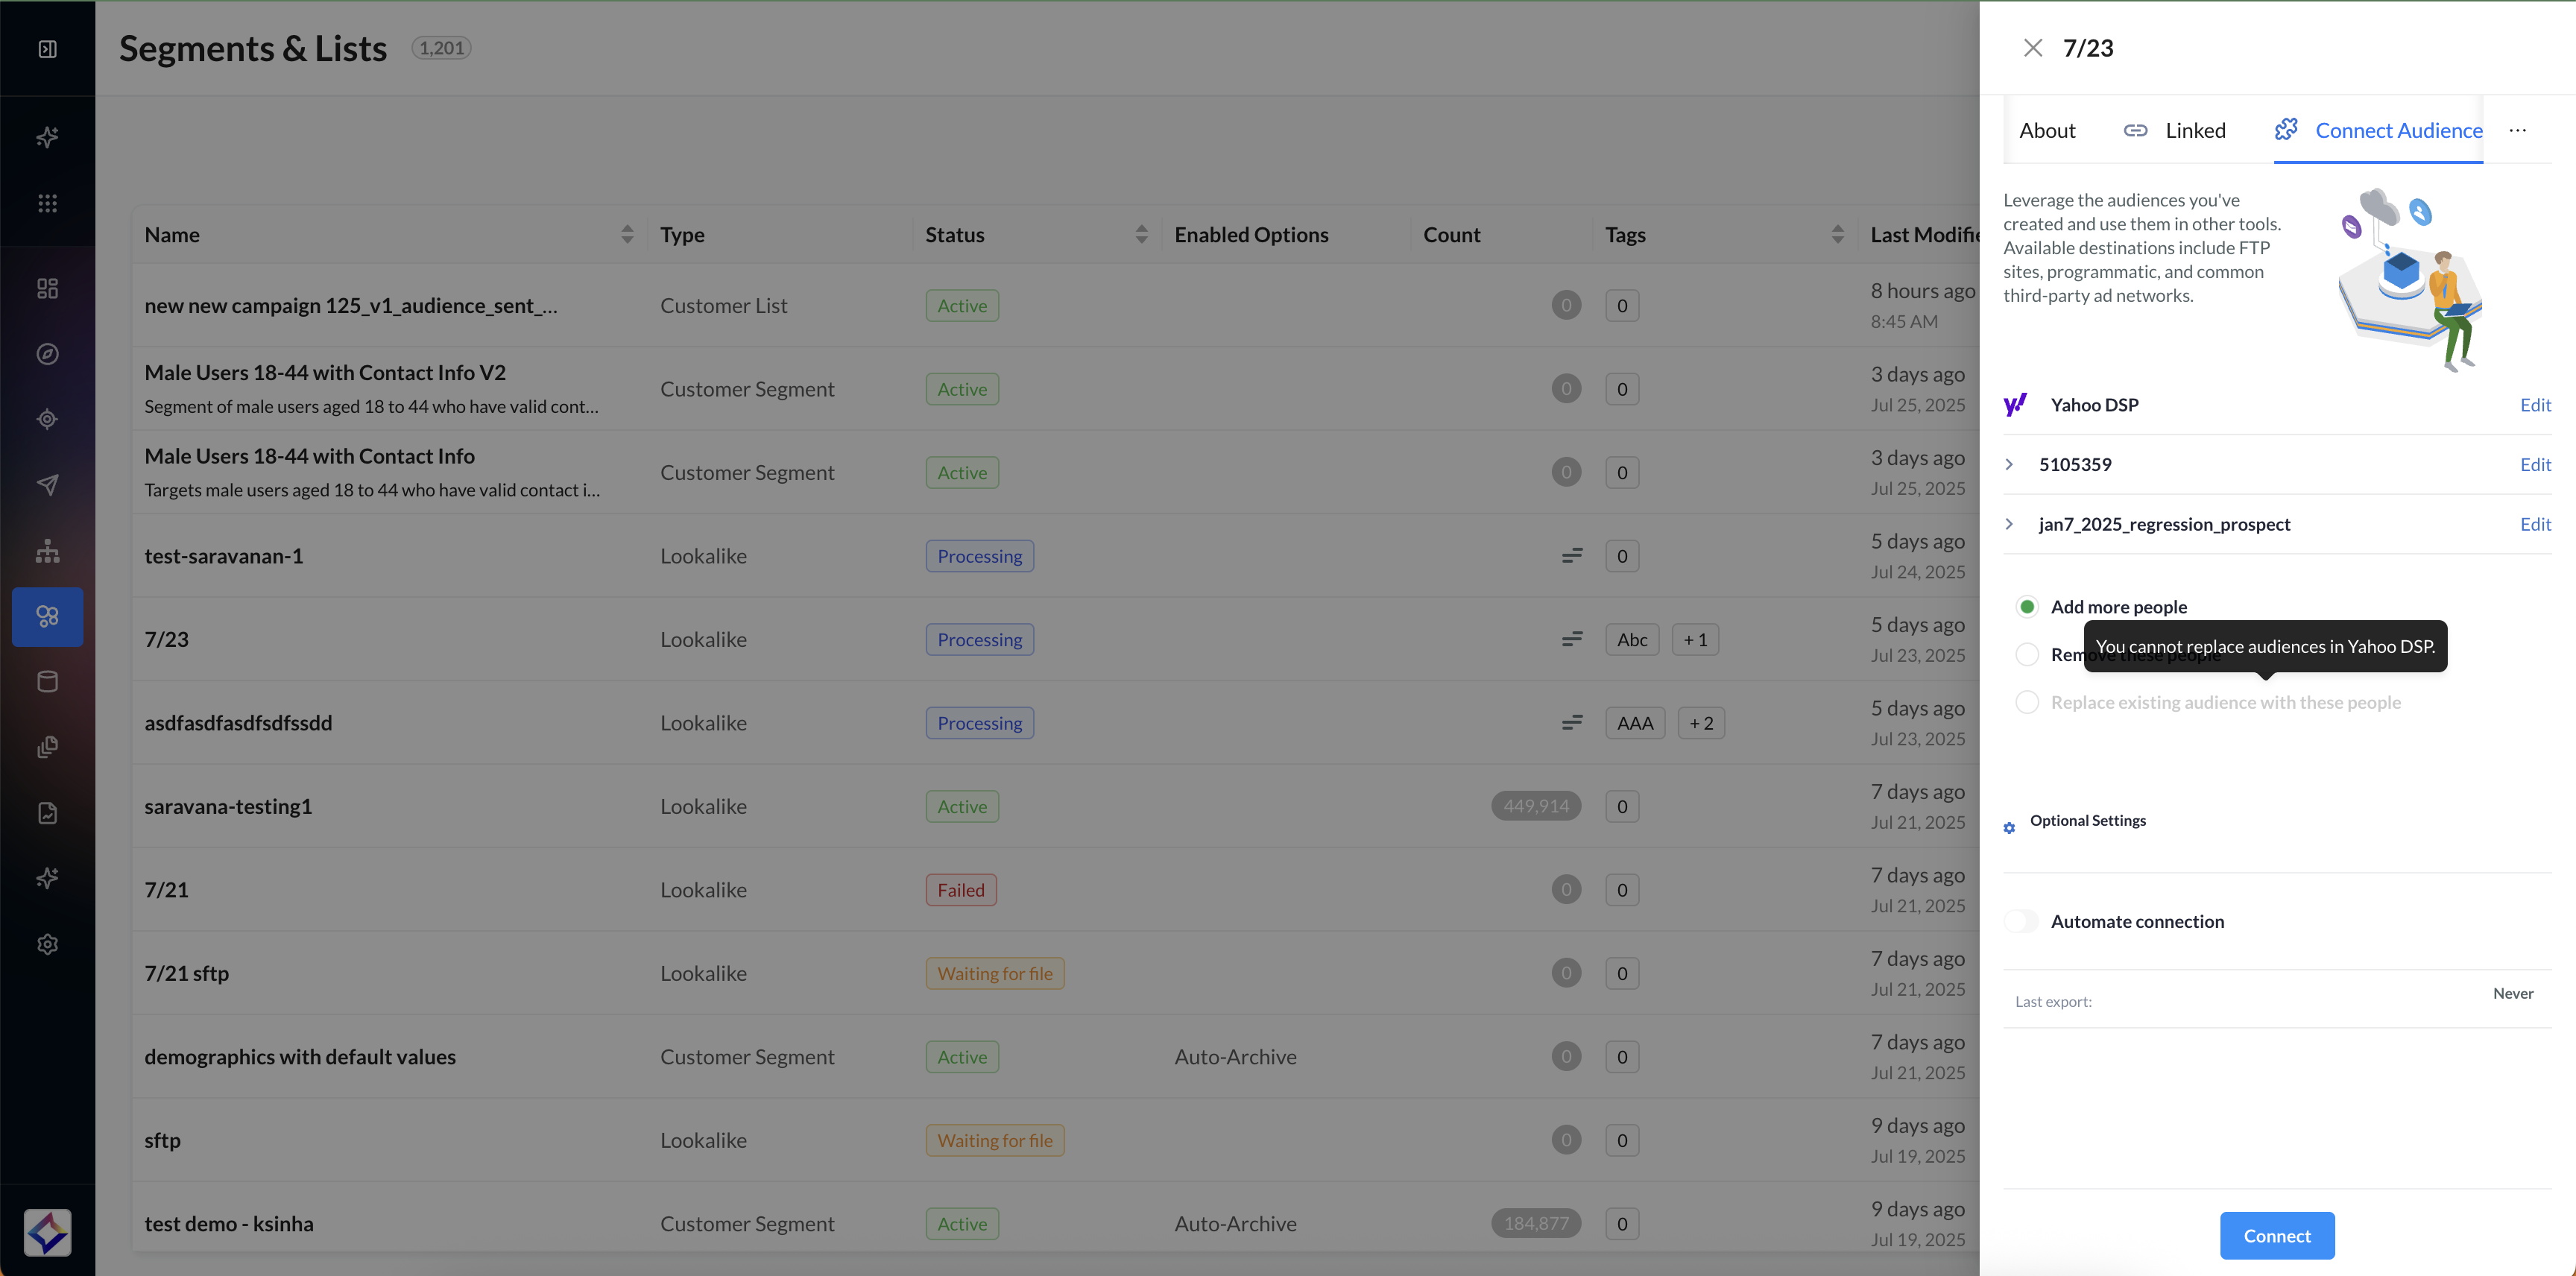
Connector | Available Operators | Known Limitations |
|---|---|---|
|
| |
Google Ads |
|
|
Programmatic (Zeta DSP) |
|
|
Yahoo DSP |
|
|
If the anonymous to known feature is enabled for your account, anonymous users within customer segments will not be supported for exports to Google, Facebook, Yahoo DSP, or Zeta Programmatic, and will be skipped.
More about Destinations
1. Locate the Segment or List you want to set up an export for, and click on its action menu (…) > Export.
2. Within the Connect Audience panel on the right, select Email from the list of Available Connectors. Click on Next.
2. Add the email IDs of your recipient(s). Multiple email addresses can be added separated by a comma.
3. Choose the file type the data should be delivered in:
CSV - This is a standards-compliant comma-separated values file
JSONL - JSON Line is a convenient format for storing structured data that may be processed one record at a time. Each row is a JSON-formatted object.
Read more about JSON Lines
4. Click on Connect to save your file export.
.gif?inst-v=268a9387-48fb-4bc7-b288-e5006def4796)
Buckets/External SFTP
The goal of SFTP is to provide access to the data we collect so users of our platform can integrate it into their own systems. Furthermore, users can securely retrieve standard data feeds that deliver an automated dump of all users or any specified segments found in the Zeta platform. The SFTP location that the export will be delivered to is displayed in the FTP Location field. This is an internal, static location from which the file should be pulled.
To set up cloud storage partners (Google Buckets, Amazon S3, Microsoft Azure Blob Storage, SFTP, FTP, FTPS, etc), visit the Settings > Connections page. You can then send Customer Audiences to these cloud storage partners that you have authenticated and retrieve the user-level data to integrate into your own systems.
Amazon S3
1. Select Amazon S3 from the list of Available Connectors and click on Next.
.gif?inst-v=268a9387-48fb-4bc7-b288-e5006def4796)
2. From the list that appears, select the desired Amazon S3 Connection you want to export your audience to, and click on Next.
3. Choose the file type the data should be delivered in:
CSV - This is a standards-compliant comma-separated values file
JSONL - JSON Line is a convenient format for storing structured data that may be processed one record at a time. Each row is a JSON-formatted object.
Read more about JSON Lines
4. Click on Connect to save your file export.
Microsoft Azure Blob Storage
1. Select Microsoft Azure Blob Storage from the list of Available Connectors and click on Next.
.gif?inst-v=268a9387-48fb-4bc7-b288-e5006def4796)
2. From the list that appears, select the desired Microsoft Azure Blob Storage Connection you want to export your audience to, and click on Next.
3. Choose the file type the data should be delivered in:
CSV - This is a standards-compliant comma-separated values file
JSONL - JSON Line is a convenient format for storing structured data that may be processed one record at a time. Each row is a JSON-formatted object.
Read more about JSON Lines
4. Click on Connect to save your file export.
Google Buckets
1. Select Google Buckets from the list of Available Connectors and click on Next.
.gif?inst-v=268a9387-48fb-4bc7-b288-e5006def4796)
2. From the list that appears, select the desired Google Buckets Connection you want to export your audience to, and click on Next.
3. Choose the file type the data should be delivered in:
CSV - This is a standards-compliant comma-separated values file
JSONL - JSON Line is a convenient format for storing structured data that may be processed one record at a time. Each row is a JSON-formatted object.
Read more about JSON Lines
4. Click on Connect to save your file export.
SFTP
1. Select SFTP from the list of Available Connectors and click on Next.
.gif?inst-v=268a9387-48fb-4bc7-b288-e5006def4796)
2. From the list that appears, select the desired FTP Connection you want to export your audience to, and click on Next.
3. Choose the file type the data should be delivered:
CSV - This is a standards-compliant comma-separated values file
JSONL - JSON Line is a convenient format for storing structured data that may be processed one record at a time. Each row is a JSON-formatted object.
Read more about JSON Lines
4. Click on Connect to save your file export.
🔺 For Mac users: If gzip files do not extract just by double clicking on the file itself, open Terminal on your mac device and Type gzip -d file.gz <exact file location of the gzip file> and press return. OR type gunzip <exact file location of the gzip file> and press return. Alternatively, just drag and drop the gzip file straight into the Terminal window. Other recommendations would be using third-party apps to unzip any zipped file. |
Matched lists and lookalike audiences can be exported to Google, Facebook, and ZXDS.
Zeta Programmatic Audiences
No additional fields should appear for this option, as this destination is configured by Zeta on the back end to map to the necessary DSP accounts. When the export runs, all active contacts for a user are hashed and sent to Zeta DSP for generating a match audience.
.gif?inst-v=268a9387-48fb-4bc7-b288-e5006def4796)
In addition to the user contacts, the following user attributes, when present, are included as a part of the export as well, in order to improve the match rate at the destination. Note that these attributes are optional, and Zeta detects them based on their exact name as specified below.
email_md5
first_name
last_name
address_line_1
address_line_2
city
state
zip
Exporting to Facebook or Google Ads is always incremental for any segment or list.
This destination should be configured prior to being able to use it. If this is not yet configured, you will be prompted to authenticate in Settings > Connections. If you have more than one account configured for this destination, you’ll be prompted to select it before you see a list of audiences.
A drop-down list of the custom audiences already available to export into will be displayed. If no custom audience is selected, a new one will be created with the name of the segment or list chosen as the source.
When the export runs, all the active contacts for a user are hashed and sent to Facebook for generating a custom audience.
.gif?inst-v=268a9387-48fb-4bc7-b288-e5006def4796)
Facebook requires the approval of the following documents prior to allowing access to the Custom Audiences. Please note, if you are working on behalf of the client, they will need to approve these:
If you face any error when exporting your audience to Facebook, please recreate the audience list/segment and try exporting the audience again.
Read more about Facebook Connector for Prospects
Yahoo DSP
This destination should be configured prior to being able to use it. If this is not yet configured, you will be prompted to authenticate in Settings > Connections. If you have more than one account configured for this destination, you’ll be prompted to select it before you see a list of audiences.
Your Yahoo DSP MDM ID must be correct in order to authenticate your account. Yahoo requires the first-party (Customer) and third-party (Prospect) data to be stored separately underneath your account’s MDM ID. While exporting audiences across Yahoo, you will need to explicitly select Customer and Prospect audiences throughout your export process, and you cannot send data of one kind in ZMP to the opposite in Yahoo DSP.
.gif?inst-v=268a9387-48fb-4bc7-b288-e5006def4796)
You have the option to export to an existing audience segment in Yahoo DSP or to create a new one. Exporting to an existing Yahoo DSP segment will add new members only. It currently doesn’t support overwriting or removing audience members.
Read more about Yahoo DSP Connector for Customers and Prospects
Google Ads
This destination should be configured prior to being able to use it. If this is not yet configured, you will be prompted to authenticate in Settings > Connections. If you have more than one account configured for this destination, you’ll be prompted to select it before you see a list of audiences.
Once integrated, a drop-down list of all customer match audiences available in your Google Ads account will automatically show up for selection.
If you'd like to create a new Customer Match Audience in your Ad account, simply type the name, and you will see an option to create one in-line directly from the Hub.
When the export runs, all active contacts for a user are hashed and sent to Google Ads for generating a match audience.
When selecting Optional Settings when configuring your export, there are 2 Google Ads-specific fields that can be included. These fields must be created with these exact names as user-level properties, and values must be in the format prescribed by Google, documented below:
Field Name | Function | Accepted Values |
|---|---|---|
google_ad_user_data | consent for sending advertising user data to Google |
|
google_ad_personalization | consent for personalization advertising within Google Ads |
|
Google Ads also accepts Address for matching, so the following fields can be selected: first_name, last_name, city, state , country_code, postal_code, street_address - per Google requirements, at least these 4 must be included for matching: country_code, postal_code, first_name, and last_name
.gif?inst-v=268a9387-48fb-4bc7-b288-e5006def4796)
Scheduling Automated Exports
You can only automate partner exports using the Add operator.
Exports can be scheduled to run either once or, for certain audiences, set to be automated on a repeat schedule. You can schedule recurring exports for Customer Segments, Customer Lists, and Prospect Segments since these audiences can be updated within the ZMP. Prospect Lists, Matched Lists, and Lookalikes cannot be edited so you won’t be able to set these exports to run more than once.
1. To set up a recurring export for a Customer Segment, Customer List, or Prospect Segment, select the connector and configure the destination details as you would for a one-time export.
2. Once finished, switch on the toggle for Automate Connection to reveal your scheduling options.
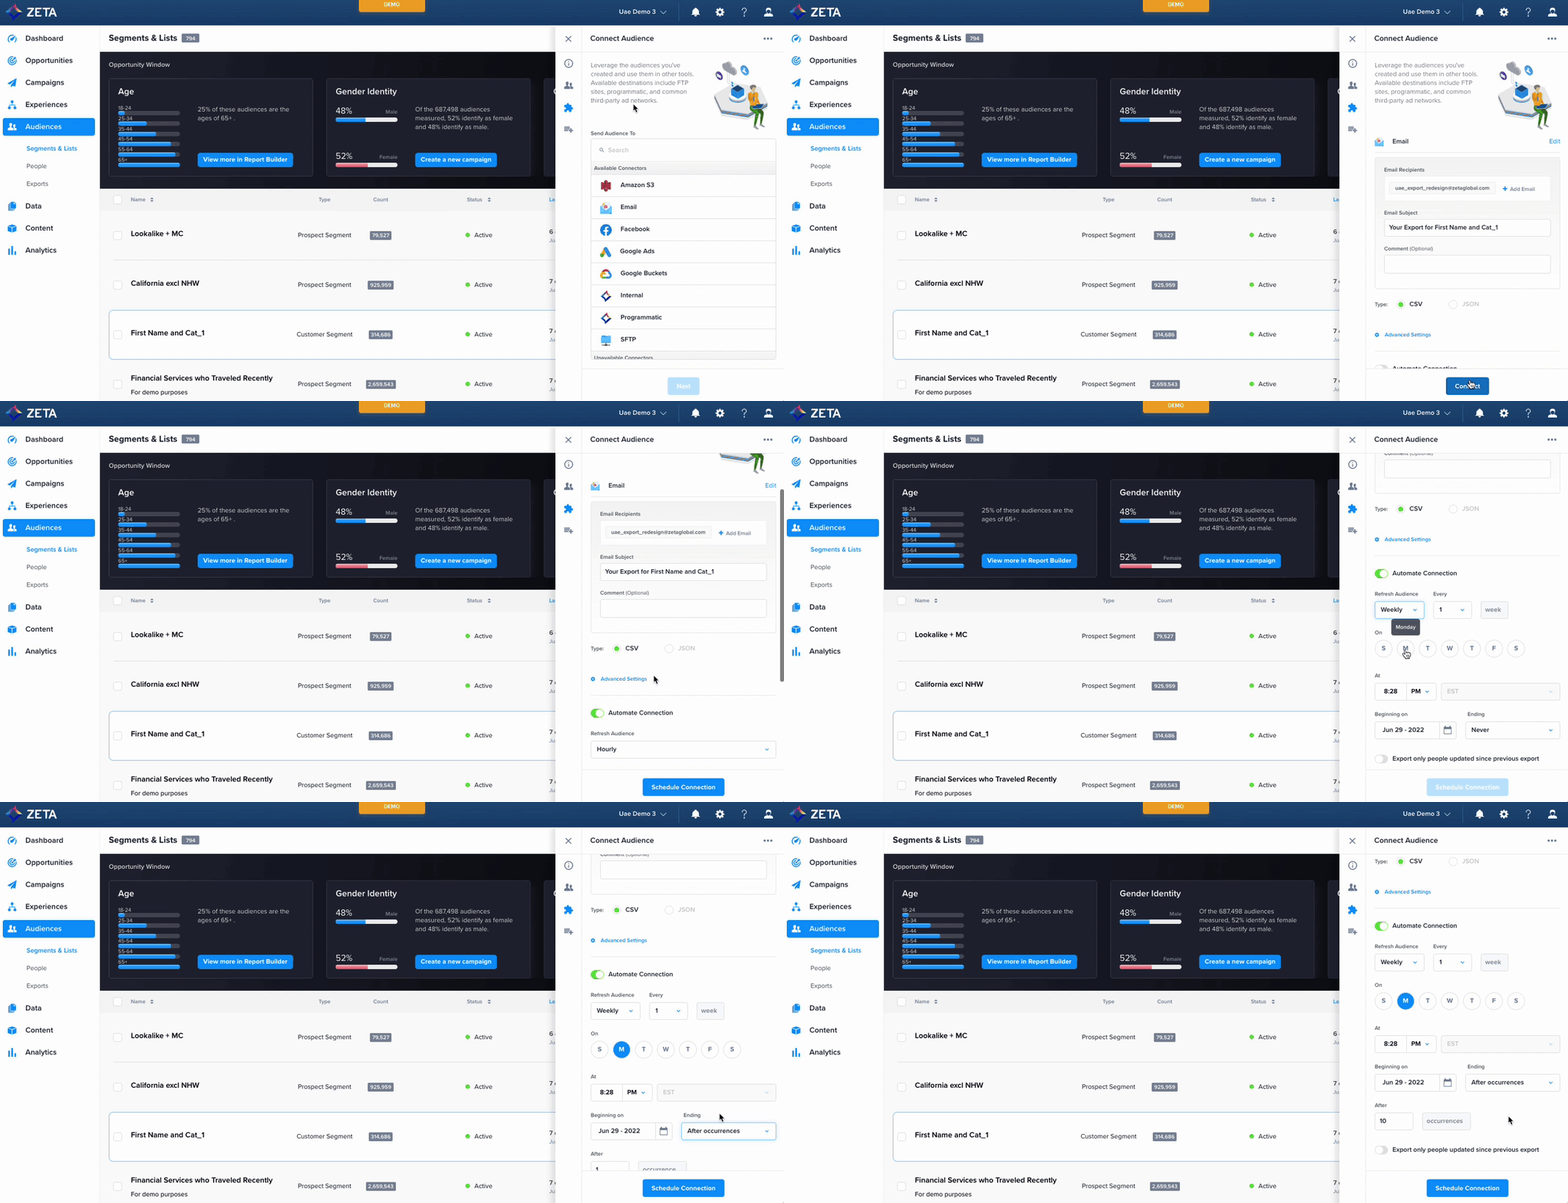
3. First, select the frequency at which your audience will be refreshed:
Hourly | Not available for Programmatic or third-party ad networks because these exports can often take at least 24 hours to complete |
Daily | Once per day, including weekends |
Weekly | Select the day(s) of the week and the desired cadence (every 1-4 weeks) |
Monthly | Select the day of the month |
Quarterly | Select the month of the quarter and the day of that month |
4. Select the time at which your export should begin. The time zone is determined by your account-level setting.
5. Choose the date on which to begin your connection. This will be the first time your export initiates, so the beginning date should typically match to the next available date and cannot be in the past. For example:
If you are setting up a weekly automation for every Monday, then the Beginning on date must be a Monday in the future.
If you are setting up a monthly automation for the 1st day of the month on June 29, 2022, then the Beginning on date should be July 1, 2022.
6. Lastly, specify how and when you want your recurring export to end:
Never | Your automation will continue until you cancel it |
On a date | Your automation will continue until it reaches a specific date in the future. Similar to the Beginning on rules listed above, you must select an ending date on which an export is scheduled to fall |
After Occurrences | Your automation will stop exporting after it runs the number of times you specify |
7. After you configure your automated export, including the export operations listed below as applicable, click Schedule Connection to finish.
When trying to change an automated export from a specific date to NEVER, you may find that the Ending On option seems unclickable. Please wait until the 'X' button next to Ending on becomes clickable. Once it does, you can select the 'Never' option.
Export Operations
By default, automated exports are set to add people to their destinations. However, some destinations give you the option to receive all records that were either added, removed, or updated since the previous export. For destinations that have Optional Settings in their export flow, you can add an attribute called export_operations with a potential value of initial_export, added, removed, or updated.
Automated exports can be configured to export only deltas against the previous export by selecting the option Export only users who have been updated since the previous export.
Partner and programmatic destinations can only Add people to an automated export. This will both add new people and remove people who’ve exited a Prospect Segment since the last recurring export. To Remove or Replace, you must use a one-time export if your selected destination supports it.
It is recommended to keep the schedule frequency to more than 24 hrs. Google Ads can take up to 24 hours for a list to be populated with members, so you’ll most likely see an In Progress status (on the Google Ads UI) if you upload to an audience list more frequently, especially if it’s a large segment.
For privacy purposes, the user list size will show as zero until the list has at least 1,000 members. After that, the size will be rounded to the two most significant digits. Your audience should contain at least 5,000 members to the list to ensure that ads start serving.
If a user record doesn’t match, Google may still use it as part of policy compliance checks, but Google won’t otherwise use it for Customer Match or any other Google product. The matching process can take up to 48 hours.
You can then start targeting your Customer Match audience in your Google Ads campaigns.
You can also start targeting similar audiences on YouTube and Gmail, if your Customer Match audience meets the eligibility requirements. For more information, refer to:
Editing Automated Exports
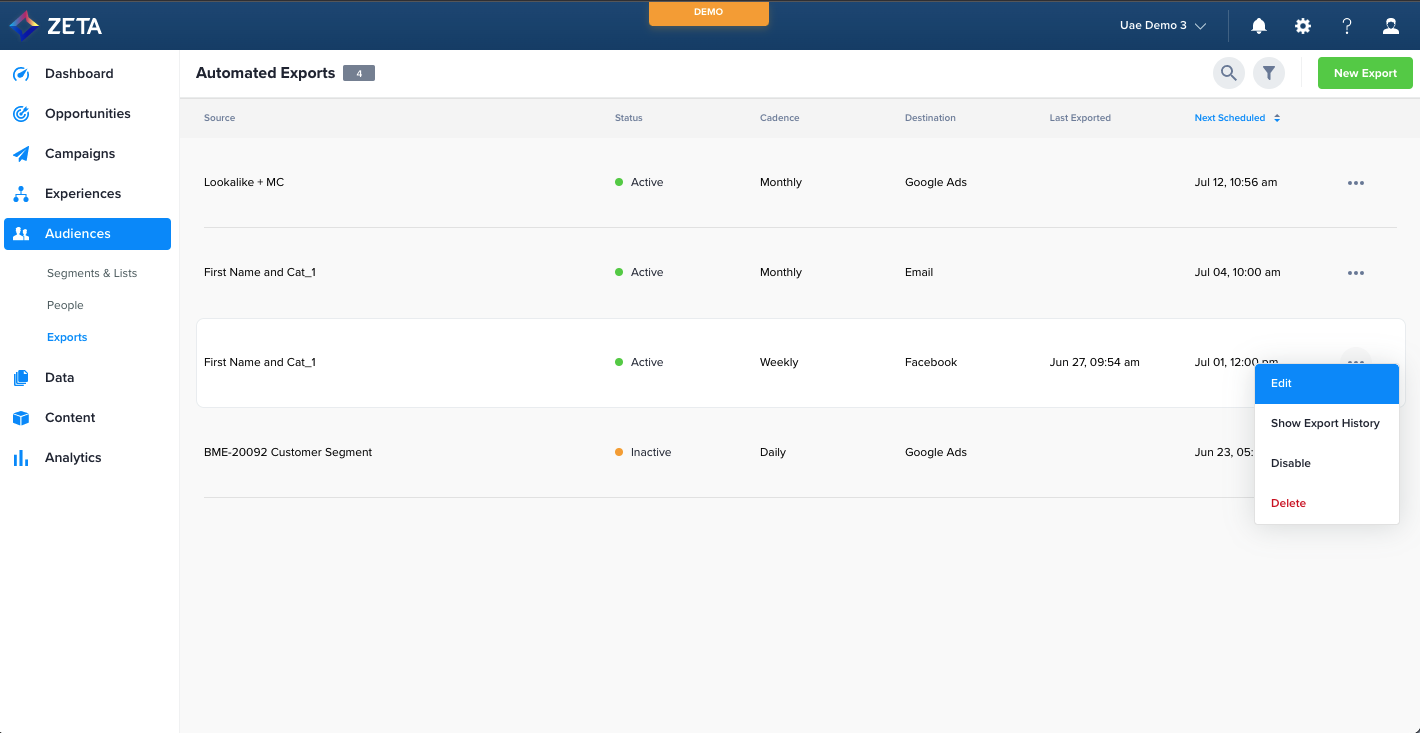
If you need to make changes to your automated export, go to Audiences > Exports to find a list of all your recurring exports, both enabled and disabled.
For Active exports, the table lists each export’s status, cadence, destination, last export date (if it exists), and next scheduled export date. Your menu has the following options:
Edit | Make changes to the cadence or high-level details (not the destination) |
Show Export History | See details about each individual export that has been initiated (you will be taken to the Data > Files > Exports page) |
Disable | Turn off the automated export so that it doesn’t run anymore (the export will remain on this page so that it can be enabled again) |
Delete | Remove the export from this page so that it can’t be edited or re-enabled |
For Inactive exports, the table lists each export’s status, cadence, destination, last export date (if it exists), and next scheduled export date. Your menu has the same options as an Active export, except for:
Enable | Turn on the automated export so that it begins to run again (you will need to adjust the Beginning on date so that it is not in the past at the time you are re-enabling) |
Ineligible Exports
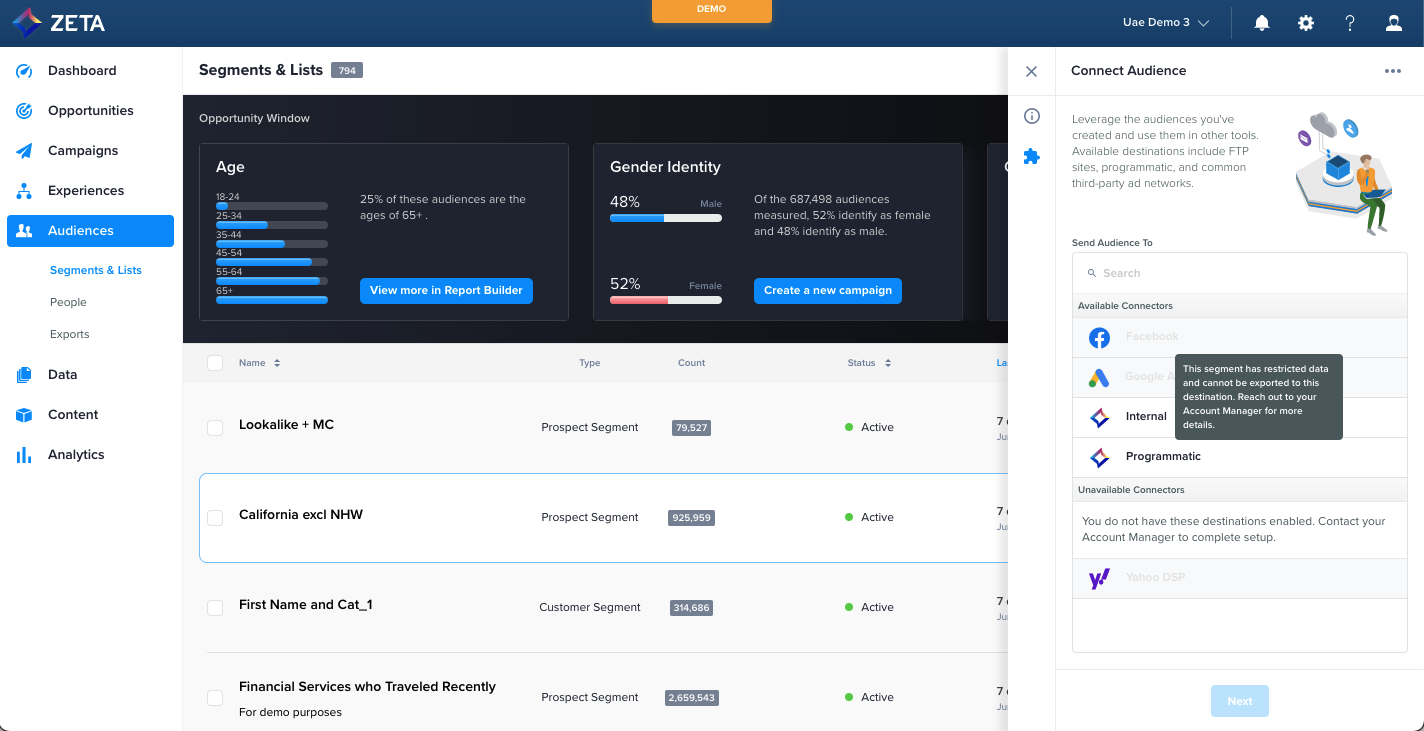
Zeta’s Data Cloud unlocks vast opportunities to enrich Customer Segments and create Prospect Audiences that can help you acquire more customers. However, sometimes there are certain data points and filters that you can use to build an audience that can’t necessarily be exported outside of Zeta’s ecosystem. If this is the case, we now offer better transparency in the export panel when audiences can’t be connected to third-party ad networks such as Google Ads, Facebook, and Yahoo DSP.
These restrictions on exporting Prospect Audience data don’t extend to Internal or Programmatic destinations, unless privacy laws apply.
Learn more about audience exporting integrations.
