

Transferring data securely and efficiently across systems is critical for modern marketing operations. Traditional methods of moving data can often be slow, costly, or insecure, but managed connections like SFTP/FTP solve this challenge by enabling reliable, encrypted data exchange between platforms.
The Zeta Marketing Platform (ZMP) features a built-in SFTP Site Manager, providing you with full control over creating, managing, and utilizing these connections. With it, you can centralize all your partner connection details, making setup and management simple and seamless.
With Connections in ZMP, you can:
-
Create and manage connections to send or receive data between ZMP and external systems.
-
Self-manage a variety of protocols and services, including FTP, FTPS, SFTP, Amazon S3 buckets, Google Cloud Storage, and more.
-
Edit and delete connections from one centralized location, ensuring flexibility and control.
In the following sections, we’ll walk you through how to set up, configure, and manage your connections inside ZMP.
Creating Connections
Reach out to Support to get the Data Explorer enabled for your ZMP instance.
1. Navigate to platform Settings > Integrations > Connections. Click on New Connection.
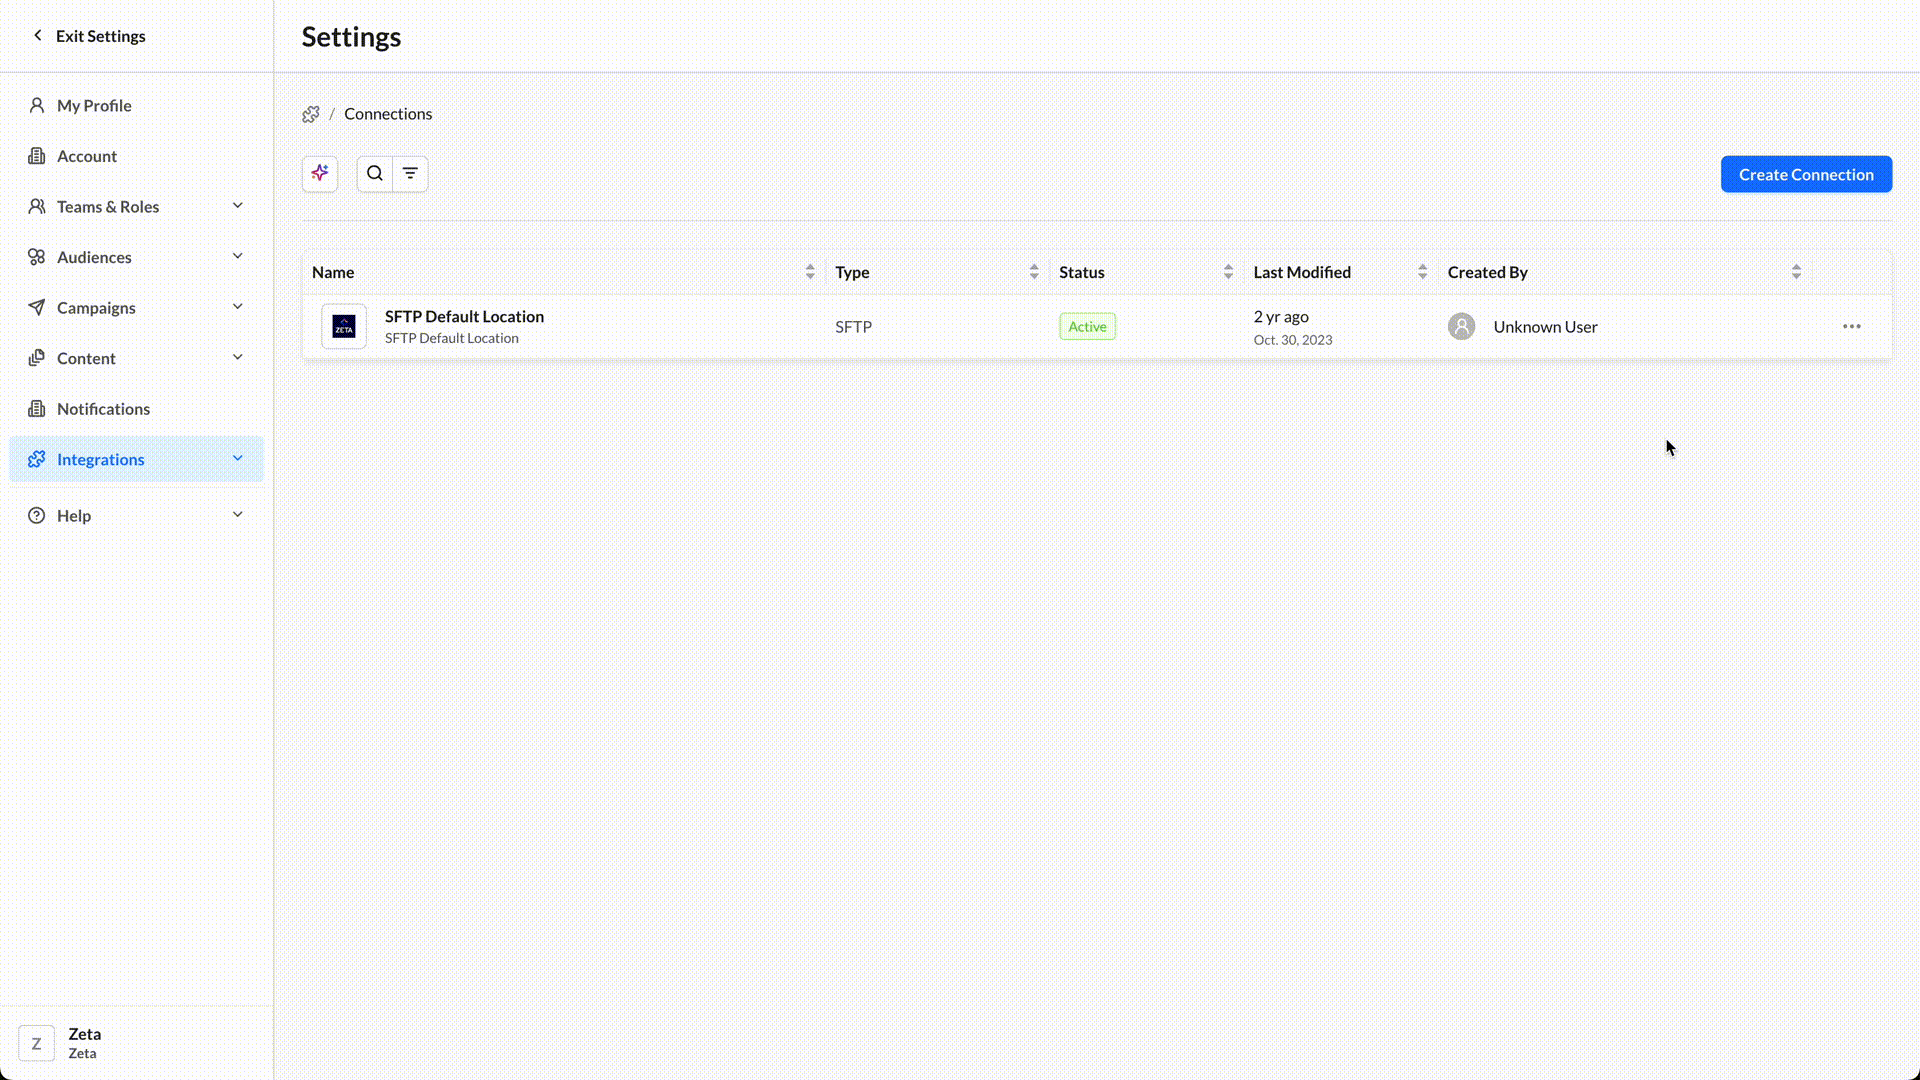
2. Fill in all the details and click on Save.
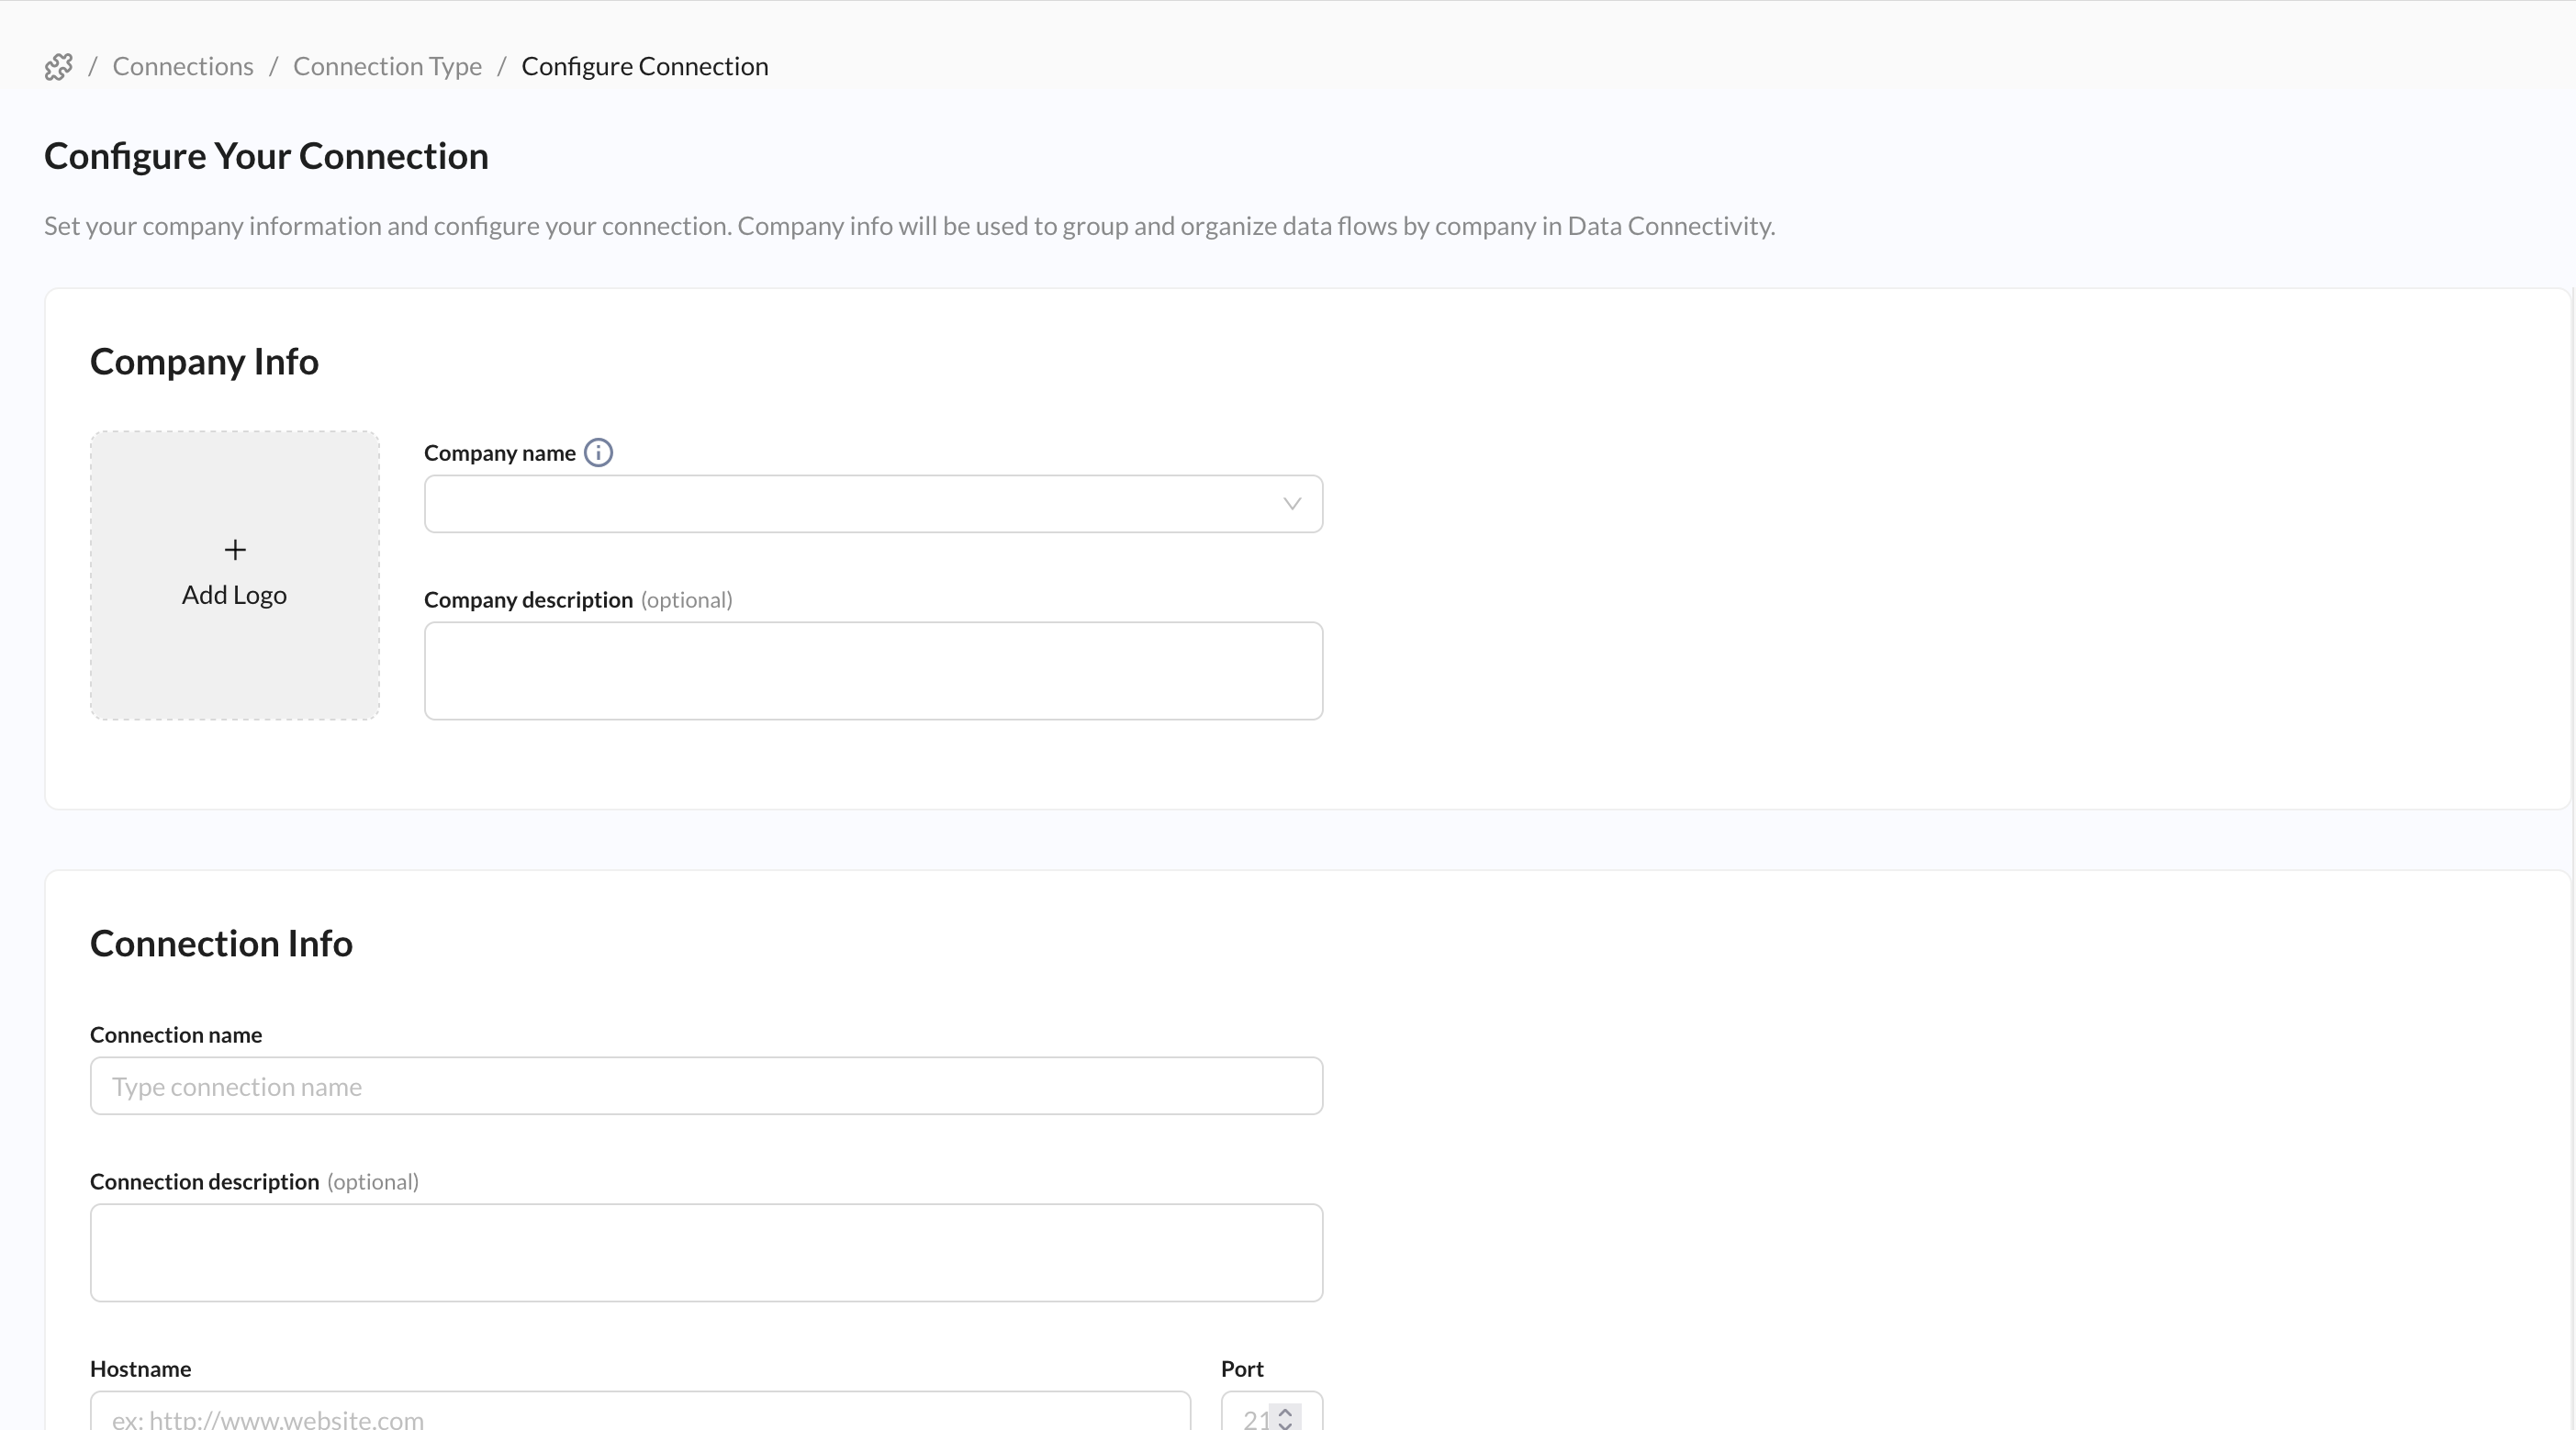
Note: If you do not want to share the entire directory, you can enter a subset of the directory
3. As the connection is being tested in the backend,
-
If the test comes out positive, the connection will be established with an Active status, and the data transfer between ZMP and the connection will be possible
-
If an issue arises during the testing, a pop-up will appear. If you click on Save Anyway, the connection will keep showing the Failed status and won’t allow sending to or bringing in data from this connection.
4. The new connections should be available to be used as:
-
Sources and Destinations under Data Conductor - SFTP, S3, Google Buckets, Microsoft Azure Blob
-
Segments and Lists exports - SFTP
5. You can also filter the connections based on column values: Type, Status, Created, and Modified.
Authentication methods (Password / SSH)
When configuring an SFTP connection in ZMP, there are two methods available to authenticate your credentials:
-
Password-Based Authentication – You enter the username and password provided by your SFTP provider directly into the connection form.
-
SSH Key-Based Authentication – You can securely authenticate using an SSH key pair instead of a password. This method is often preferred for enhanced security and automation.
Make sure to verify with your SFTP administrator which method is supported by your server before configuring the connection.
Secure Copy Protocol (SCP) Enablement
The Secure Copy Protocol (SCP) is enabled by default in ZMP to ensure safe and fast data transmission during file transfers to and from your SFTP server.
-
If your SFTP server does not support SCP, you can disable this option within the connection settings before saving.
-
Disabling SCP ensures compatibility while still allowing standard SFTP functionality to continue without disruption.
JWT OAuth Configuration
To configure a connection using JWT OAuth, follow these steps:
1. In the Connections page, select OAuth from the Authorization dropdown.
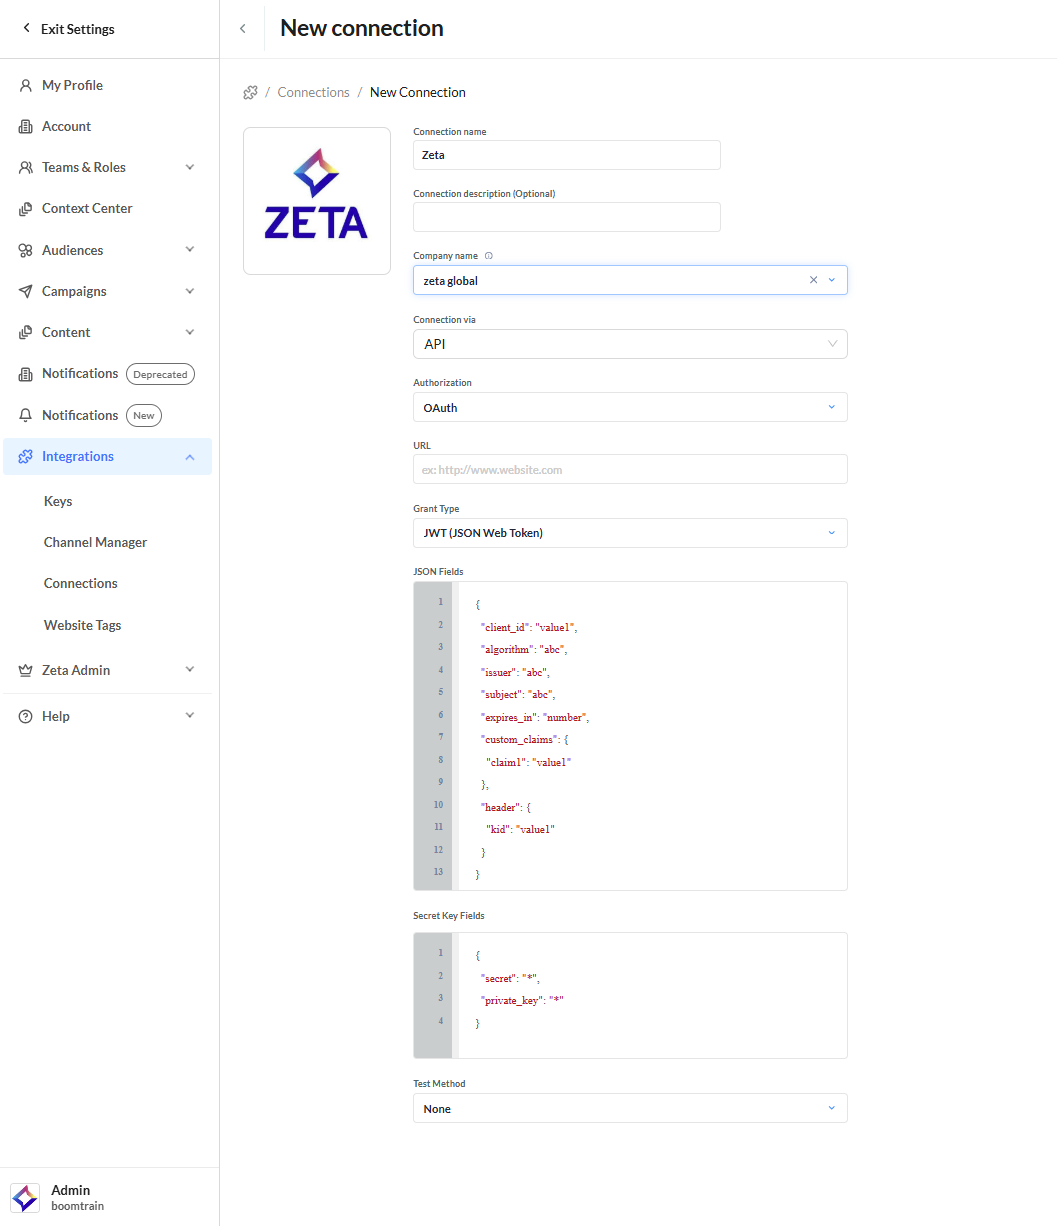
2. Under Grant Type, choose JWT (JSON Web Token).
This will display two configuration sections:
1. JSON Fields
Use this section to define the JWT token parameters in JSON format.
|
Required fields |
|
|---|---|
|
Supported algorithms |
|
All other fields are optional and can be included as needed.
2. Secret Key Fields
This section is used to input credentials based on the selected algorithm:
-
For HMAC algorithms, provide the secret
-
For RSA/ECDSA algorithms, provide the private_key
Note: All sensitive values are masked after saving for security purposes.
Once you’ve configured the authentication, click on Save to store the configuration.
-
The connection will be tested automatically. If successful, the connection becomes active and available for use
Setting Up Partner Connectors
All previously authenticated connections were moved from the Keys & Apps page to Connections. Go to each Connection page to add more accounts to your ZMP instance. Learn more about Connections.
Authenticating your third-party ad networks now happens in Connections. When you select a partner connector in the Connection via dropdown list, you’ll be prompted to log in.
1. Navigate to Platform Settings > Connections. Click on New Connection.
2. Add a Connection Name. This can be any name you wish.
3. Select a partner connector from the Connection via dropdown list.
-20250917-090329.gif?cb=69bf2e88826aca5205c3850a011bf4d0)
4. For Facebook and Google Ads, you’ll be prompted to log in to your account. Accept all listed permissions.
5. Once authenticated, you’ll see all of the ad accounts attached to your user account. Select the ad account(s) you want to use for the current ZMP instance and click Save.
-
For Google Ads, you can add an optional Display Name for each account number.
6. For Yahoo DSP, add the MDM ID and optional Display Name for each account you want to connect to the current ZMP instance and click Save.
7. You can now use these ad accounts to export audiences via the Segments & Lists page or Sync to actions in Experience Builder.
While you can add multiple accounts in a single Connection, you can only create one Connection for each partner connector. Once you create a Connection for a given partner connector, you won’t be able to select it in the Connection via dropdown list again.
Editing Connections
Once your Connection is live, you can return to it to add or remove ad accounts for each partner connector. Simply check and uncheck the checkboxes for Facebook and Google Ads. For Yahoo DSP, you can either click X to remove an account or click Add MDM ID to add an account. In any case, you’ll need to click Save to save your preferences and activate/deactivate the accounts.
To remove an entire Connection, delete it from the Connections page by opening the ... menu and selecting Delete Connection.
If you have an active automated export or experience that uses an ad account that’s being deleted, it will also be deactivated. You will see a warning message reminding you about this in the confirmation modal.
Importing Data
When importing data, you are using systems that just output files to a standard folder. The source of data for an ETL feed often requires reaching out to this location. Ideally, we can maintain multiple locations.
1. From the menu on the left, navigate to Data > Data Flows. Click on New Data Flow.
2. Click on Select a Source and choose your desired option from the dropdown. (Amazon S3 Buckets, External SFTP, Google Buckets, Microsoft Azure Blob, and more)
-20250917-090907.gif)
3. Once you have added the source, click on the icon to add a destination or perform actions on the source data.
-20250917-091347.gif)
4. Click on Save.
Exporting Data
When exporting data, you need that data to be pushed to a specific folder or different external FTP locations.
1. From the menu on the left, navigate to Audiences > Segments & Lists.
2. Locate the row with the segment or list you want to export. Click on the three dots on the right > Export.
3. Select SFTP from the list of Available Connectors and click on Next.
-20250917-091743.gif)
4. From the list that appears, select the desired FTP Connection you want to export your audience to, and click on Next.
5. Choose the file type the data should be delivered in:
-
CSV - This is a standards-compliant comma-separated values file
-
JSONL - JSON Line is a convenient format for storing structured data that may be processed one record at a time. Each row is a JSON-formatted object.
Read more about JSON Lines
6. Click on Connect to save your file export.