With a focus on AI-recommended content, Website In-Page campaigns enable you to configure placements, request recommendations filtered on resource attributes, and render the resources returned by Zeta AI. ZMP’s Website In-Page campaigns allow you to combine rule- and model-based recommendations for your onsite campaigns. This added ability will help simplify the implementation of business rules for your creative placements.
These recommendations can be for products, articles, banners, or any content, and are personalized on a 1:1 level for the person browsing the client’s website. Recommendations are powered by Zeta's powerful AI, which works to understand what types of products or content people are engaging with and for how long, in order to determine what else they may be interested in.
Reach out to Support for getting Rule-Based Decisioning enabled in order to get access to Website In-Page Campaigns.
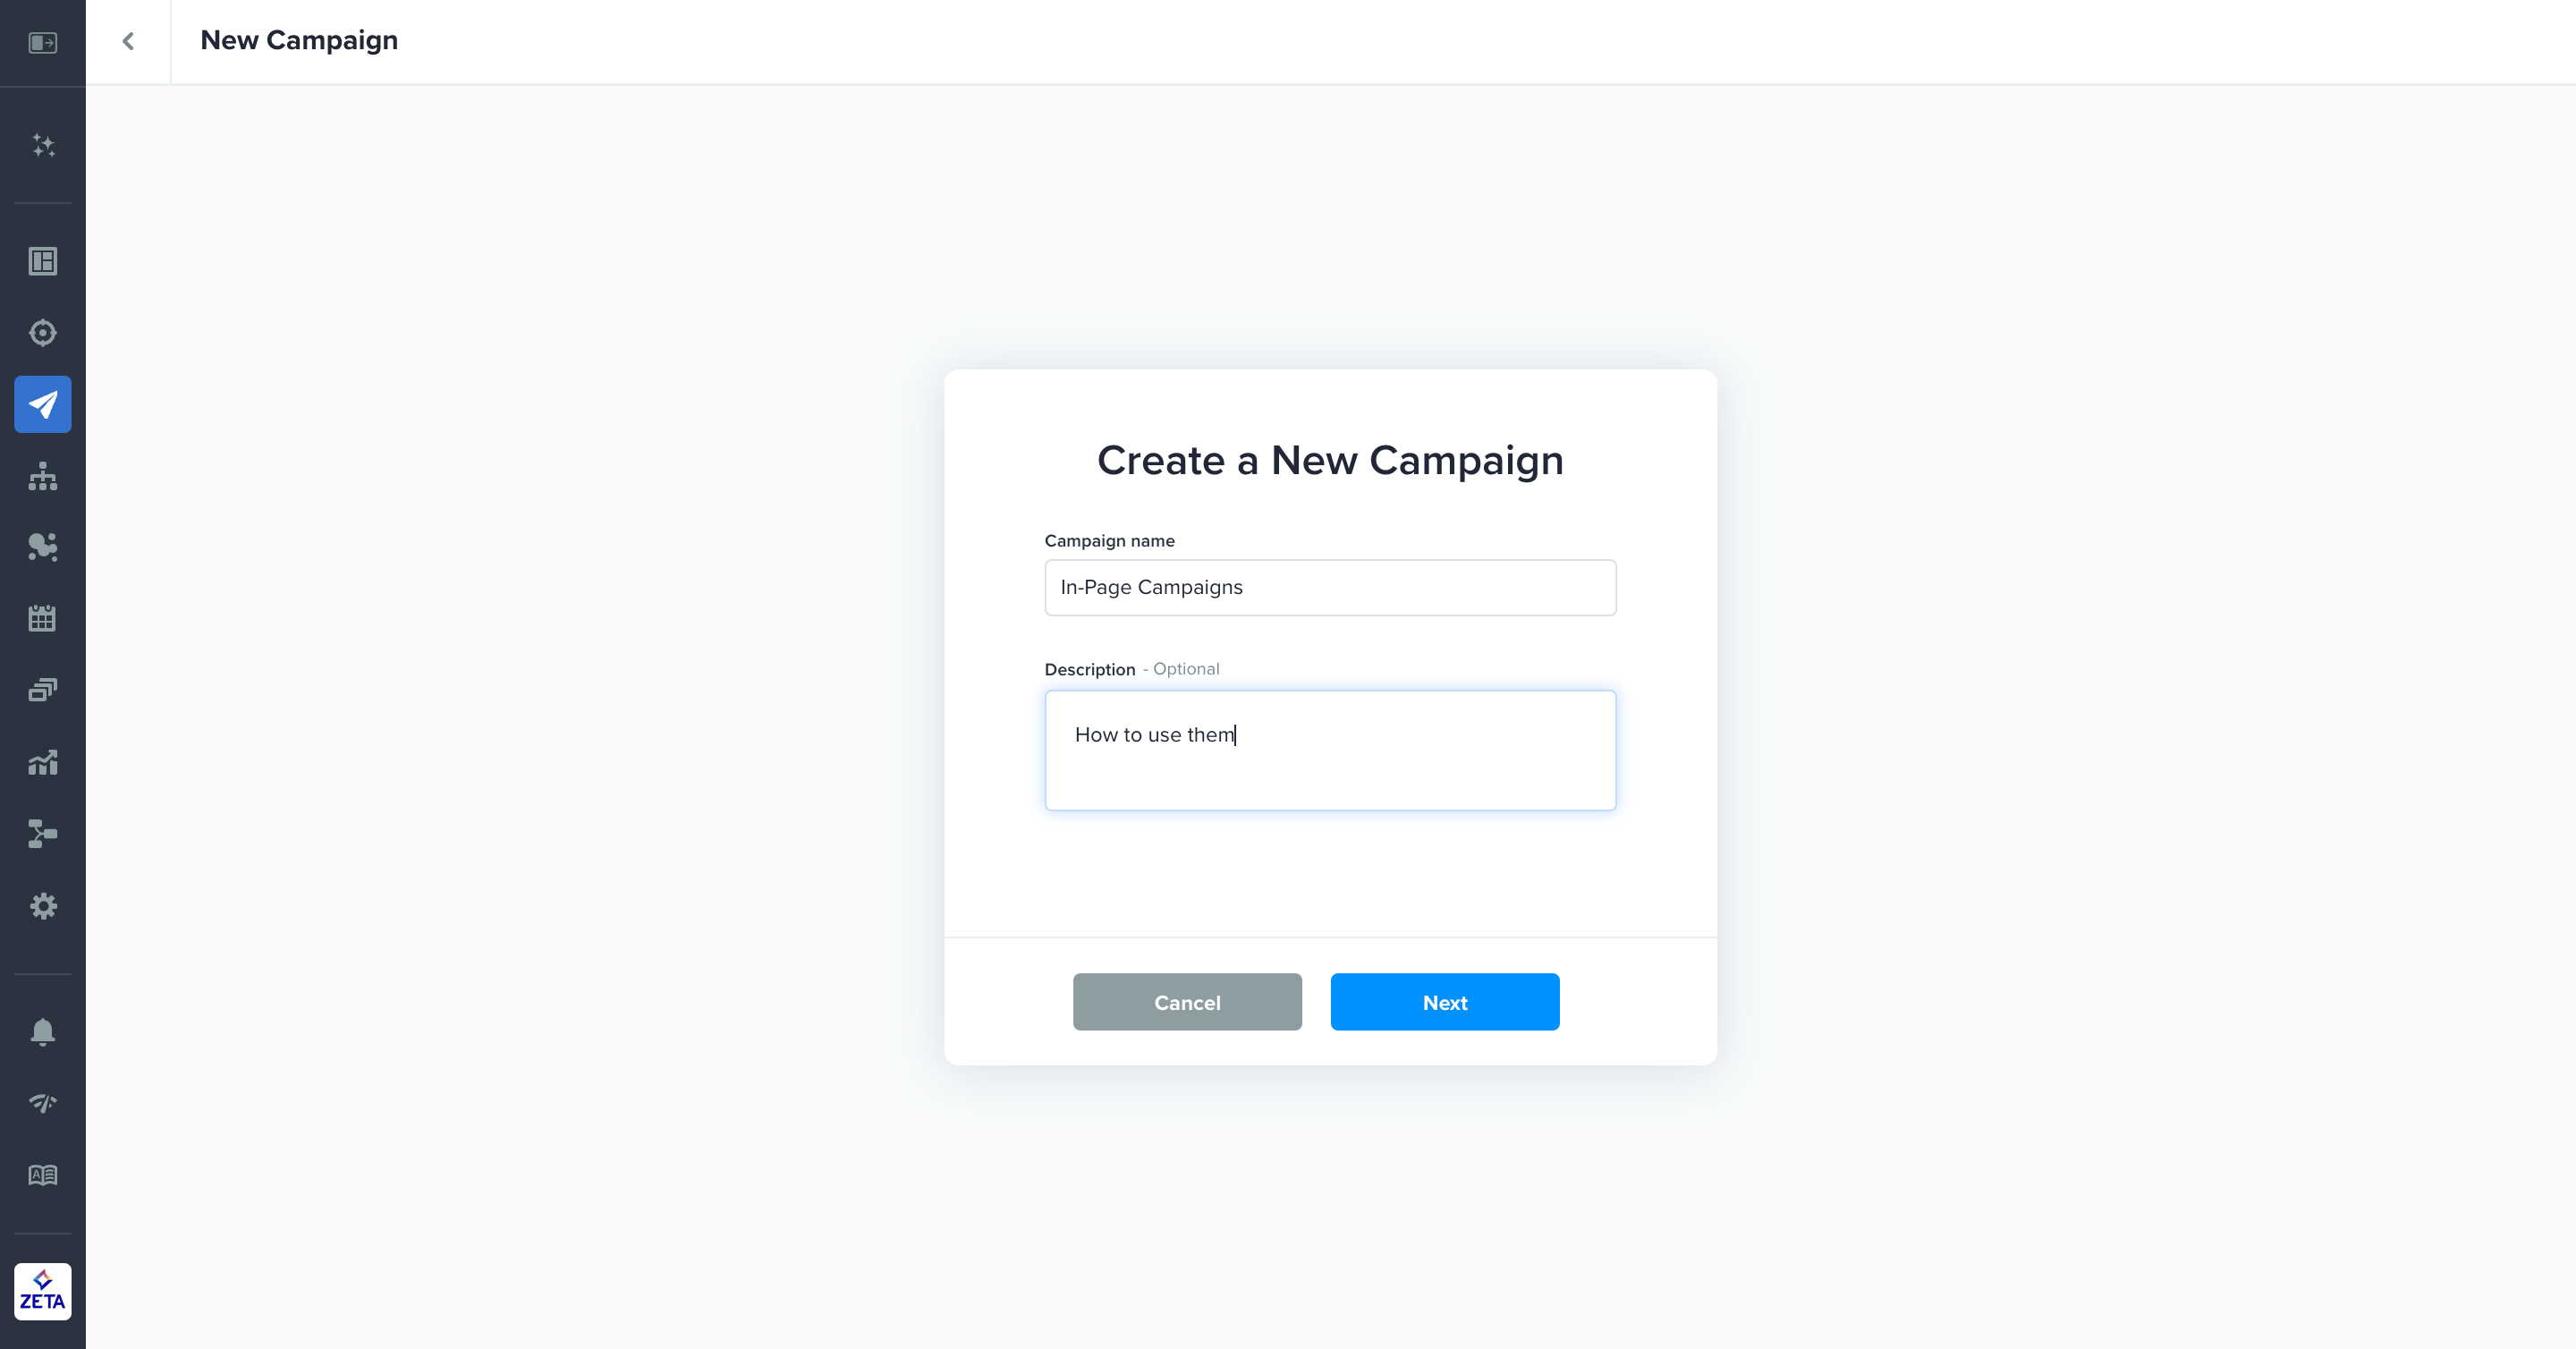
From the menu on the left, navigate to Campaigns > Website In-Page. Click on New Campaign. You can also duplicate an existing campaign on the listings page.
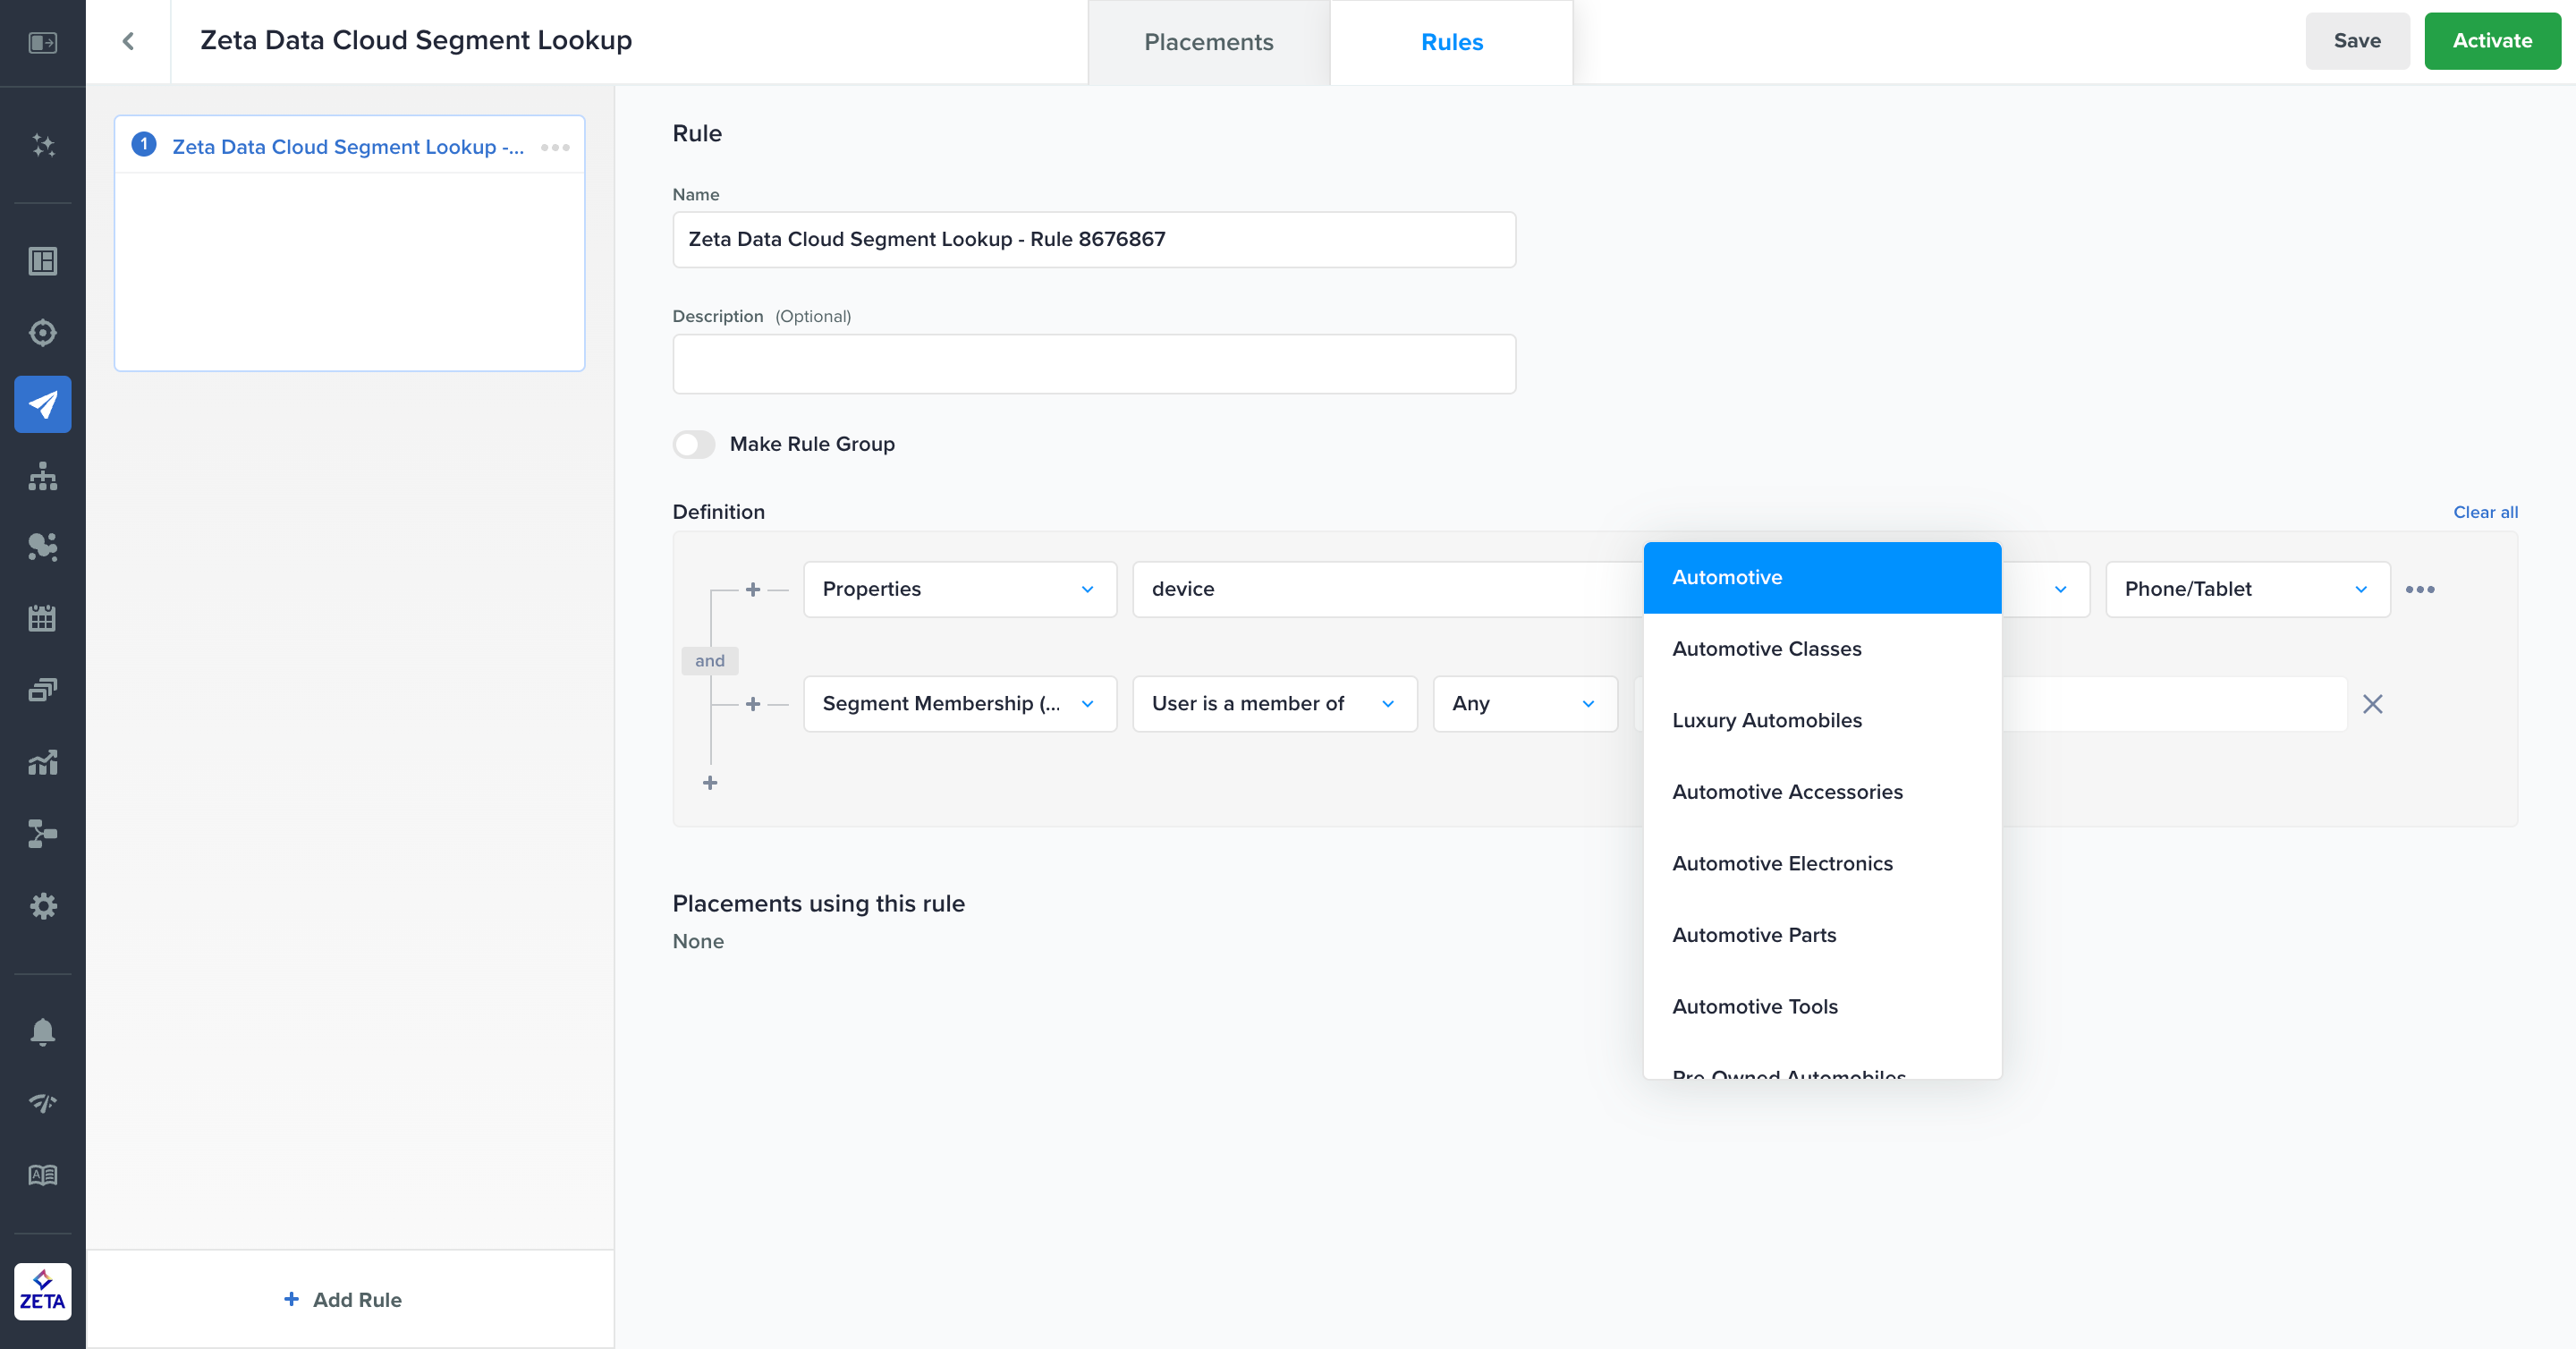
Rules Tab
You can define the different sets of rules across the different sets of placements using:
|
Type |
Definition |
|---|---|
|
Properties |
People properties stored at the person level |
|
Segment Membership (Account Data) |
Customer Audiences saved on your account |
|
Segment Membership (Zeta Data Cloud) |
Behavioral category Prospect Segments from Zeta Data Cloud |
|
Transient Attributes |
Attributes whose value is not stored in ZMP and can be passed in real-time at the time of requesting the recommendations. These can be some sensitive information of a customer or a dynamic value. Transient attributes can be created using APIs. |
You have full flexibility to use your own combination of properties. (Play around with the branching as possible in the case of Audience Explorer)
Transient Attributes are attributes whose value is not stored in ZMP and can be passed in real-time at the time of requesting the recommendations. These can be some sensitive information of a customer or a dynamic value. Transient attributes can be created using APIs.
Rule Groups
The rules interface also allows the incorporation of 'sub-rules' for each main rule through a rule group. By default, rules are evaluating users via a waterfall approach, which means that evaluation stops as soon as the audience criteria for the rule are met, and eligible resources for qualifying rules are determined However, all of the sub-rules are evaluated regardless of this.
1. Navigate to the Rules Tab of the in-page campaign
2. Toggle Make Rule Group on.
3. Start adding sub-rules and save.
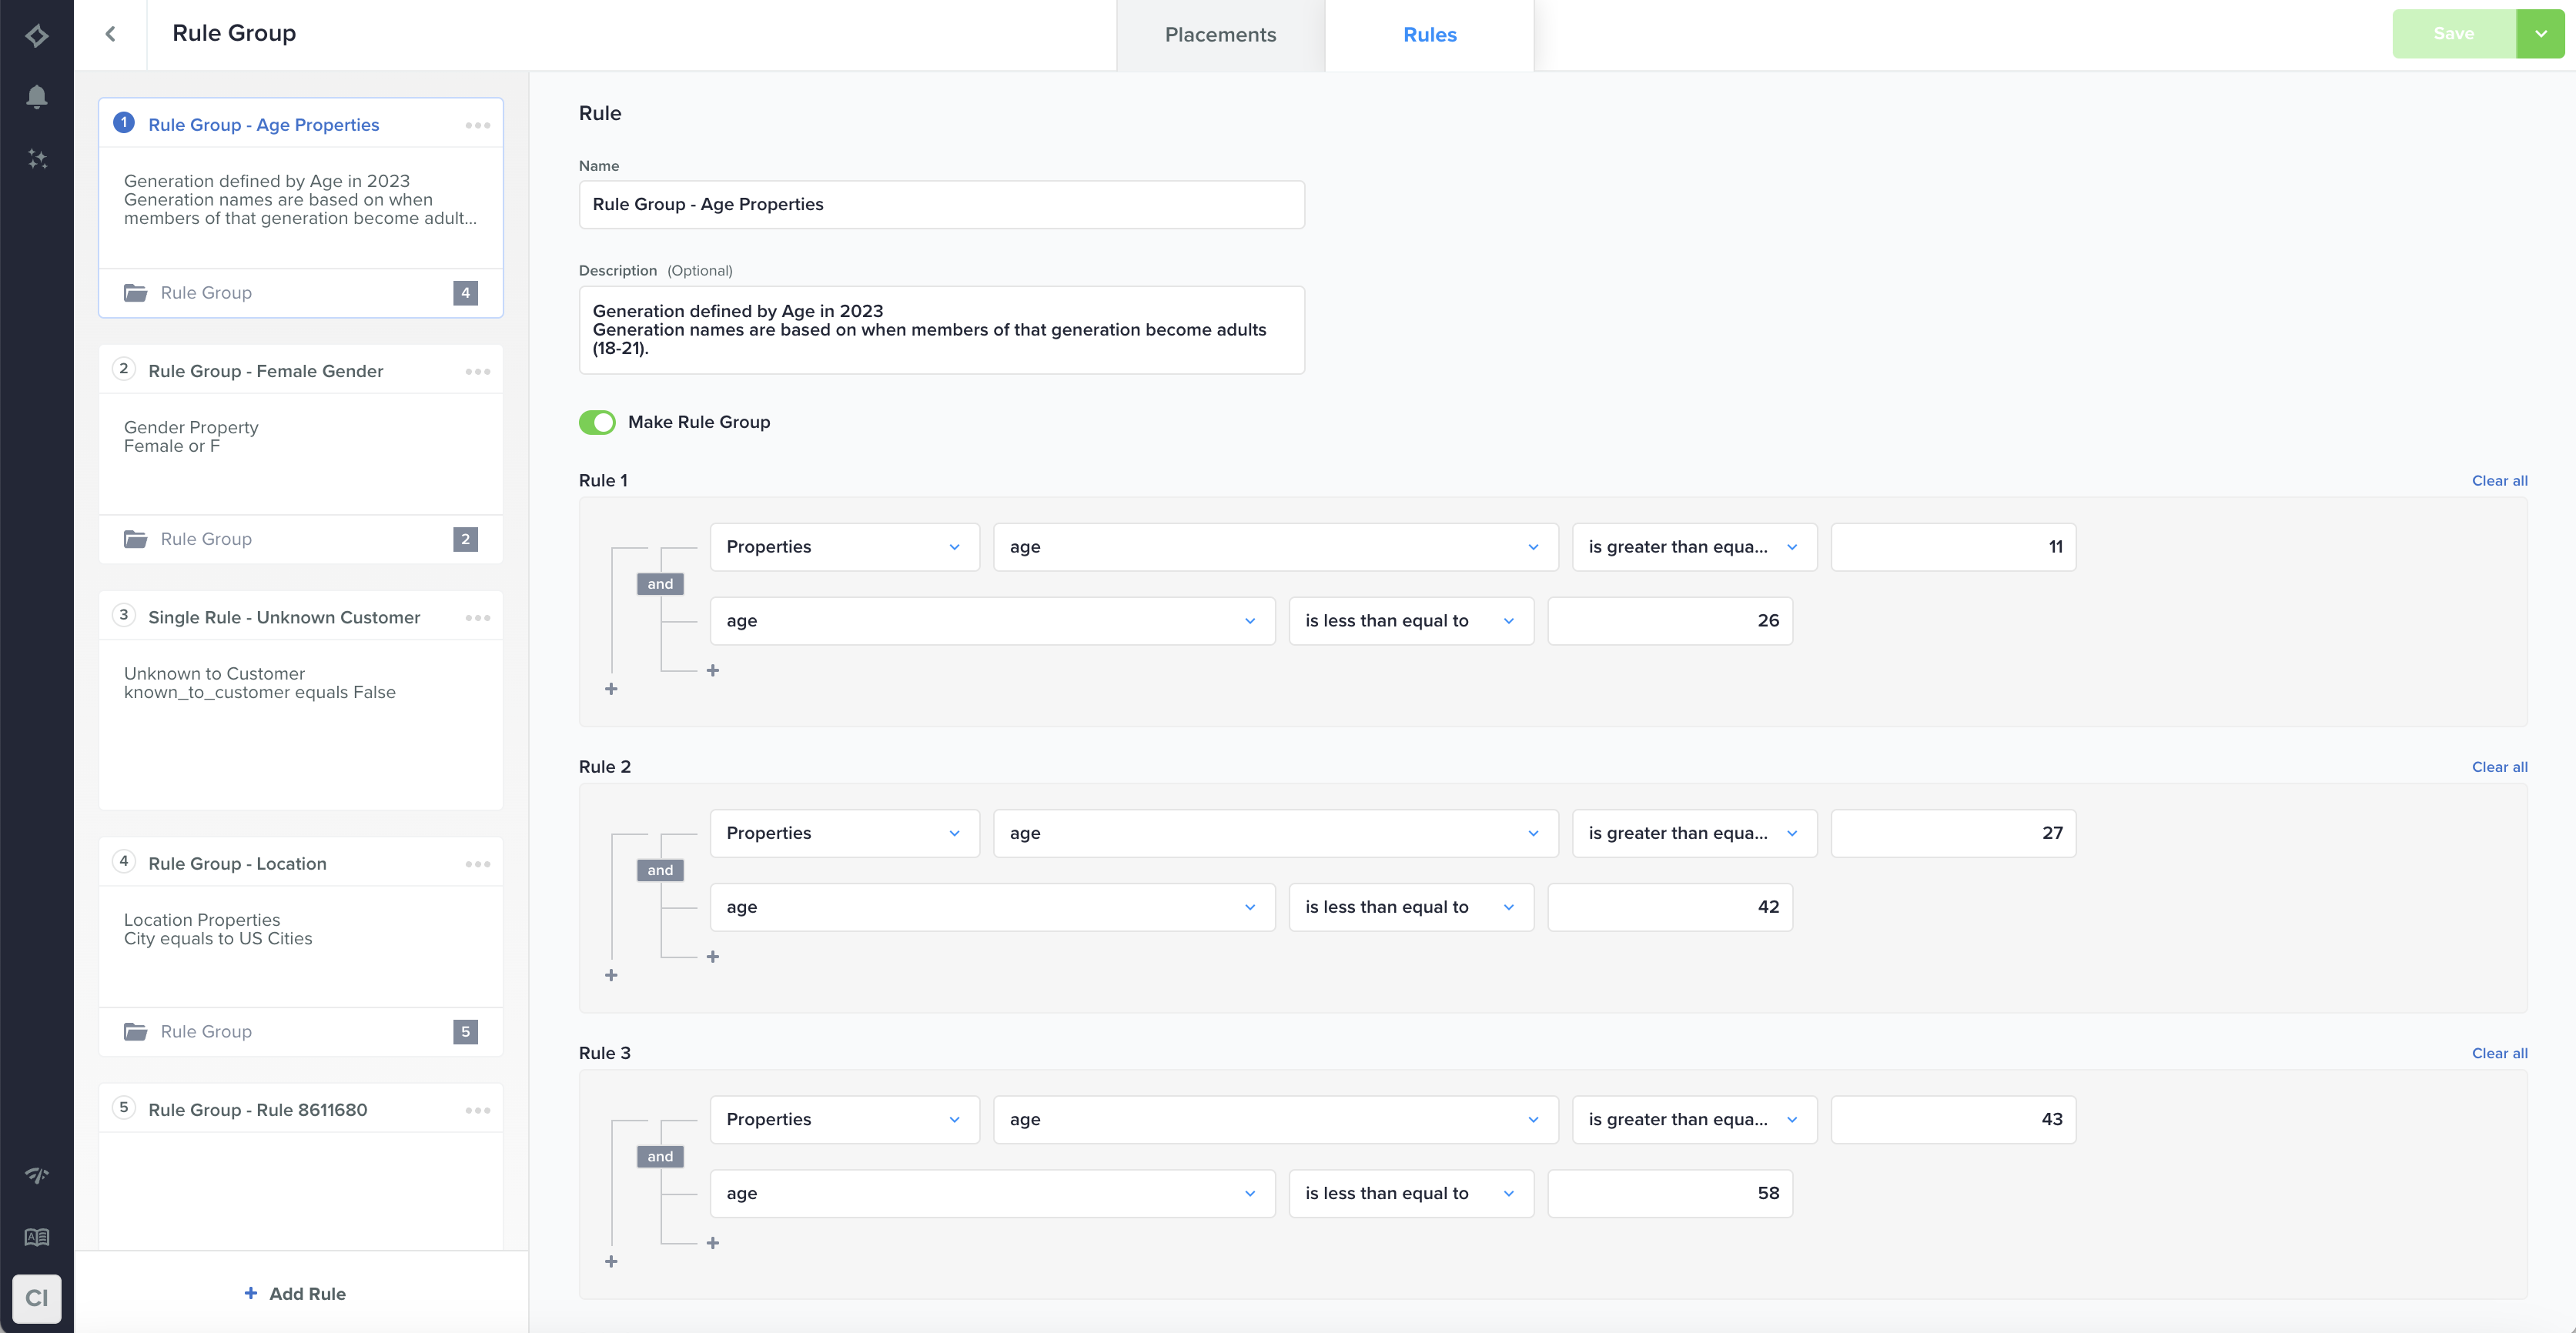
The Rules interface also allows the incorporation of 'sub-rules' for each main rule. The primary distinction between Rules and their Sub-rules is that, in the case of Rules, evaluation follows a waterfall approach, which means that evaluation stops as soon as the audience criteria for the Rules are met, and eligible resources for qualifying rules are determined. However, all of the sub-rules are evaluated regardless of this.
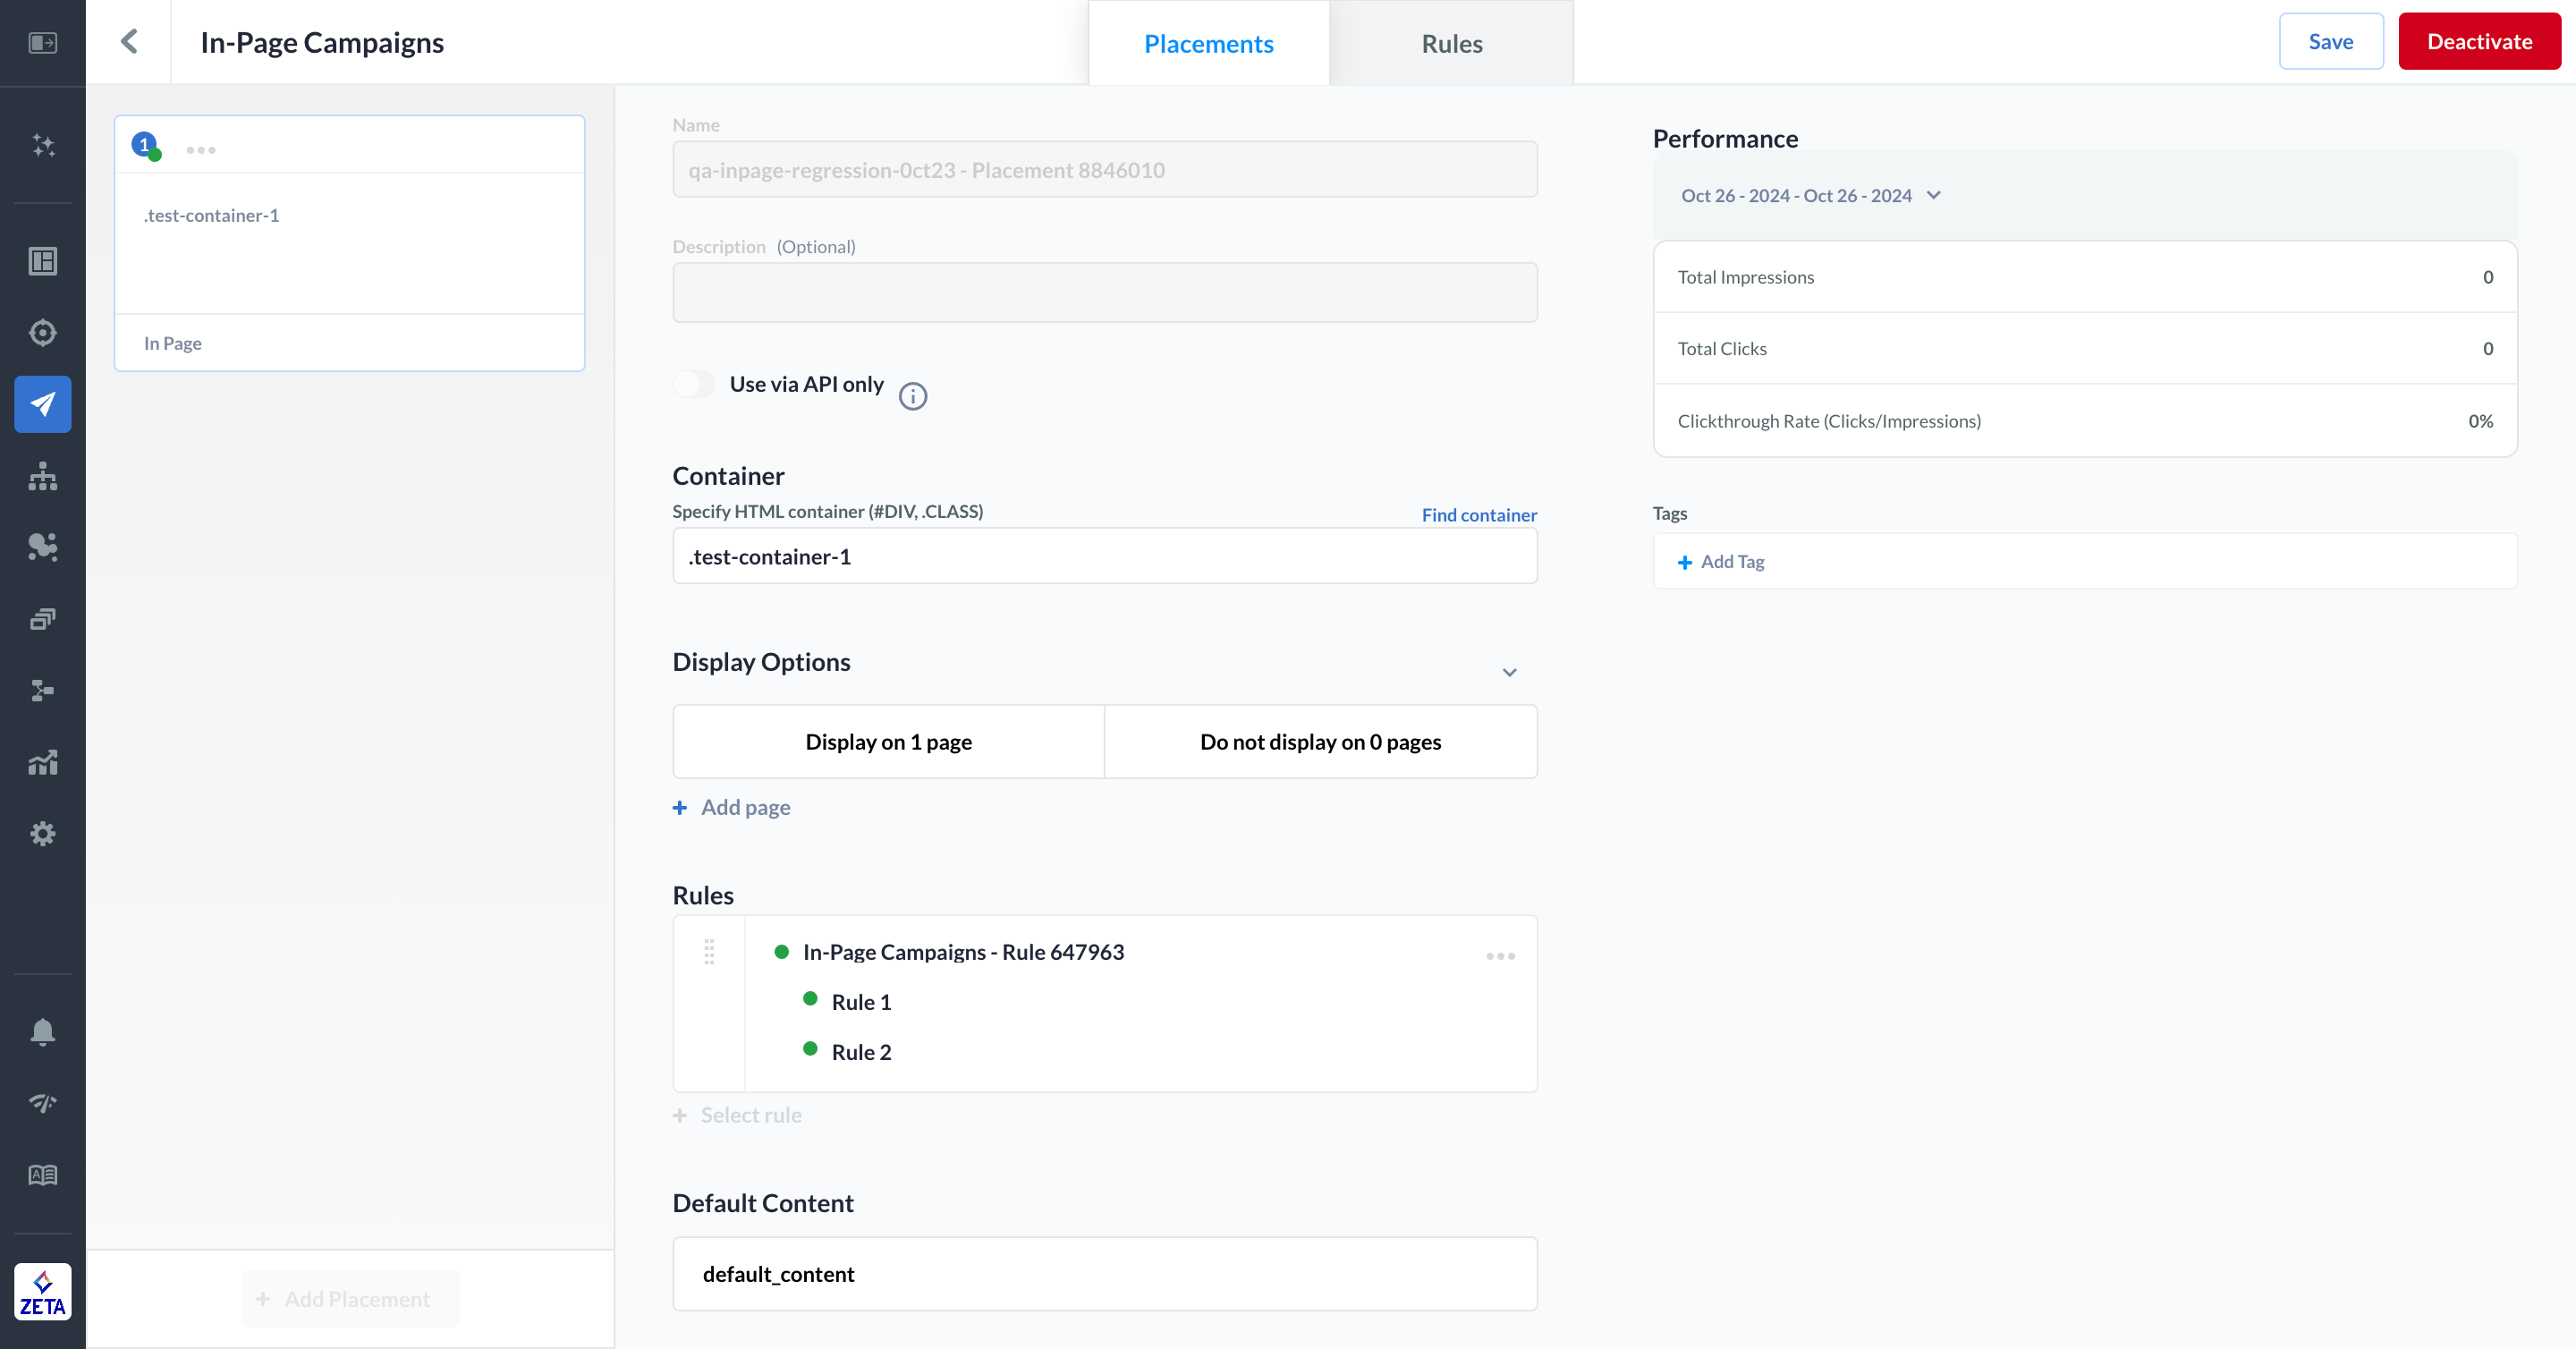
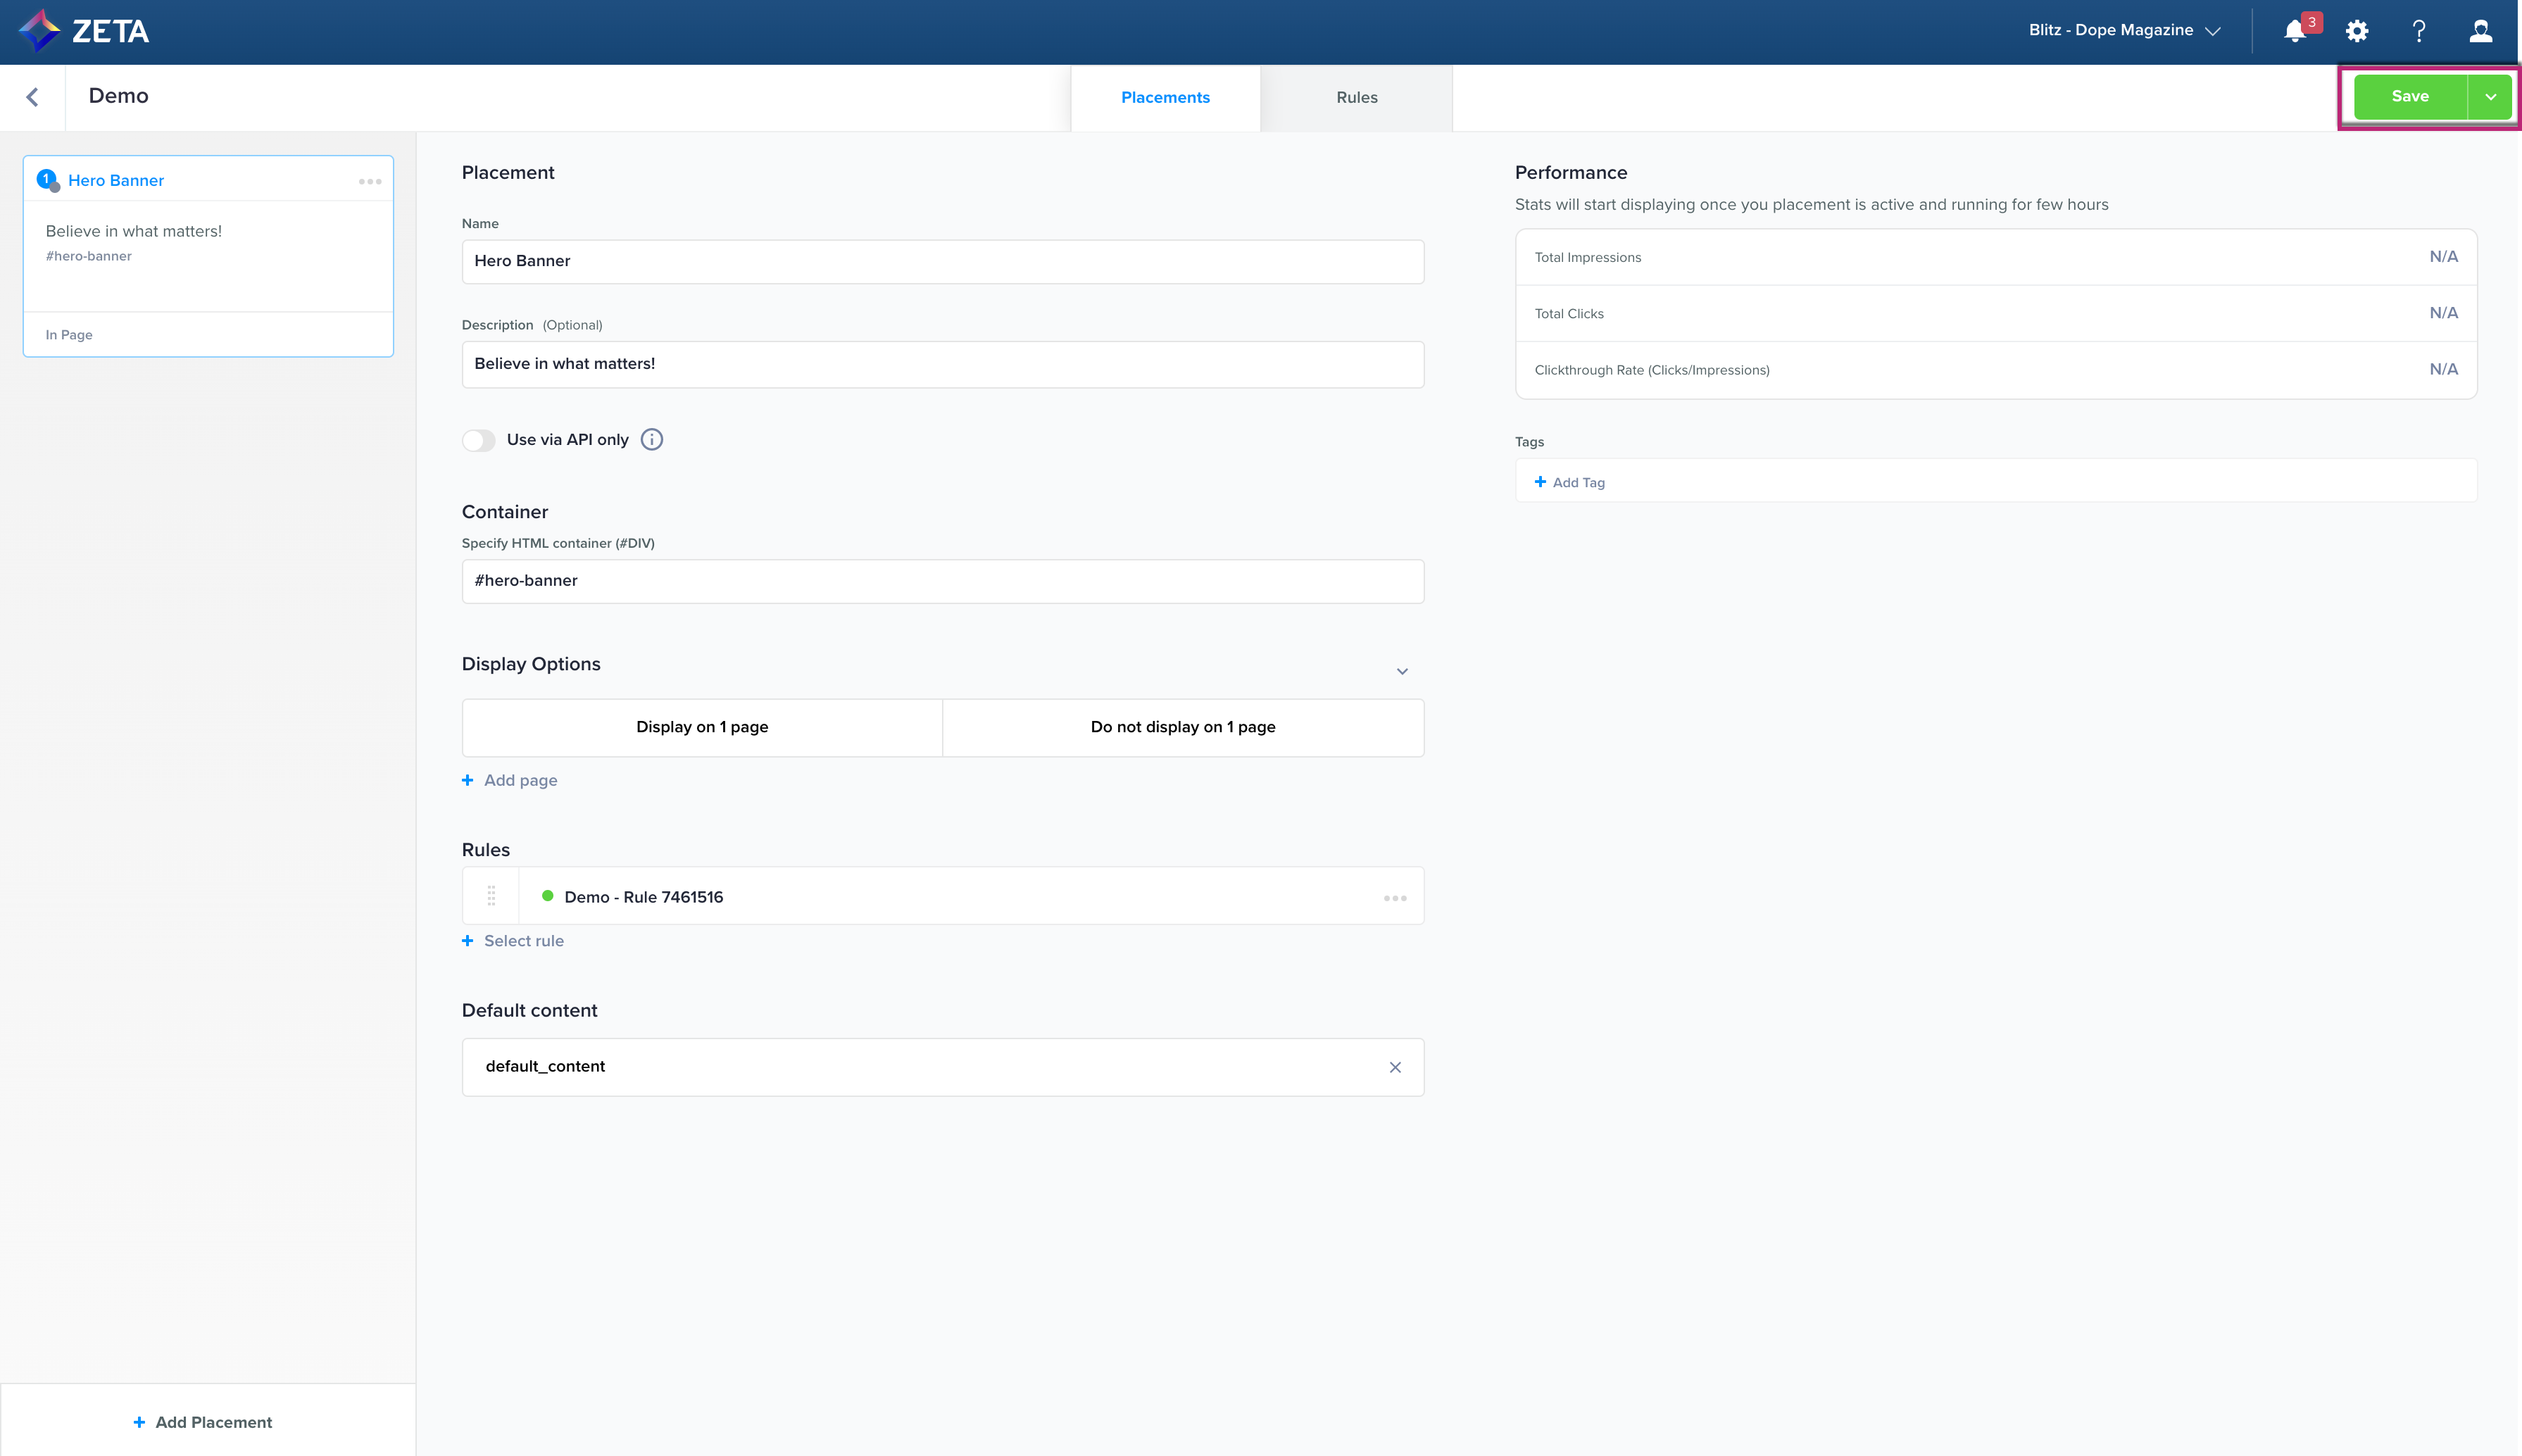
Placements Tab
The Placements tab allows you to define the different sections of the campaign page.
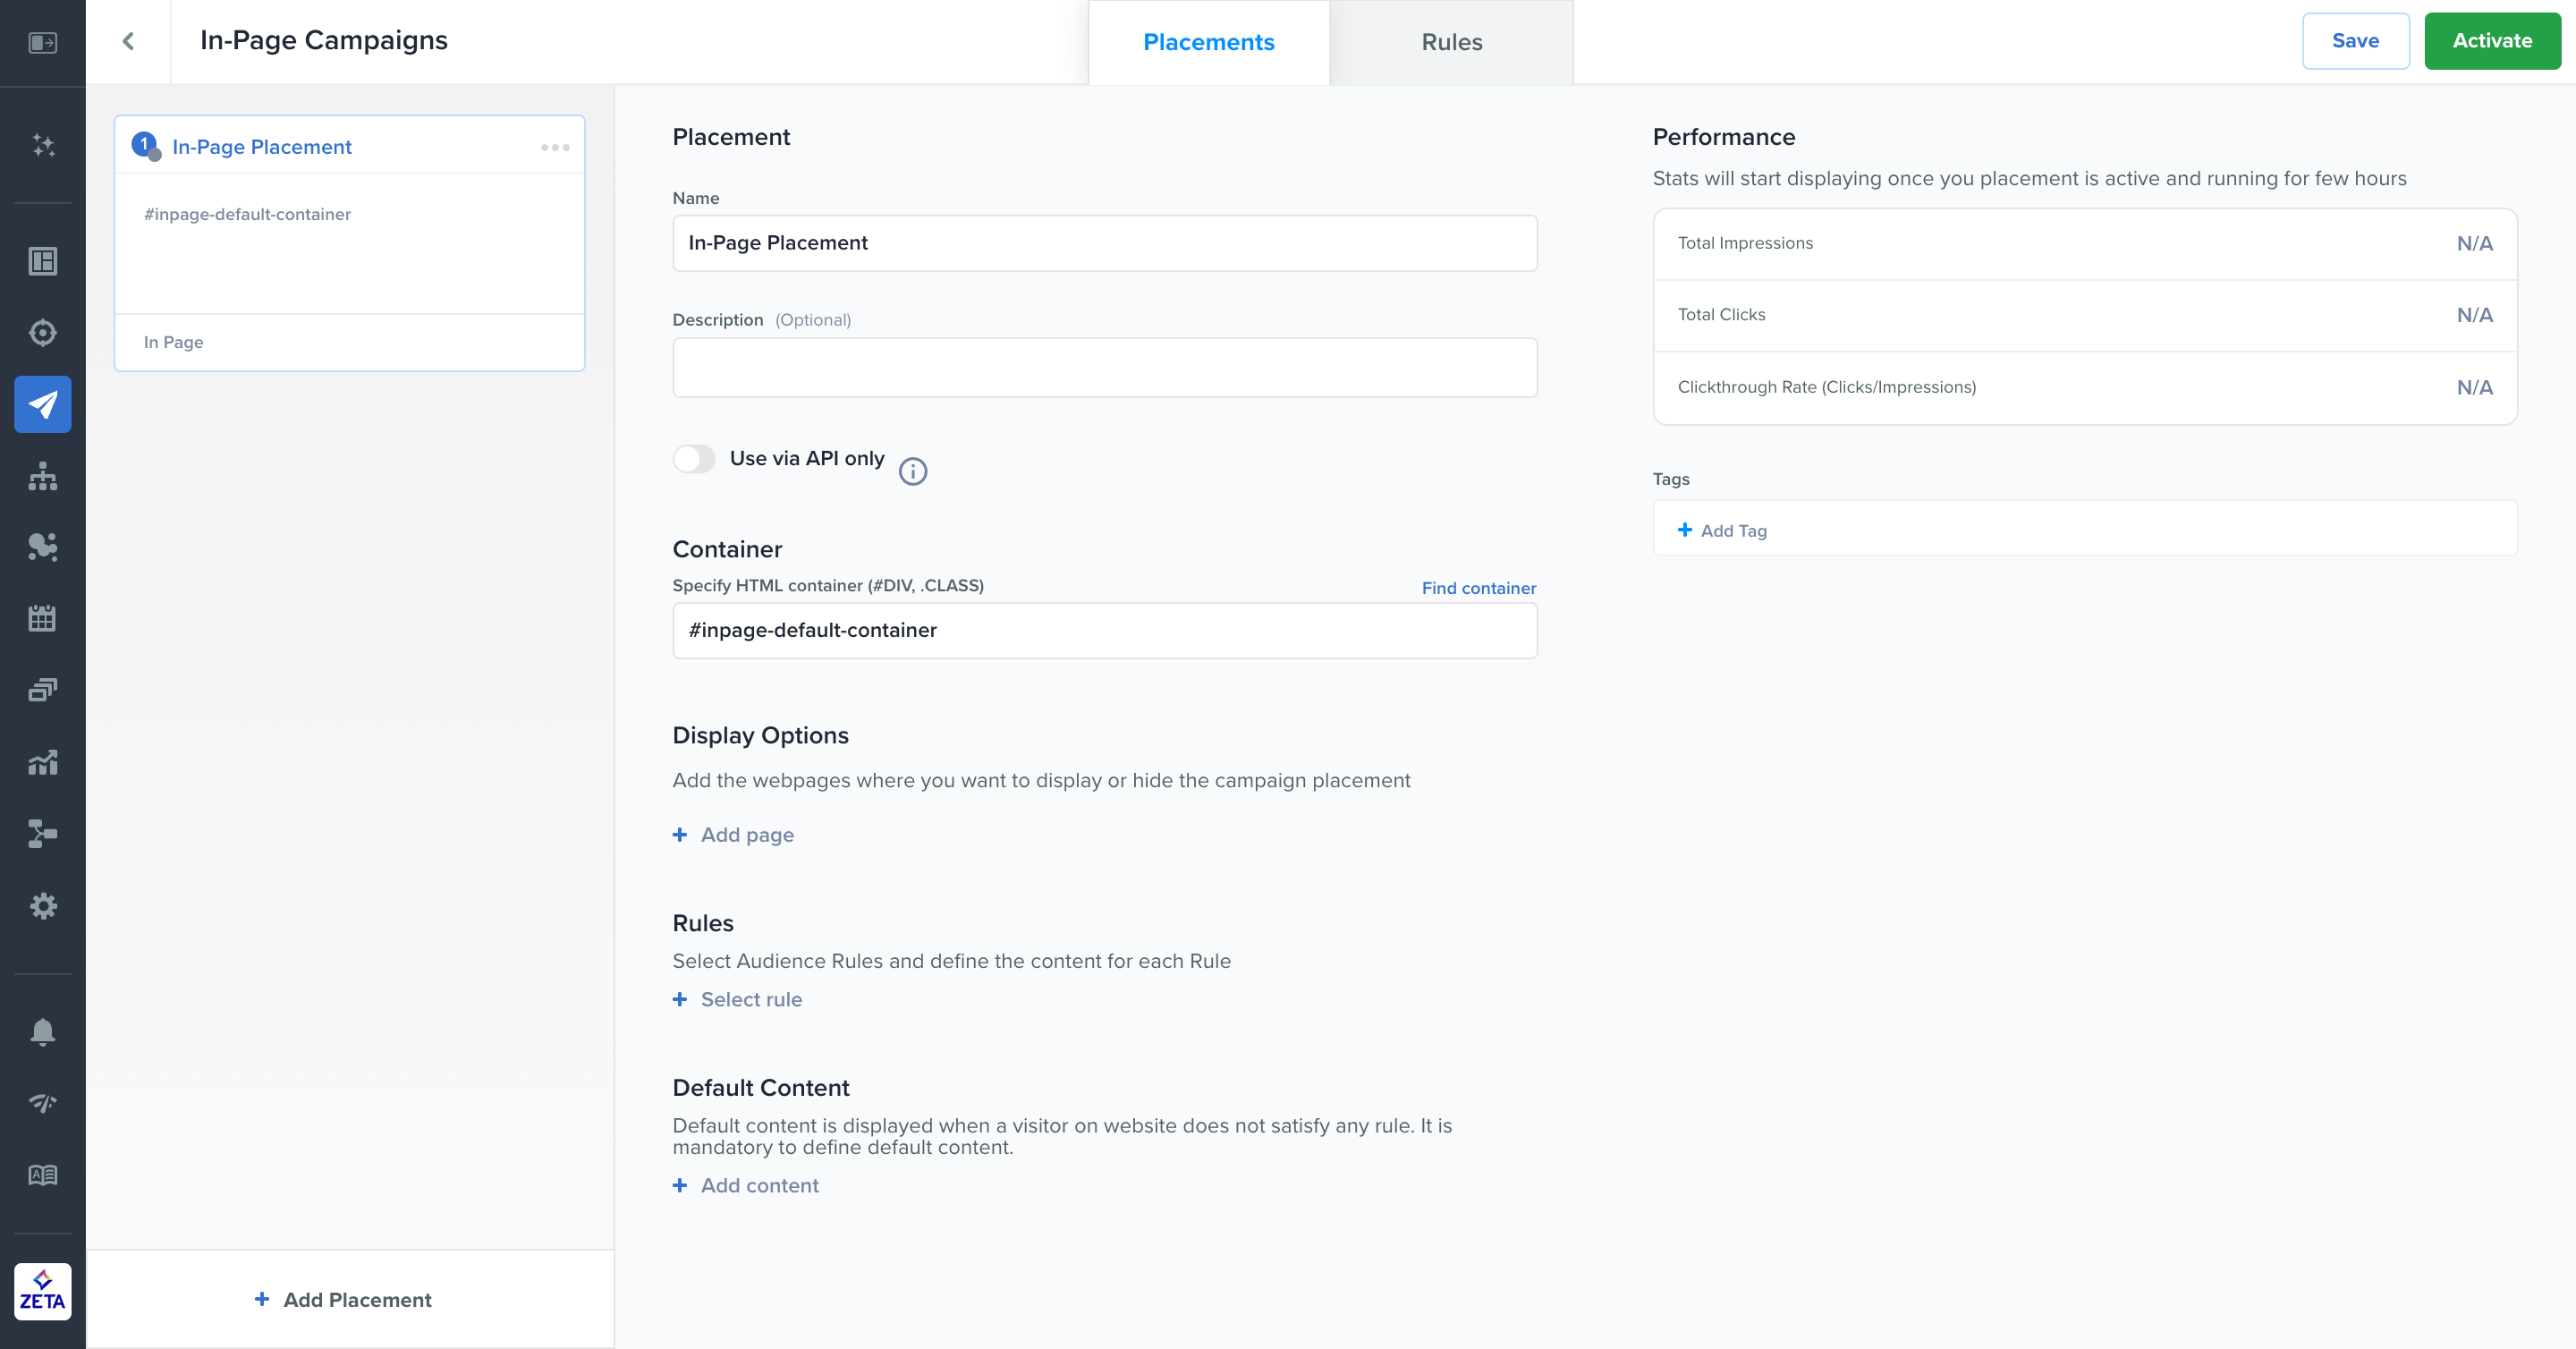
1. In the Placements tab, enter a Name and Description for your campaign.
.gif?cb=155c19f0529be9bbc04fc0908336b505)
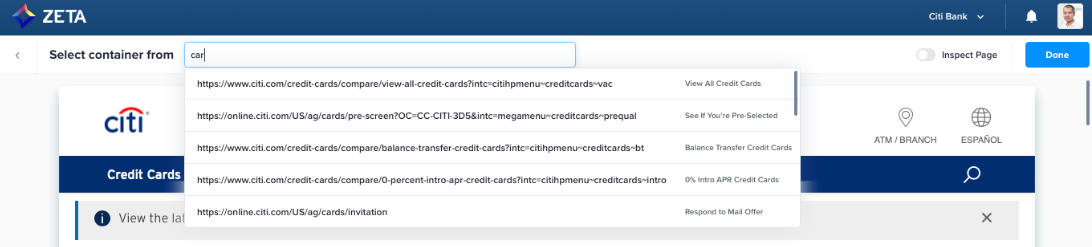
2. Next, manually define the container tags on your website, enter them in the Container field, or simply click on the Find Container button to visually select from the available container tags.
3. In the Display Options section, add the page(s) where you want to show or not show the placement content.
.gif?cb=5d989df9e9128824702301fadf3849d3)
-
You can choose to Include all sub-pages from URL by toggling it on.
-
Once added, the green dot beside the URL shows that the page is included while a grey dot suggests that it won’t display the content.
-
Click on the collapse icon against the Display Options to view a summary of the pages added.
.gif?cb=30524baefa1c122876ec08da15ea54e0)
4. In the Rules section, add a rule (already defined from the Rules tab) and play around with its content and template.
.gif?cb=4d634950e63312cdadc395ceab55ae58)
-
In Content Strategy, User Interest is based on your past history and content you’ve earlier shown interest in, Alternative shows alternatives to the content you have, and Matching shows you content similar to yours.
-
In the Template Layout section, you can change the default design directly from the HTML or CSS snippets. You can also view the Template Library to explore more design options.
-
From the Integration Options dropdown, Replace Default Content will replace the website content with yours, Append Default Content will display your content after what is already present, and Prepend Default Content will show your content before the existing one.
-
Green ticks against the Select a Rule, Content Strategy, and Template Layout suggest that you have successfully defined the rule. Click on Add.
-
You can again click on + Select Rule to add more rules by defining them from the Rules tab.
.gif?cb=ce26258dd62f0338b90c7126ac4a645d)
-
Rules are cascading in nature. When multiple rules are added, if Rule #1 does not satisfy, it will test for the next available rule. You can drag-drop rules to change their priorities.
-
You can duplicate a rule.
-
You can click on the dot next to a rule in order to deactivate or activate it.
5. In the Default Content section, you can select a fallback option for when any of the rules are not satisfied. Under this condition, this preset will be shown.
.gif?cb=d347c88b6d9ed20e5953f808a765a64a)
6. Click on Save to activate the campaign.
Container
Earlier, defining containers for personalized placements on site required the page elements on the site to be structured with unique identifiers for its Div elements. ZMP in-Page container now allows for a broader set of options and constructs that will enable a finer level of control in defining placements including the most common case of Div class-based identification for placements.
-
Use the in-Page container option for broader page-level query selectors that include the support for selecting the first Div identified based on class.
-
Use a CSS selector to qualify the first container on the page for your placement that uses the class that you specify.
Use via API Only
If you toggle the Use via API only on, you will be able to get recommendations via API without the need of implementing P13N tags. The API can be accessed using the placement name.
.gif?cb=7651b69e8f511175775040efe3cde71c)
-
When this option is toggled on, there will be no requirement for Container and Template Layout.
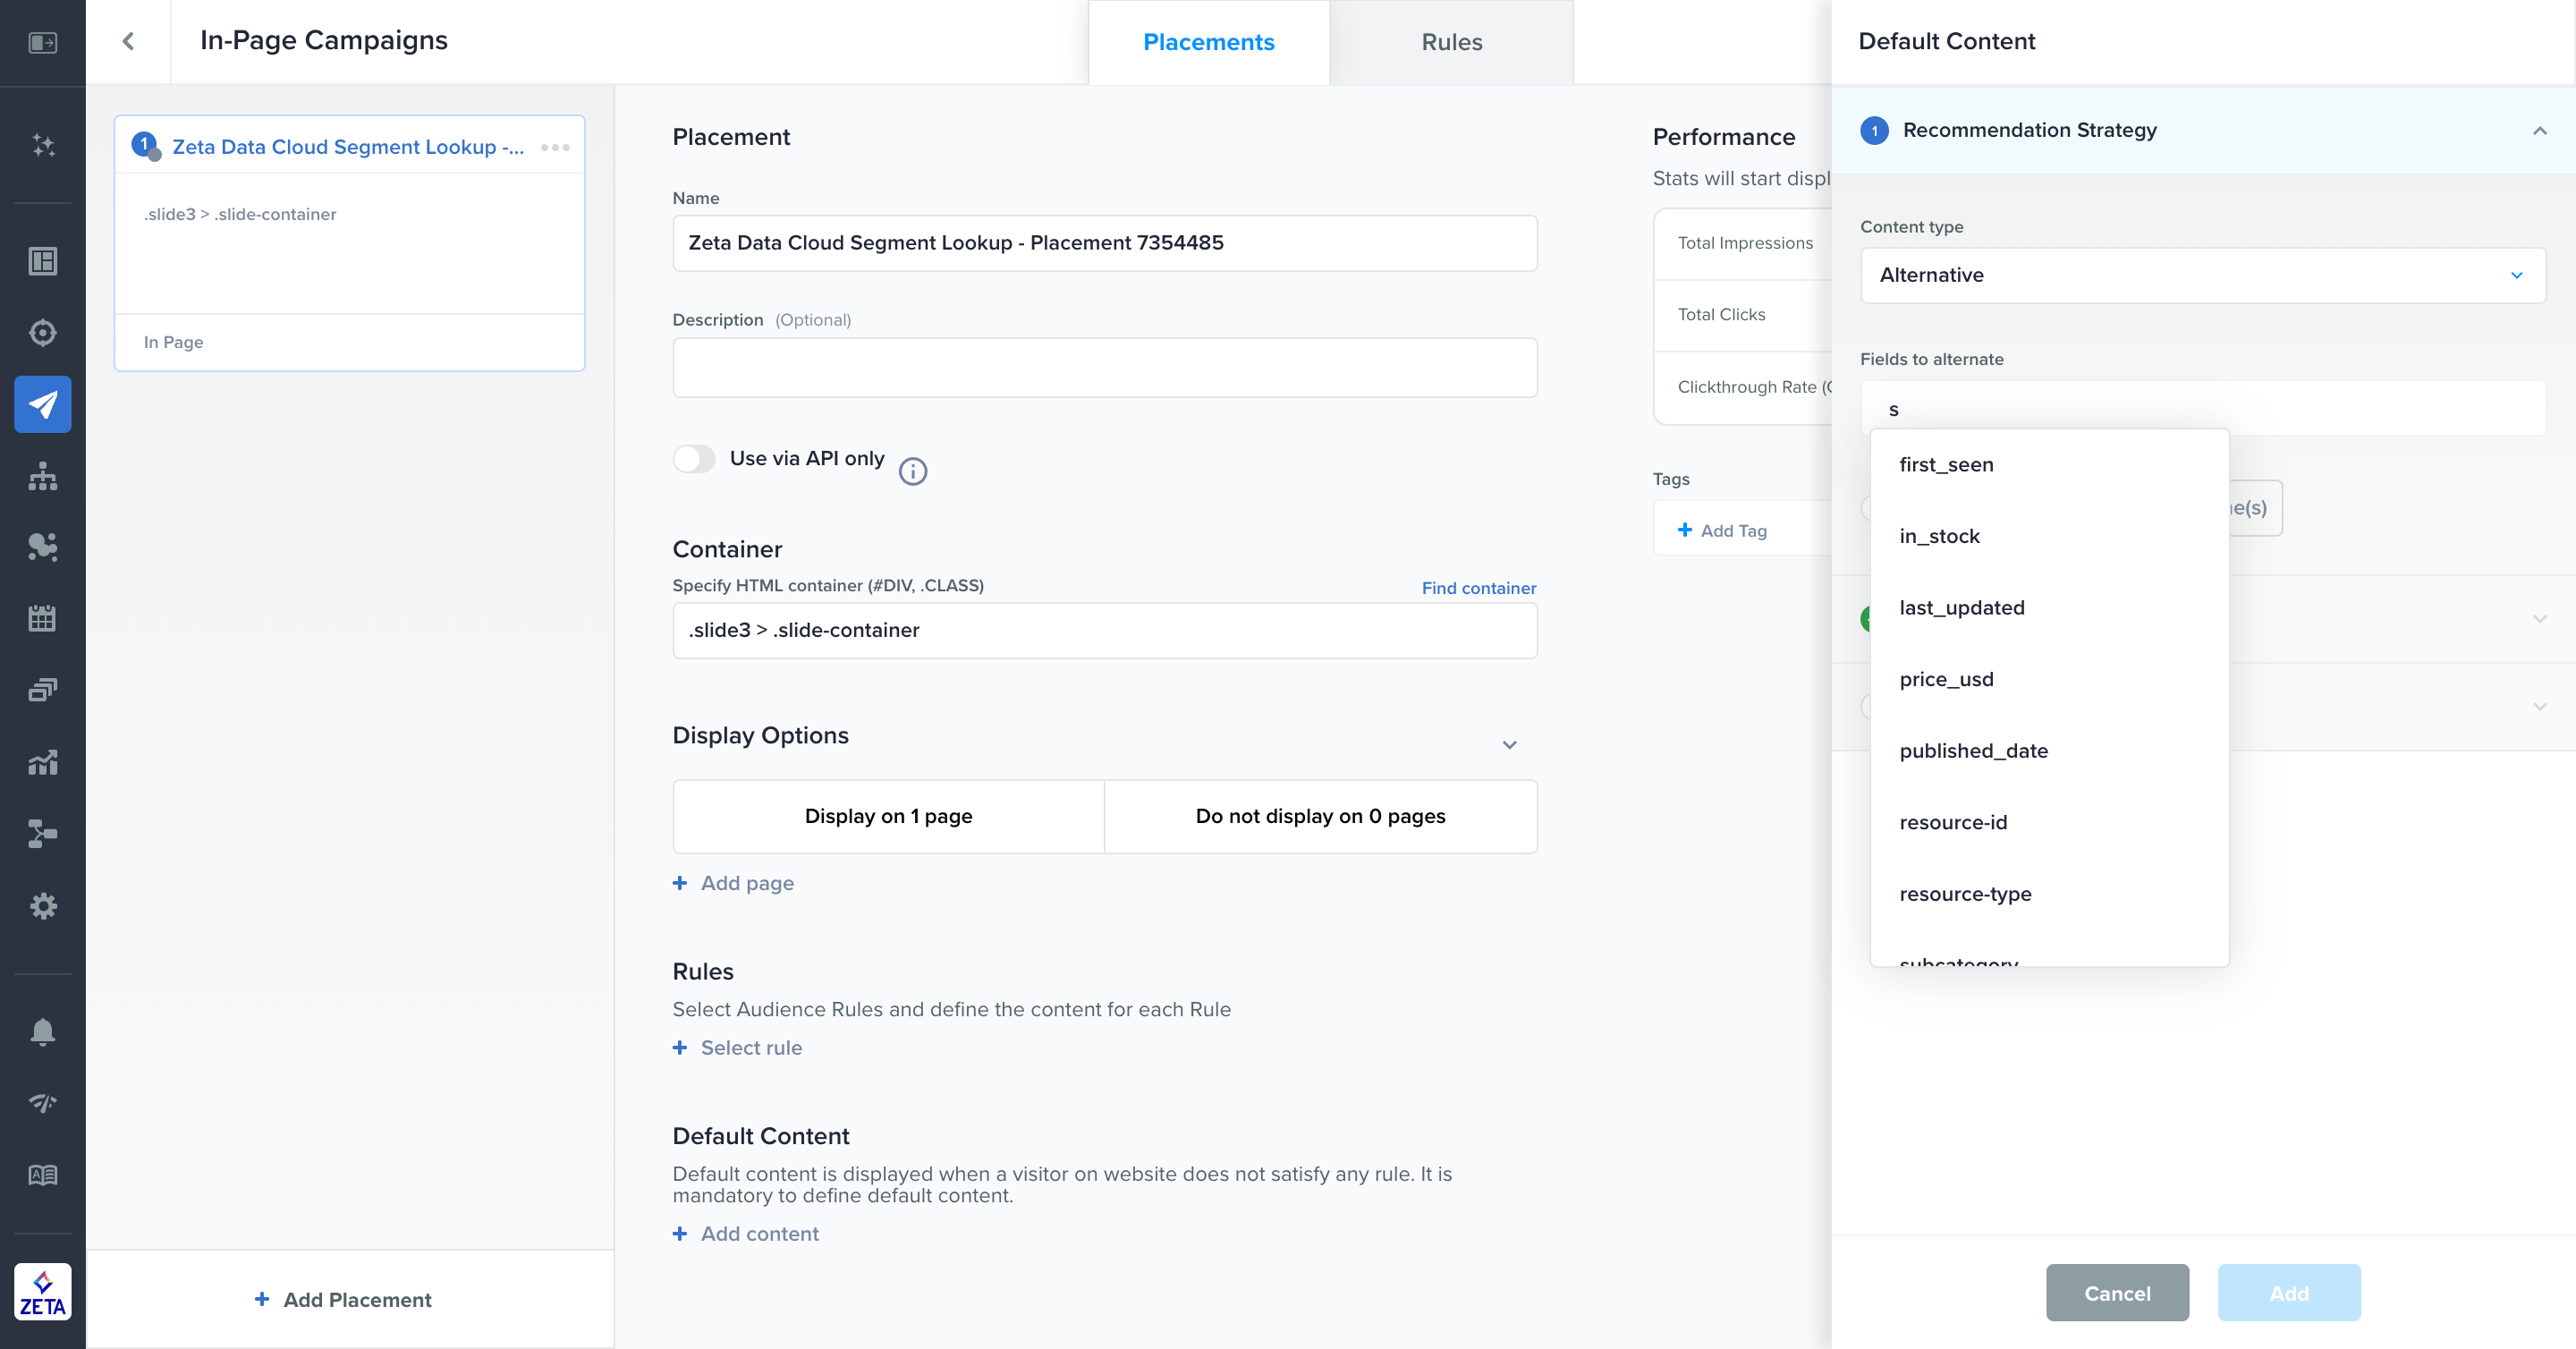
Recommendation Strategy for a Rule
By default, recommendations are set to User Interest to serve content based on past user history. However, you can also select Alternative, Matching, or Custom contexts to serve different content.
These “Request Contexts” are currently available via APIs, ZML tags, and the user interface.
|
Request Context |
Defintion |
Sample ZML Tag |
|---|---|---|
|
User Interest |
Serves content based on the user’s past history or interests they shown. |
N/A - default |
|
Alternative |
Serves alternatives to the seeded content using the selected fields. |
|
|
Matching |
Serves content similar to the seeded content using the selected fields. |
|
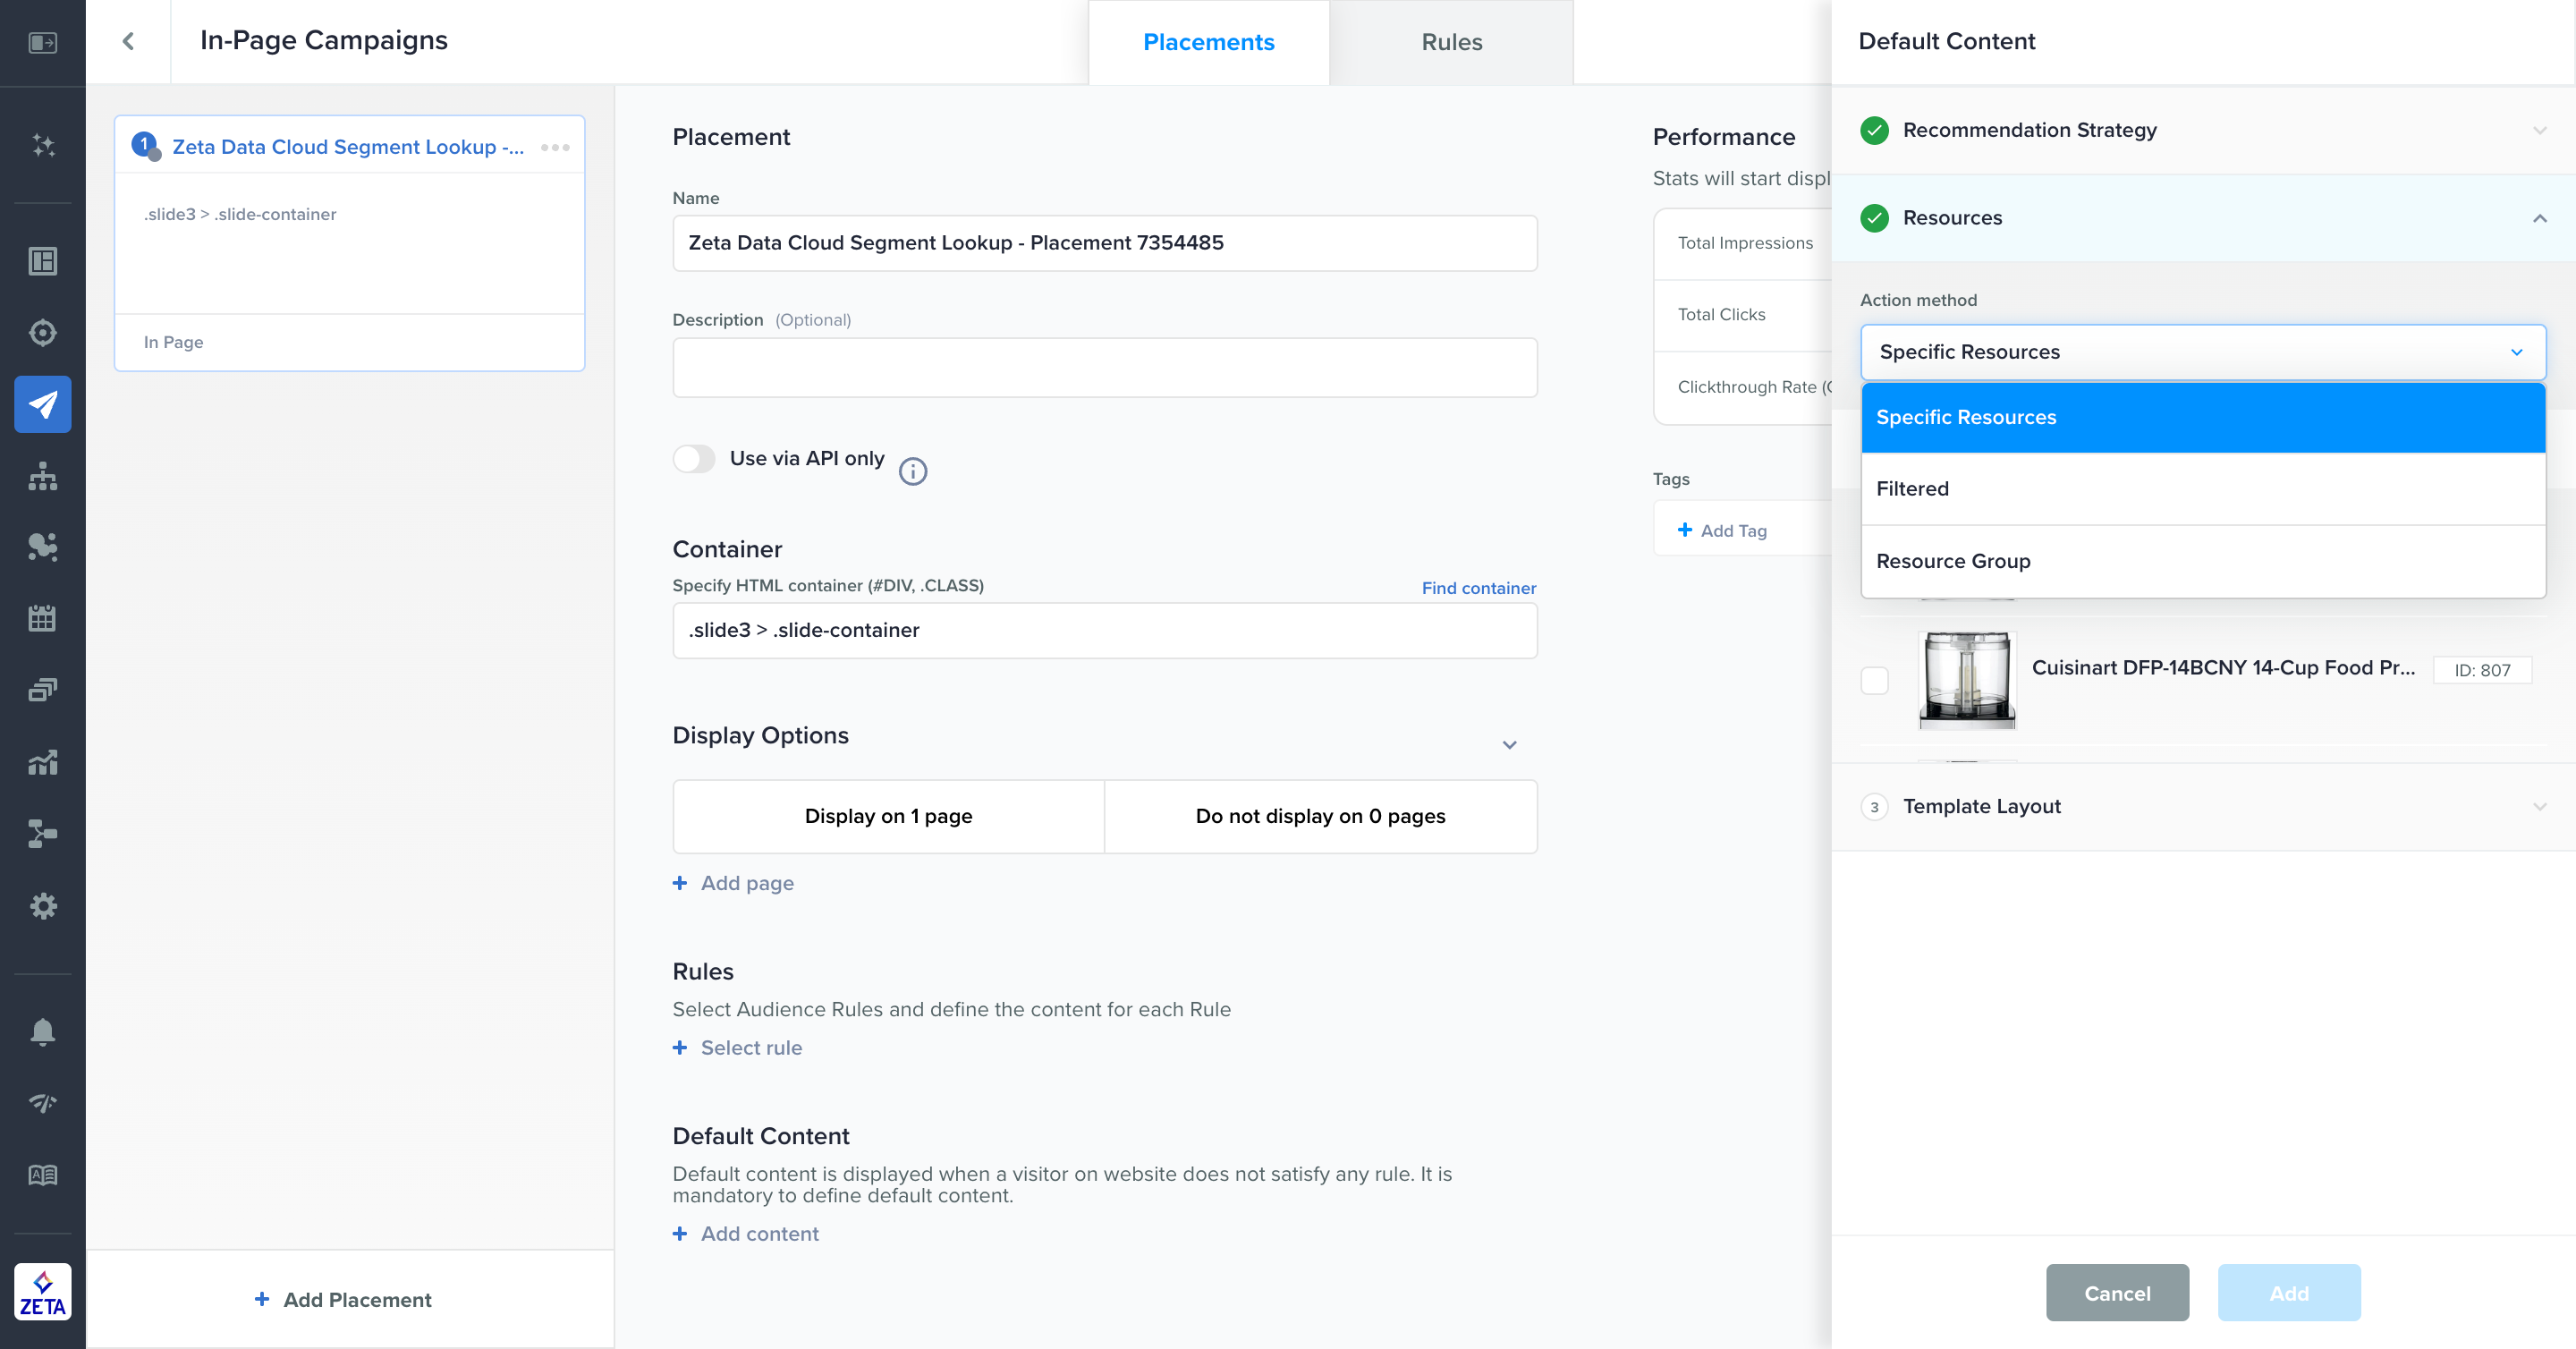
Custom Contexts
The custom option allows you to manually define the eligible resources or resource groups for the audience that qualifies under the rule, offering greater flexibility.
When utilizing the "Custom" Recommendation strategy, you have the following choices for selecting eligible resources for the rule. These resource selection options are also applicable to sub-rules.
|
Specific Resources |
This option allows you to pick a particular set of resources, which is suitable for scenarios where users are knowledgeable about the eligible resources for a rule. |
|
Filtered |
This option lets you define a set of filter criteria, based on the data associated with the resources, in order to determine the qualified set of eligible resources. |
|
Resource Group |
This option allows you to directly select a predefined resource group to determine the qualified set of eligible resources. |
Editing an Active Campaign
Once you activate a campaign, you can return to edit any non-Rules content block without deactivation. To edit, update your content as you would in draft status. When you’re ready to push your changes, click the Save button in the top right-hand nav. It will take up to 5 minutes for changes to reflect on the webpage due to caching.