

Using LiveIntent’s reporting, advertisers and publishers alike can gain deeper insights into their performance. From creatives to geo-targeting, our metrics can help companies gain a better understanding of how their money is being spent or earned.
Below, you will find step-by-step instructions that outline how to take advantage of our reporting interface.
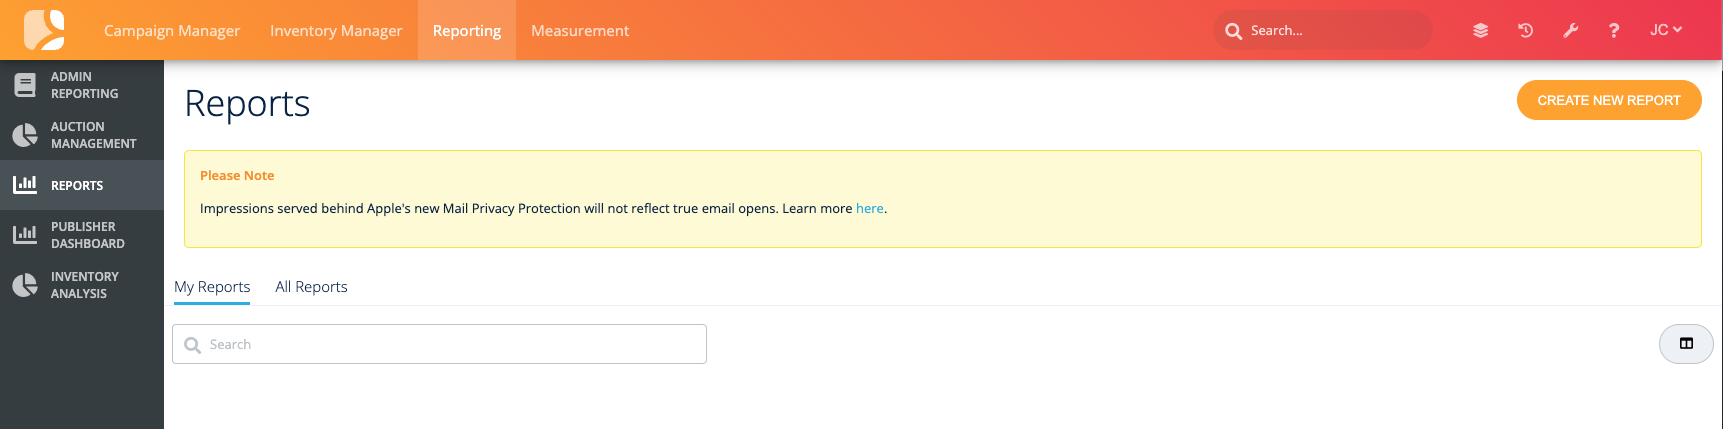
Accessing Reporting
-
Log in to the LiveIntent Platform (https://platform.liveintent.com/)
-
Click on the “Reporting” tab on the navigation pane

Generating a New Report
To generate a report after going to the reporting tab, click “Create New Report” in the top right corner of the page.
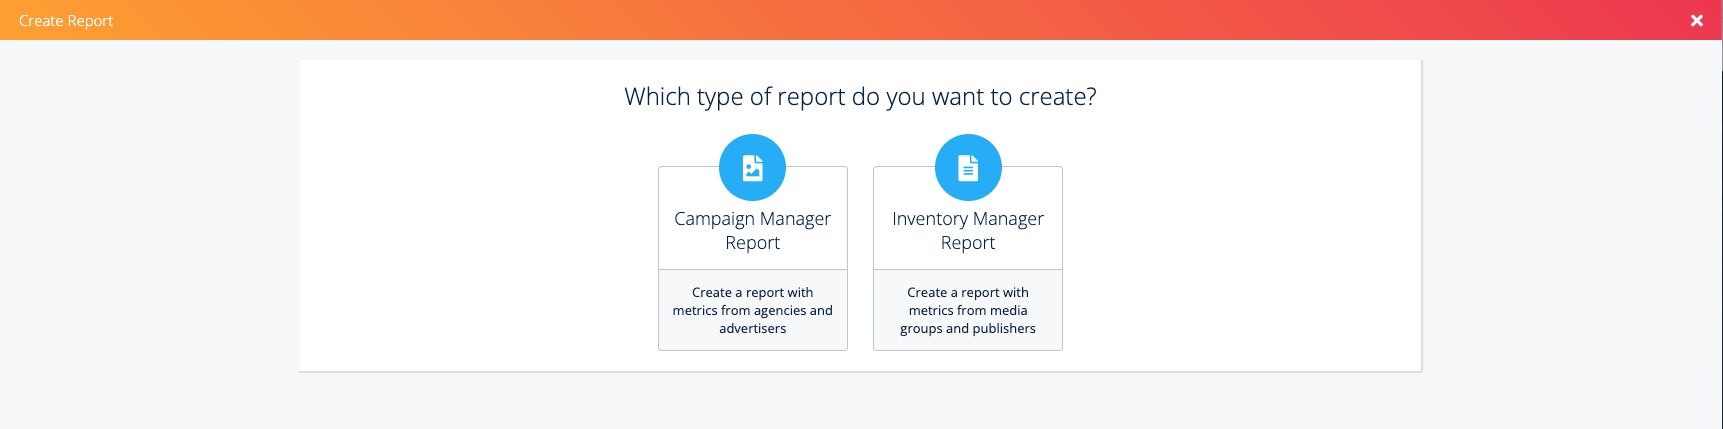
After clicking on the button, you will have the choice of creating a Campaign Manager or an Inventory Manager report.
-
A Campaign Manager report will create a report with metrics from agencies and advertisers.
-
An Inventory Manager report will create a report with metrics from media groups and publishers.
Campaign Manager Report
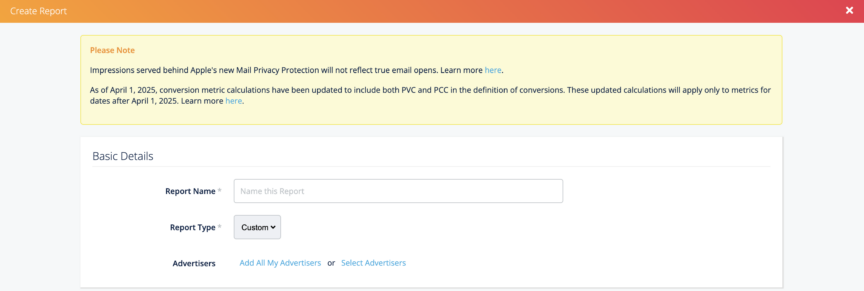
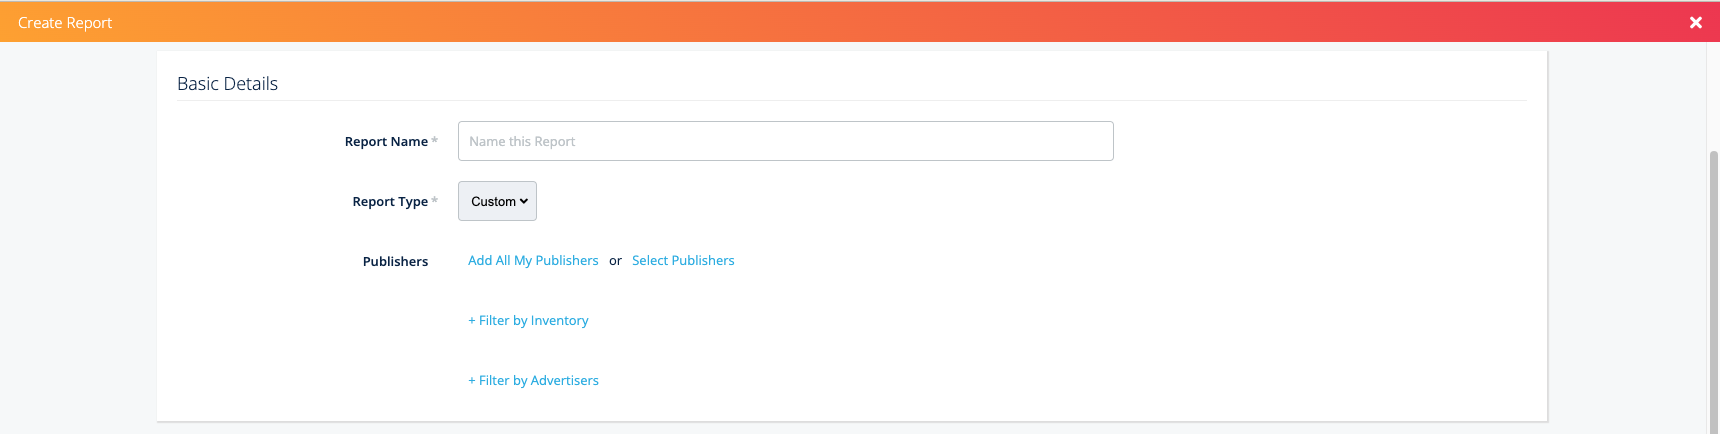
Enter the basic details for your campaign manager report.
-
Name the report
-
Choose Custom report
-
Add your advertisers
What do you want in the report?
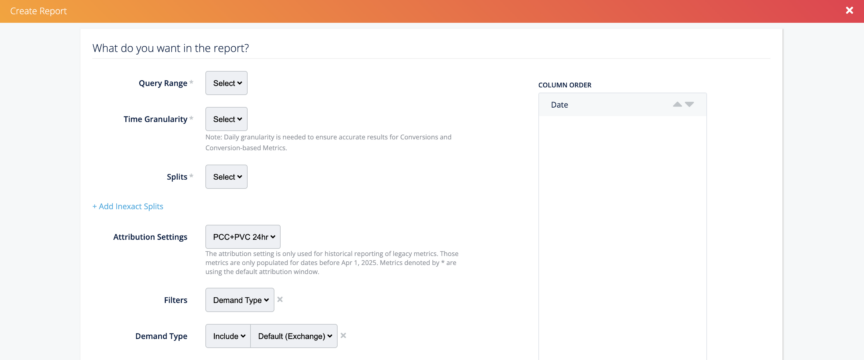
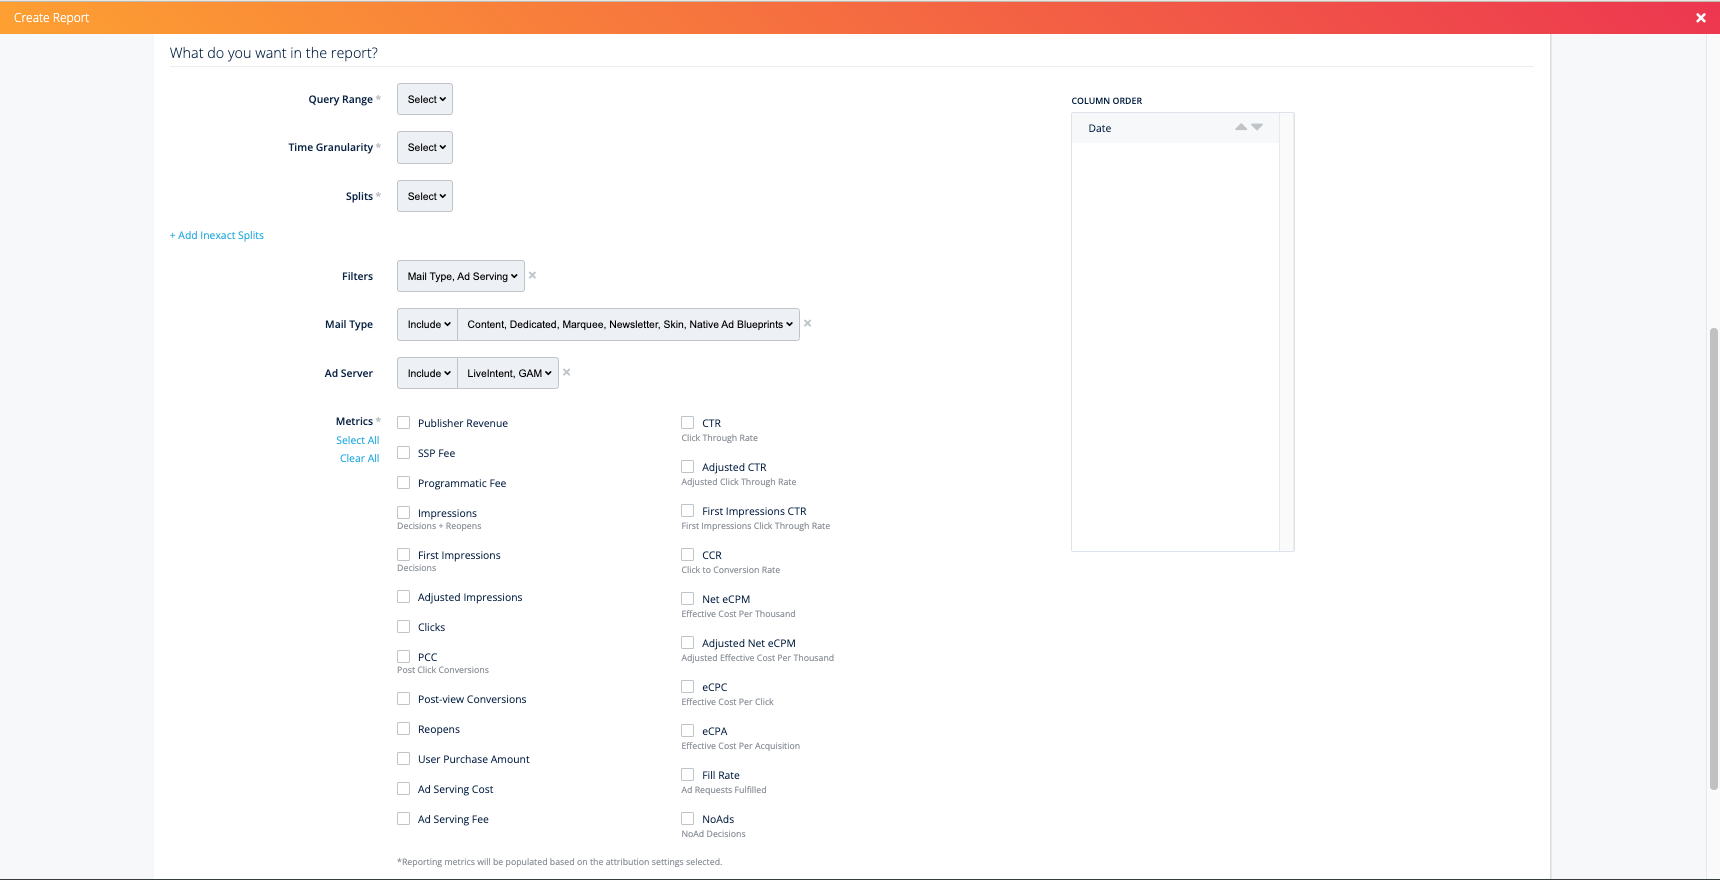
When customizing a report, date range, time granularity, splits, filters, and metrics can all vary depending on preference.
-
Query Range: Select the duration for your report from the dropdown.
-
You can choose a (1) dynamic date range that updates dynamically based on today’s date (like Week to Date, Month to Date, Quarter to Date, Year to Date, Past 30 Days, and more); or an (2) absolute date range that will be a fixed period defined by a Start and End Date
-
-
Time Granularity: Select if you’d like reporting breakdown by day, week, month, or all
-
Splits: These determine how the data in your report will be broken down. Column placement will be based on the displayed order of the splits you’ve selected from left to right.
-
Inexact Splits: These data fields are directional, meaning they use sample data and therefore are probabilistic. Whereas exact splits can be determined with certainty, inexact splits must rely on sample data to extrapolate these fields. In your report, you may find data associated with an “empty value” – this is data that cannot be tied back to a specific split.
-
Attribution Settings: This is set by your campaign manager when you’re creating the campaign and cannot be changed here. This setting will only affect calculation of legacy conversion metrics. If you have any questions about this setting, please reach out to your account team.
-
Filters (optional): Choose and narrow the options that you’d like to see in your final report. Please note that age and gender are inexact splits.
-
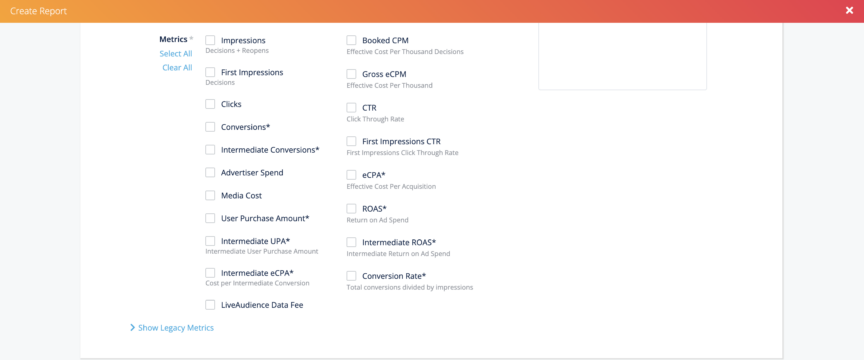
Metrics: Here you can select or unselect the metrics you’d like to report on for each of your split combinations.
Inventory Manager Report
Enter the basic details for your inventory manager report.
-
Name the report
-
Add your publishers
-
Choose to filter the report by inventory template or section, as well as by advertisers (optional).
What do you want in the report?
When customizing a report, date range, time granularity, splits, filters, and metrics can all vary depending on preference.
For definitions of metrics, splits, and filters, please see the LiveIntent Reporting Guide Glossary.
-
Report Type: Choose to generate a custom, Native, or Key Value Pair report
-
Query Range: Select the duration for your report from the dropdown.
-
Time Granularity: Select if you’d like reporting breakdown by day, week, month, or all
-
Splits: Select your preferred splits.
-
Inexact Splits: Select your preferred inexact splits (optional).
-
Filters: Choose other filters, such as demand type, mail type, etc. (optional).
-
Metrics: Here you can select or unselect the metrics you’d like to report on for each of your split combinations.
-
Note that metrics denoted by (a) have been adjusted to more accurately reflect email opens impacted by Apple’s Mail Privacy Protection. Learn more.
-
Valid Splits
|
Advertiser |
Publisher |
|
Exact Data – Advertiser ID
|
Exact Data – Advertiser ID
|
|
Inexact splits (estimated values based on sampled data) – Age
|
Inexact splits (estimated values based on sampled data) – Advertiser Domain
|
Valid Metrics
Note that metrics denoted by (a) have been adjusted to more accurately reflect email opens impacted by Apple’s Mail Privacy Protection. Learn more.
|
Advertiser |
Publisher |
|
– Impressions
|
– Publisher Revenue
Legacy Metrics
|
*Reporting metrics will be populated based on the attribution settings selected.
Scheduling your report

To schedule your report, scroll to the ‘Scheduling’ section at the bottom of the page. Click ‘Add A Schedule,’ and confirm your delivery frequency (Daily, Weekly, Monthly), Start and End times for the delivery duration, and Delivery time (Morning, Afternoon, Evening).
Scheduling workflow
There are 3 methods of delivery for reports (available for both Campaign and Inventory reports):
-
For Email
TIP: Have team members who should also receive a report? Just add them by clicking ‘Add More Recipients’.
PLEASE NOTE: To schedule a report, it must have at least one recipient. That one recipient does not have to be the user creating the report, however.
-
For the SFTP server
PLEASE NOTE: Delivering reports to clients via an SFTP server is an internal tool only, meaning clients will need to provide LiveIntent account managers with the fields listed above (Address, User, Password). Please reach out to your LiveIntent account manager to get started.
-
For S3 bucket
PLEASE NOTE: Delivering reports to clients via a S3 bucket is an internal tool only, meaning clients will need to provide LiveIntent account managers with the fields listed above (S3 Bucket Name, S3 Key Name, Access Key, Secret Key). Please reach out to your LiveIntent account manager to get started.
Receiving Your Report
Your scheduled reports will be sent via the method you choose (Email, SFTP server, or S3 bucket). If you choose to send reports via email, you will receive a separate email for each report that you generate. The report will be sent with a hyperlink that allows you to download the report as a .zip file.